FACILITATOR CARD
#1 Tops
This activity requires 1 facilitator and 2 tables (one for making tops and the other for testing them).
Materials
Item Name Qty Type
#1 Masking Tape 1 roll Consumable
#2 Arena Boundaries (5 taped cardboard rectangles) 2 Permanent
#3 Straws, Green 1 bag of 50 Permanent
#4 Disks, Red 1 box of 30 Permanent
#5 Stop Watches 2 Permanent
#6 Markers, Dry-erase 2 Permanent
#7 Disks, Yellow 1 box of 50 Permanent
#8 1 Liter Plastic Container (to hold straws) 1 Permanent
#9 Recording Sheet, Laminated 1 Permanent
#10 Station Identification Sign in Stand 1 Permanent
#11 Public Instructions in Stand (Eng & Span) 1 Permanent
#12 Facilitator Instructions Card, Laminated 1 Permanent
#13 Image A: Globe: Earth Spins on an Axis 1 Permanent
#14 Image B: Bey-Blades (a Spinning Toy) 1 Permanent
#15 Image C: Tornado 1 Permanent
Set-up
Table 1
Post Participant Activity Card in display stand.
Set out image cards.
Set out containers with disks and straws.
Table 2
Set up arenas.
Set out laminated Recording Sheet, with dry-erase marker.
Tape stopwatch leashes to different parts of table.
Procedure
1. Participants will make tops at Table 1.
2. Participants can test tops individually (for spin time) or against other tops in the arena.
3. Record longest-spinning tops on Recording Sheet with a dry-erase marker.
4. Reference color images for real-life application of tops.
(more on the other side)
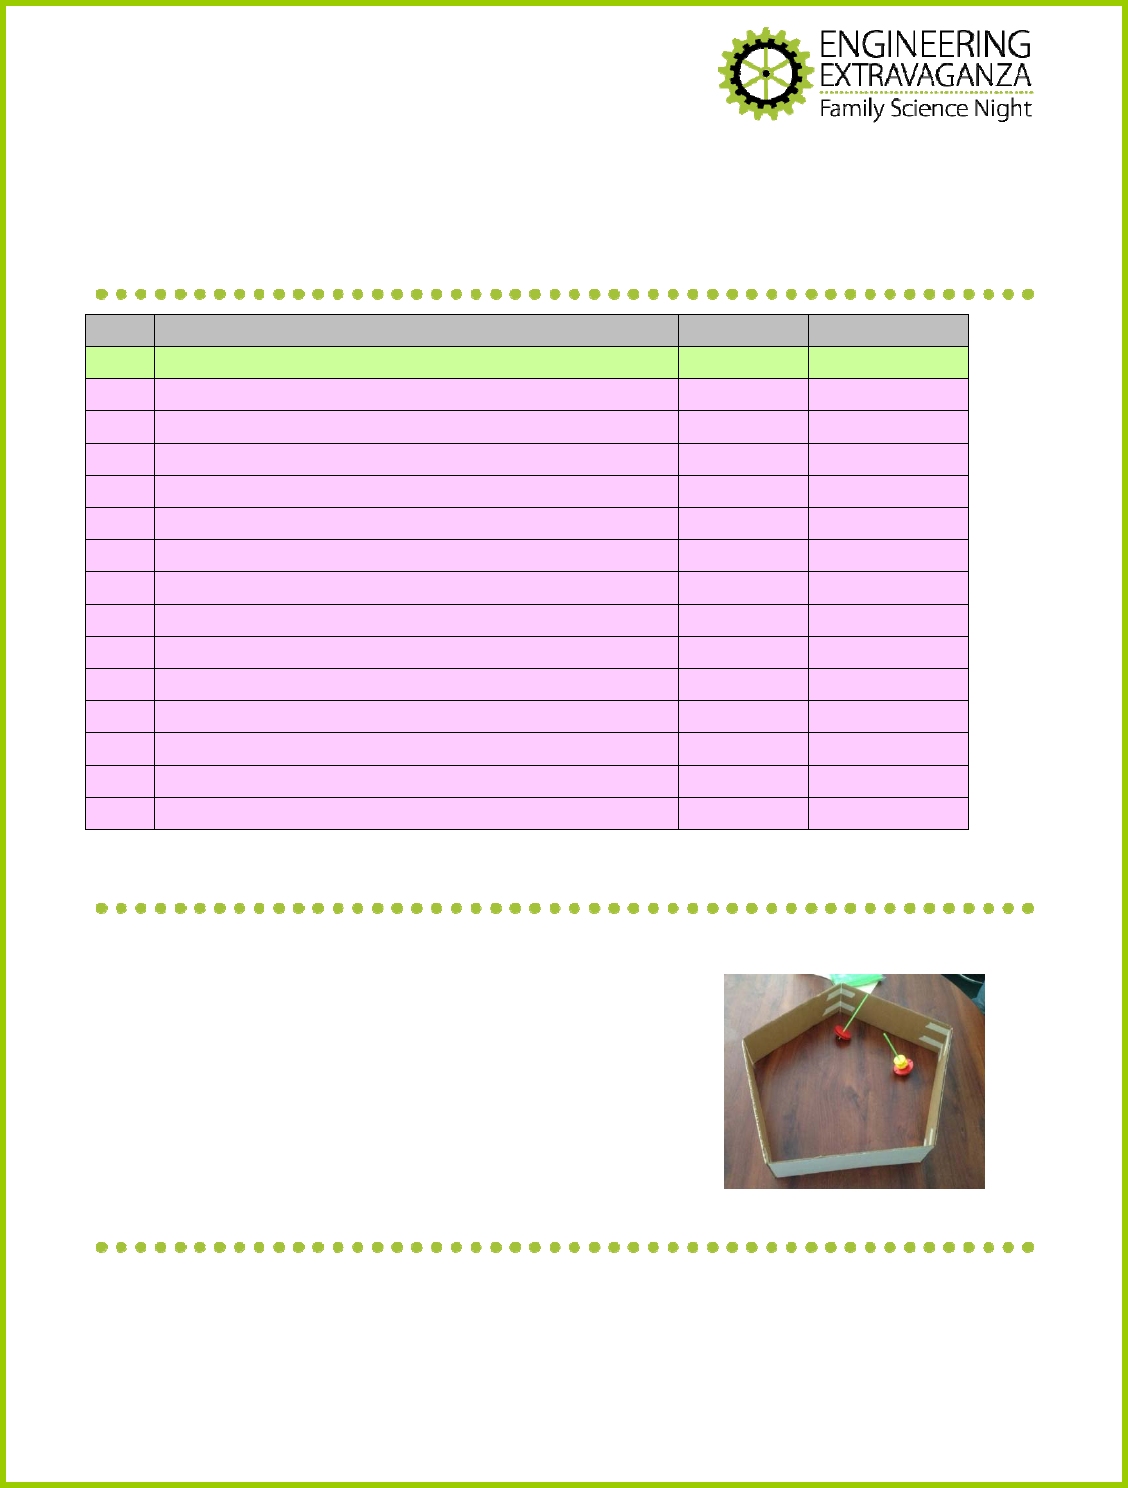
T
his is the arena where
tops will be tested.
Questions to Ask while Participants Work
1. How did you get your top to start spinning?
2. What could you change to make your top spin longer? Faster? Be more stable?
3. How did you change your top after looking at other people’s tops?
4. What do you think would happen if…?
Big Concepts in Science & Engineering
You need a force to start a top spinning. A force is a push or a pull.
Fast-spinning tops are more stable.
Bigger tops are more stable and spin longer.
Engineers develop and use models (prototypes) to improve the solution to a defined
problem.
Clean-up
Return materials to individually labeled containers (i.e. bags).
Return all items neatly to bins, including small and easy-to-miss items.
Inventory each bin, using the Materials List on the side of the bin. Clearly note any missing
materials.
Source
Adapted from FOSS: CA ed. Berkeley, CA: University of CA, 2007.
Grade 2: Balance & Motion - Inv. 3 Spinners
FACILITATOR CARD
#2 Dowels
This activity requires 1 facilitator and 1 table.
Materials
Item Name Qty Type
#1 Newspapers (packets of full sheets) 20+ School Supplied
#2 Tape, Masking 6 Consumable
#3 Wipes 1 Consumable
#4 Dowels, Wooden 10 Permanent
#5 Station Identification Sign in Stand 1 Permanent
#6 Public Instructions Card in Stand (Eng & Span) 1 Permanent
#7 Facilitator Instructions Card, Laminated 1 Permanent
#8 Image A: Eiffel Tower in Paris, France 1 Permanent
#9 Image B: Power Line Towers 1 Permanent
#10 Image C: Step Ladder 1 Permanent
#11 Image D: Geodesic Dome 1 Permanent
Set-up
Set up the table near a trash can (for hand-wipe disposal) and near an open area (for
building).
Spread out wooden dowels, newspapers, and tape on table.
Post Participant Activity Card in display stand.
Set out image cards.
Before participants arrive, roll up at least 20 paper dowels. (Roll newspaper around a
wooden dowel for sizing. Secure with tape.)
Throughout the evening, continue making dowels and encourage others to help.
Procedure
1. Invite participants to make lots of paper dowels (using a wooden dowel, a sheet of
newspaper, and tape).
2. Once participants have plenty of dowels, challenge them to build a strong structure (house,
tower…), securing dowels with tape.
3. Collaboration and teamwork are encouraged in both dowel-making and structure-building.
4. Offer a (single) hand-wipe for inky hands; point out trash can for disposal.
5. Reference color images for real-life applications of construction engineering.
(more on the other side)


Questions to Ask while Participants Work
1. What can you change to make your structure more stable?
2. How did you change your structure after looking at other people’s structures?
3. How can you change the dowels to make them stronger?
4. Where are the weak points on your structure? How do you know? How can you reinforce
them?
5. How did your team work together? What skills or knowledge did you contribute? What skills
or knowledge did others contribute?
Big Concepts in Science & Engineering
Gravity is a force that pulls down toward the earth.
Acute angles are stronger than obtuse angles.
Engineers develop and use models and use mathematical thinking to solve everyday design
problems.
Clean-up
Return materials to individually labeled containers (i.e. bags).
Return all items neatly to bins, including small and easy-to-miss items.
Inventory each bin, using the Materials List on the side of the bin. Clearly note any missing
materials.
Source
Adapted from Build It! Festival, GEMS, Lawrence Hall of Science.
FACILITATOR CARD
#3 Catapults
This activity requires 1 facilitator and 1 table (though 2 tables is ideal).
Materials
Item Name Qty Type
#1 Tape, Masking 1 Consumable
#2 Tape, Scotch 1 Consumable
#3 Rubber bands (assorted sizes) 50 Consumable
#4 Balls, Cotton 8 Permanent
#5 Marker, Dry-erase 2 Permanent
#6 Balls, Foil 8 Permanent
#7 Gram pieces (5g, 10g, 20g) 8 each Permanent
#8 Measuring tapes 8 Permanent
#9 Balls, Ping-pong 8 Permanent
#10 Spoons, Plastic Long-handled 8 Permanent
#11 Spoons, Plastic Regular 8 Permanent
#12 Rulers 8 Permanent
#13 Balls, Styrafoam 8 Permanent
#14 Station Identification Sign in Stand 1 Permanent
#15 Public Instructions Card in Stand (Eng & Span) 1 Permanent
#16 Facilitator Instructions Card, Laminated 1 Permanent
#17 Image A: Boys on Teeter-totter in Afghanistan 1 Permanent
#18 Image B: Catapult in Castle 1 Permanent
#19 Image C: Mexican Slingshot 1 Permanent
Set-up
Set out catapult components: rulers, thick rubber bands, spoons, and gram pieces.
Set out catapult ammunition in containers: cotton,
aluminum, styrofoam, and ping-pong balls.
Make a masking tape line on the floor, table, or some
other location for participants to conduct a side-by-side
test.
Set out measuring tape, laminated Recording Sheet, and
dry-erase marker near test area.
Post Participant Activity Card in display stand.
Set out image cards.
(more on the other side)
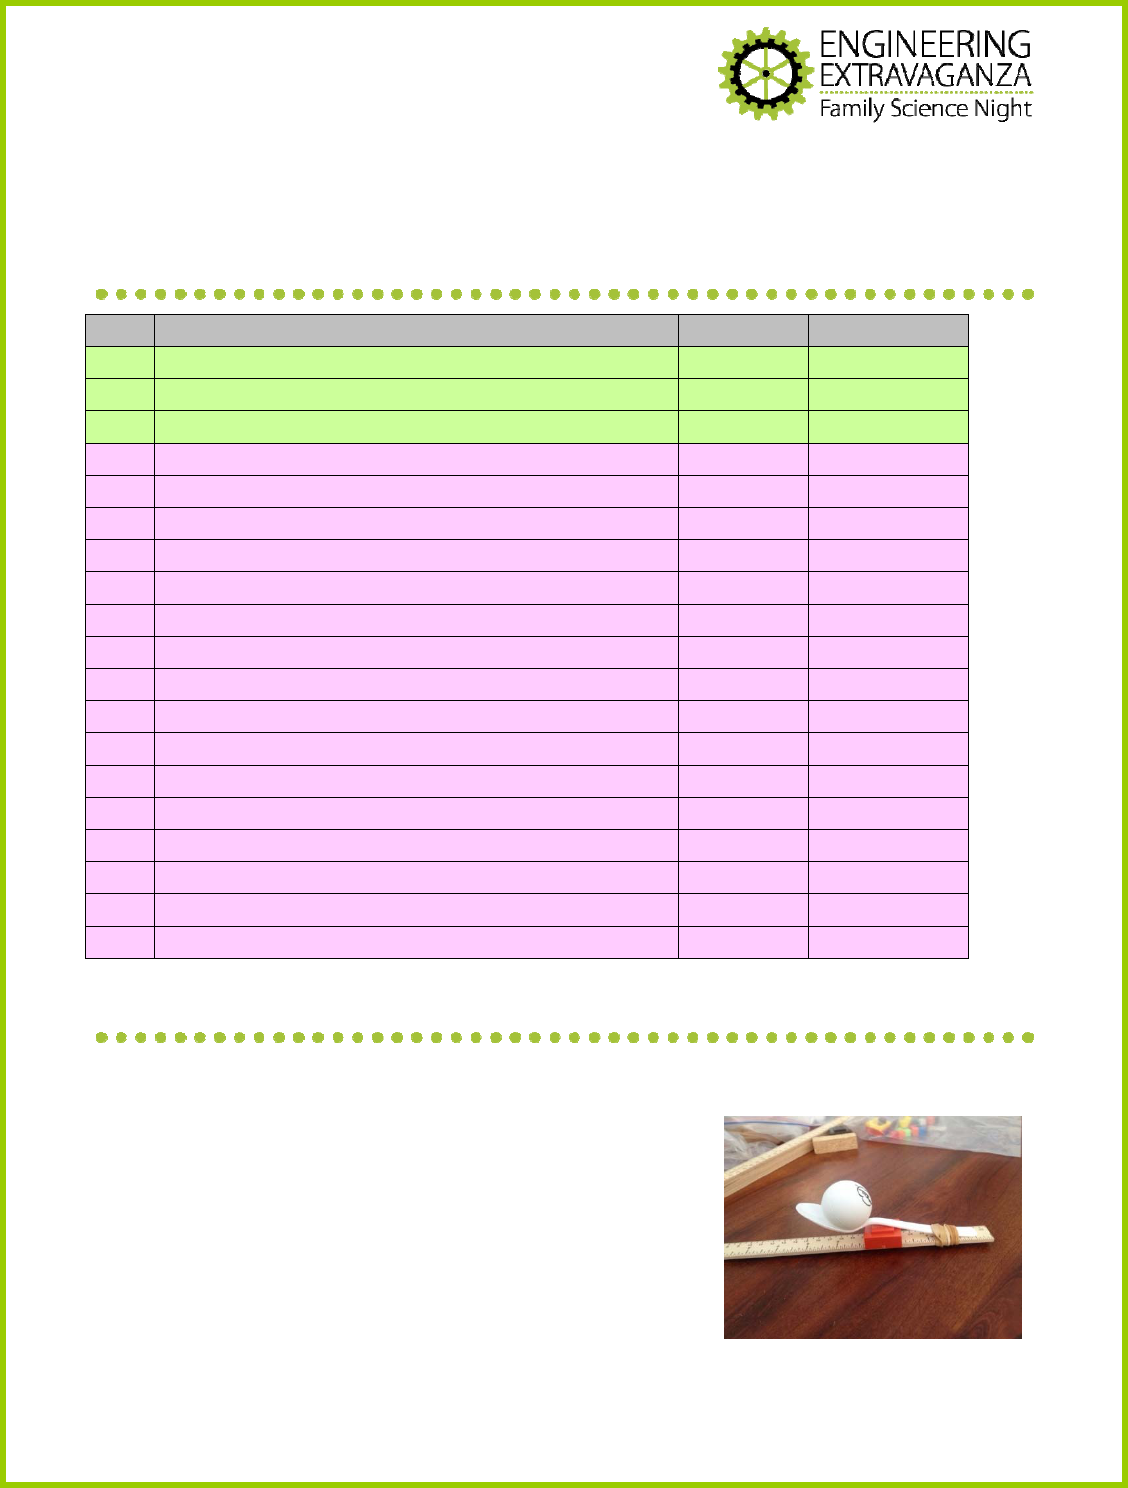
T
his is the catapult participants
will build.

Procedure
1. Participants build catapults and then test them, using different types of ammunition.
2. Encourage participants to change catapult components (spoon length, gram piece size,
rubber band tightness) and retest.
3. Ask participants to retrieve all launched ammunition.
4. Have participants place catapults at masking tape start line and compete side-by-side.
5. Use measuring tapes to track distance launched. Record with a dry-erase marker on the
laminated Recording Sheet.
6. Reference color images for real-life applications of catapults.
Questions to Ask while Participants Work
1. How did you get your catapult to work?
2. What can you change to make your catapult throw farther?
3. How did you change your catapult after looking at other people’s catapults?
4. Why do you think some objects flew further than others?
5. If you could build a new catapult with any materials in the world, what would you choose?
6. What could you use a catapult for today?
Big Concepts in Science & Engineering
You need a force to move something.
A force is a push or a pull.
Tightly-pulled rubber bands have potential energy. When the rubber band is released, the
potential energy is converted into kinetic (moving) energy.
The more potential energy an object has, the more it will move.
The more mass an object has, the more force it takes to make it move.
To improve their proposed design solutions, engineers plan and carry out investigations in
which they constantly analyze and interpret their results.
Engineers use mathematical thinking to solve problems.
Clean-up
Return materials to individually labeled containers (i.e. bags).
Return all items neatly to bins, including small and easy-to-miss items.
Inventory each bin, using the Materials List on bin side. Clearly note any missing materials.
Source
Adapted from Lucy Calkins’ 2013 Units of Study: 2nd Grade “Science Lab Reports”
FACILITATOR CARD
#4 Parachutes
This activity requires 1 table and 2 facilitators (one to help with parachute building and the other to
troubleshoot at the test area.)
Materials
Item Name Qty Type
#1 Chairs, bench, or stage for parachute testing 1-4 School Supplied
#2 Coffee Filters, 8-cup 200 Consumable
#3 Tape, Masking 1 Consumable
#4 Paper Clips 1 box Consumable
#5 Rubber Bands 200 Consumable
#6 Tape, Scotch 2 Consumable
#7 Sticky Dots 420 Consumable
#8 String (3 Different Weights) 3 rolls Consumable
#9 Scissors, Adult 1 Permanent
#10 Scissors, Child 6 Permanent
#11 Hole Punchers 4 Permanent
#12 Markers, Colored 4 boxes of 8 Permanent
#13 Parachute Prototype 1 Permanent
#14 Weights with Paper Clips Attached (Assorted) 24 Permanent
#15 Station Identification Sign in Stand 1 Permanent
#16 Public Instructions Card in Stand (Eng & Span) 1 Permanent
#17 Facilitator Instructions Card, Laminated 1 Permanent
#18 Image A: Dandelion Seeds 1 Permanent
#19 Image B: Jellies at Monterey Bay Aquarium 1 Permanent
#20 Image C: Space Shuttle Discovery Landing 1 Permanent
#21 Image D: US Navy Parachute Demonstration 1 Permanent
Set-up
Table
Set out coffee filters, sticky dots, string, small paper
clips, scotch tape, scissors, and hole punches.
Post Participant Activity Card in display stand.
Set out image cards.
Hang the parachute prototype near the table.
(more on the other side)
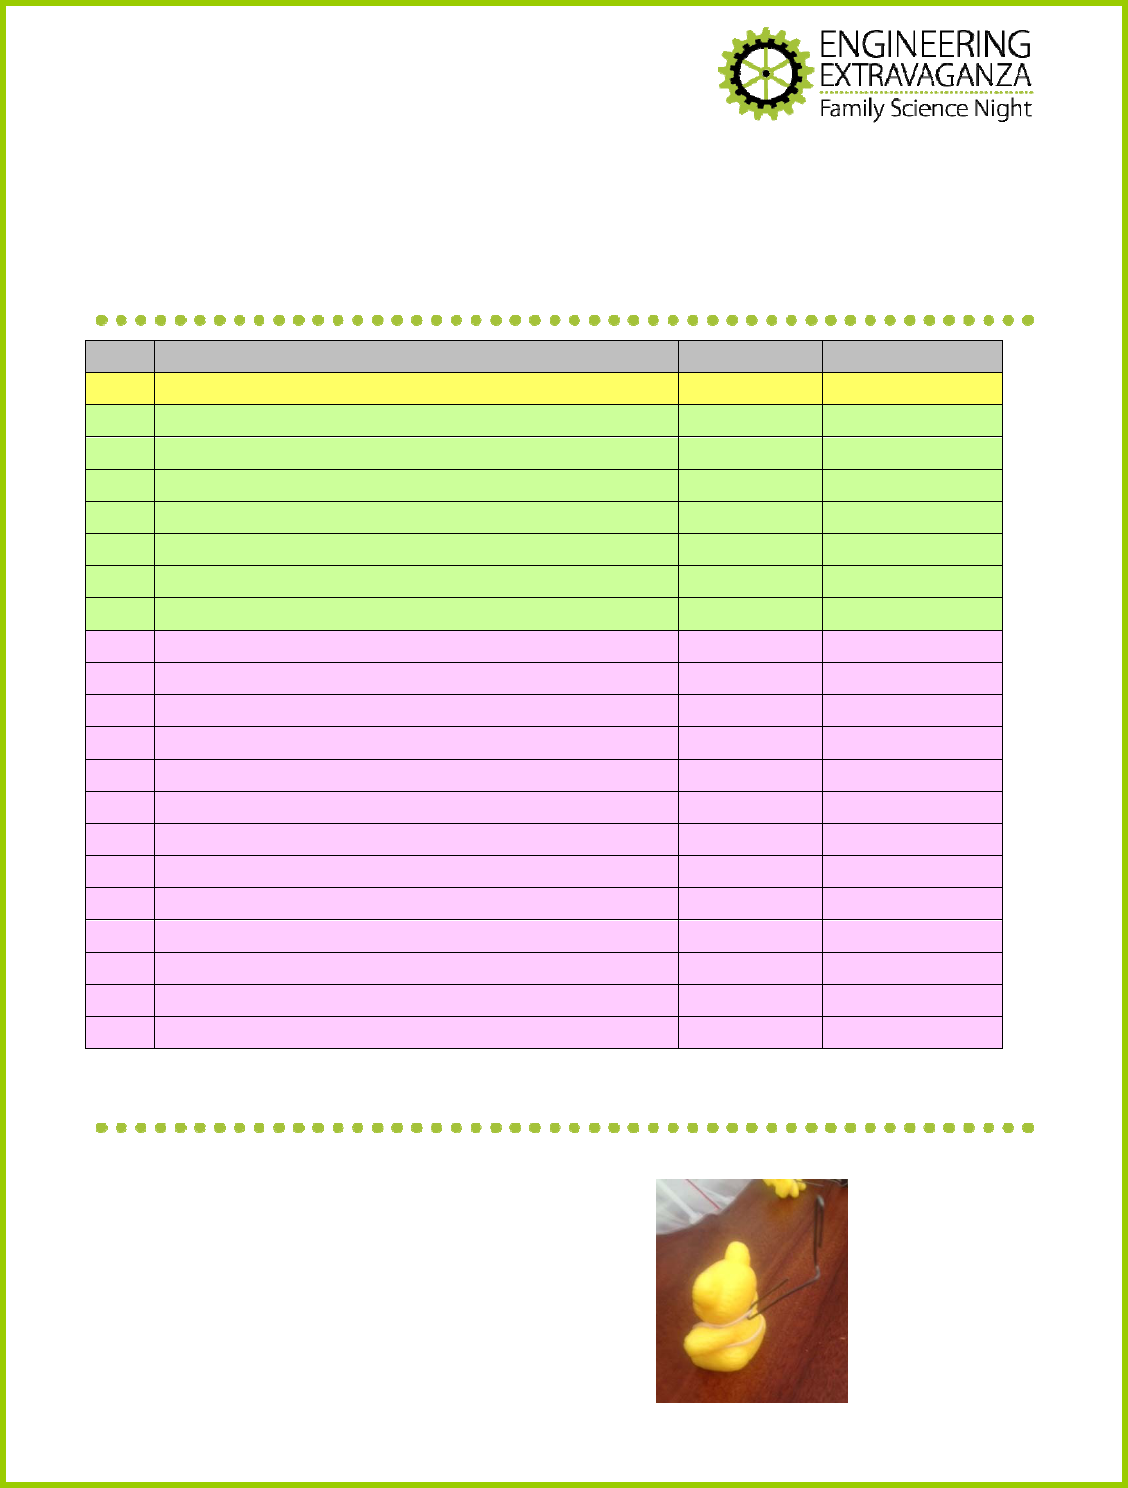
T
his is how the
bear weight is
rigged so that it
attaches to the
p
arachute.


Test Area
Set up a test station near the parachute table with 1-4 chairs,
benches, or a stage for participants to drop parachutes from.
Put container of weights (bears, etc.) near the test station.
Secure stopwatch leashes to nearby chairs with masking tape.
Procedure
1. Facilitator 1 helps participants make parachutes at the table, using the prototype as a guide.
2. Once the parachute is created, direct participants to the Test Area.
3. Facilitator 2 monitors the Test Area.
4. Participants stand on an elevated surface and drop their parachutes (by holding the napkin
center point where the 4 creases come together).
5. Participants may modify parachutes with different weights of string, canopy materials, or the
addition of vents or different weights. Encourage only 1 design modification before re-
testing, to see the effect of the change.
6. Compare parachutes by having one person drop a parachute from each hand.
7. Record slowest-falling parachutes on laminated Recording Sheet, with dry-erase marker.
8. Reference color images for real-life application of parachute design.
Questions to Ask while Participants Work
1. How did you get your parachute to work?
2. What can you change to make your parachute fall more slowly?
3. How did you change your parachute after looking at other people’s parachutes?
4. Why do you think some parachutes fell more slowly than others?
5. Did any of your results surprise you?
6. Did you ever get stuck during this engineering challenge? What did you do to move past it?
Big Concepts in Science & Engineering
You need a force to move something. A force is a push or pull.
Parachutes are designed to take advantage of air resistance pushing up on the canopy to
counter the force of gravity pulling down on the object.
Engineers define problems and propose solutions.
Engineers constantly modify their designs to improve their performance.
Clean-up
Return materials to individually labeled containers (i.e. bags).
Return all items neatly to bins, including small and easy-to-miss items.
Inventory each bin, using the Materials List on bin side. Clearly note any missing materials.
Source
Adapted from FOSS: CA ed. Berkeley, CA: University of CA, 2007.
Grade 1: Air & Weather - Inv. 1 Exploring Air
T
his is the
weighted
parachute,
ready for
fli
g
ht.
FACILITATOR CARD
#5 Boxes
This activity requires 1 facilitator and 1 table.
Materials
Item Name Qty Type
#1 Construction/Copy Paper for boxes (ideally 12”x18”) 50-100 School Supplied
#2 Tape, Scotch 6 Consumable
#3
Glue, White (Facilitator use ONLY)
1 Consumable
#4 Scissors, Adult 4 Permanent
#5 Scissors, Child 8 Permanent
#6 Boxes, Small Cardboard 2 bags of 10 Permanent
#7 Pens, Ballpoint 12 Permanent
#8 Station Identification Sign in Stand 1 Permanent
#9 Public Instructions Card in Stand (Eng & Span) 1 Permanent
#10 Facilitator Instructions Card, Laminated 1 Permanent
#11 Image A: Moving Boxes in Warehouse 1 Permanent
#12 Image B: Pizza Box 1 Permanent
#13 Image C: Moving Box 1 Permanent
Set-up
Table 1
Set out container of boxes, large paper, child scissors, adult scissors, pens and scotch tape.
Post Participant Activity Card in display stand.
Set out image cards.
Procedure
1. Each participant gets one cardboard box. They open it until it lays flat. (Some boxes may
have a glued seam that must be carefully opened.)
2. Participants hold the flattened box on a large sheet of paper, trace around it, and then cut
out the shape. (Adults may want to help children mark folded edges with dotted lines.)
3. Participants then try to fold up the new box and secure it with tape.
4. Once a box is made, challenge participants to add a feature, like a handle, to their existing
box or design a new one.
5. Participants may keep their box.
6. Reference color images for real-life applications of packaging engineering.
7. Try to re-assemble boxes after use. This way the same cardboard box can be used by
multiple participants. (Boxes that had a glued seam may need to be re-glued and set aside
until dry.)

(more on the other side)

Questions to Ask while Participants Work
1. How does the shape of the box change when you open it?
2. What types of materials would fit in your box?
3. How could you change your design to make a long, skinny box? A cube-shaped box?
4. What shapes do you see in the flattened box?
5. What skills or knowledge did this require of you as an engineer?
Big Concepts in Science & Engineering
Containers are made from raw materials.
Containers can be different sizes and shapes.
Containers are designed to fit different-sized materials and objects.
Containers are used to hold and transport materials and objects safely and efficiently.
The design of 3-dimensional materials begins in a 2-dimensional design space.
Engineers develop, use, and constantly improve models (or prototypes) to solve everyday
problems.
Engineers use mathematical thinking in solving problems.
Clean-up
Return materials to individually labeled containers (i.e. bags).
Return all items neatly to bins, including small and easy-to-miss items.
Inventory each bin, using the Materials List on the side of the bin. Clearly note any missing
materials.
Source
Adapted from FOSS: CA ed. Berkeley, CA: University of CA, 2007.
Kindergarten: Wood & Paper - Inv. 5 Constructions
