
Modern Requirements4DevOps
2020 Release
Smart Docs Training Module

Overview of Smart Docs
How create a new Smart Doc
Different features available in Smart Doc
How to create a new Meta Template
How to Create a Smart Doc Output
AGENDA

End User
Smart Docs Module Overview
Admin User
New Features

q Smart Docs is an online document authoring system that is built directly into
Azure DevOps.
q This module is a replacement for Microsoft Word when managing
requirements.
In other words, Smart Docs is a tool that bridges the gap between document and
information management by authoring requirements in a document view online.
What is Smart Docs?

End User Experience
What you will learn:
q How to create a Smart Doc using existing Meta Template
q How to add work items
q How to add / create properties to work items
q How to create Document (reusable) Template
q How to create Version of Smart Doc
q How to compare versions
How to create a Smart Doc using Meta Template
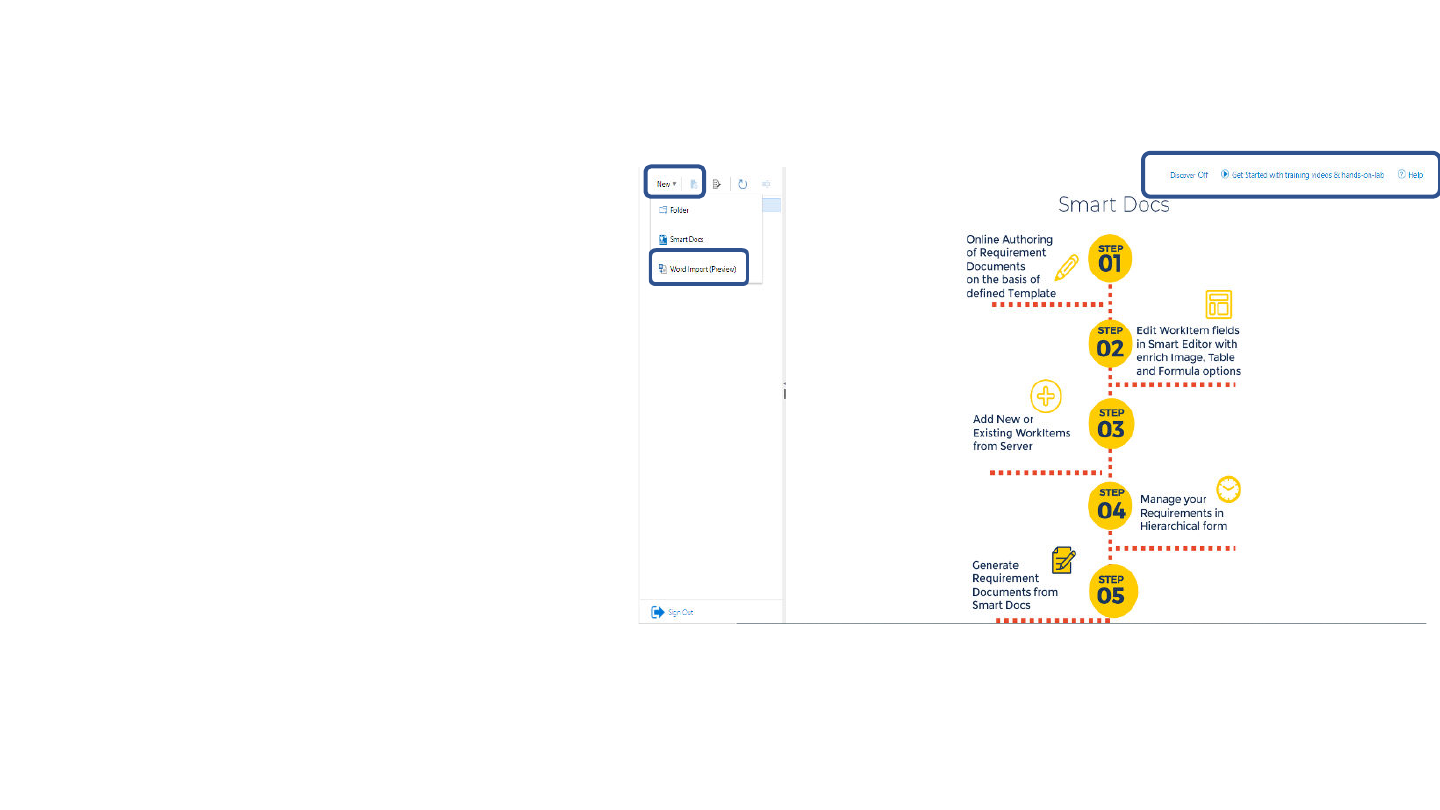
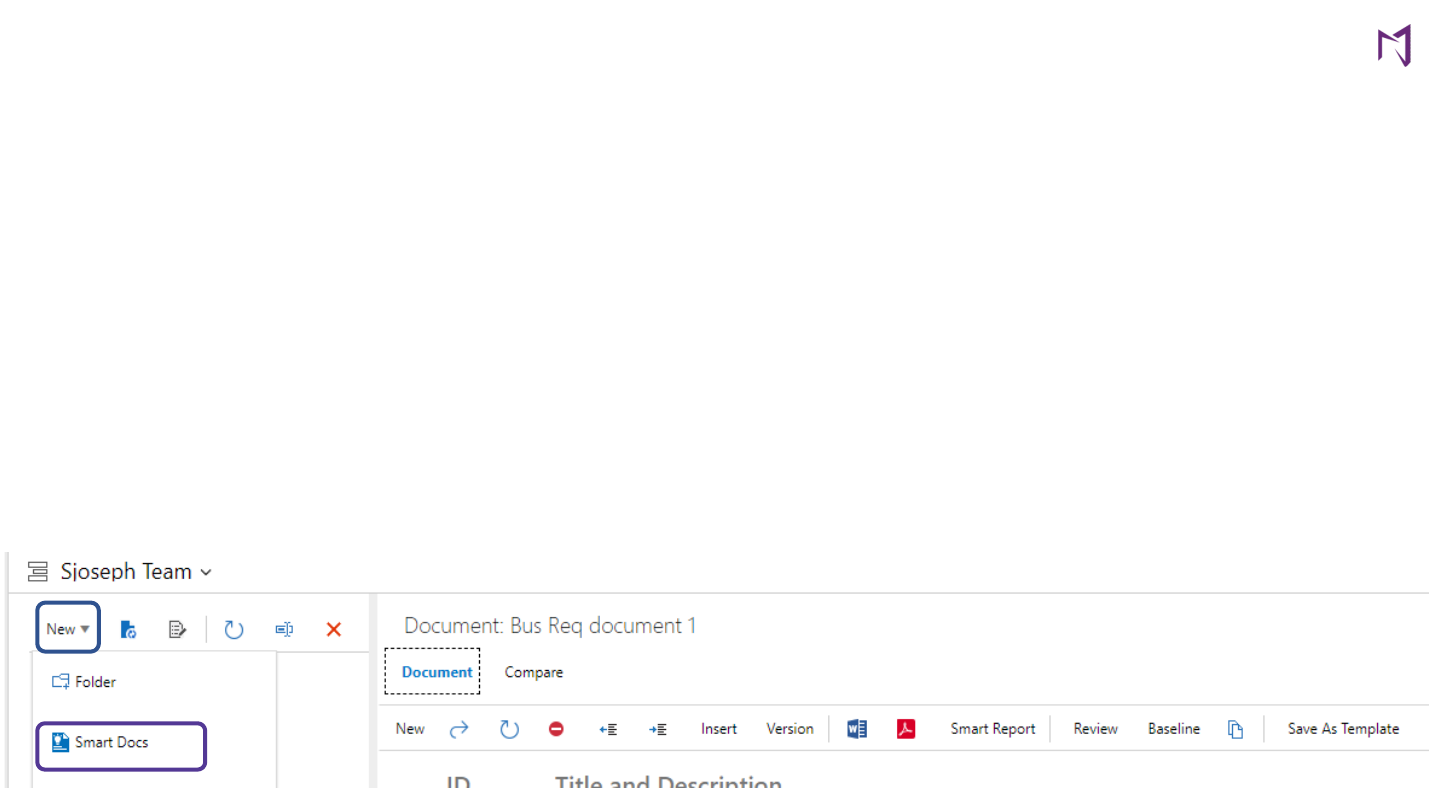
You are now in smart doc authoring
window.
• Click on New tab to the left of your
screen
• Choose “Smart Doc” from the drop
down options
Note: There is help available, click on Discover
tab to learn more about Smart Docs and it
usability along with training videos.

There are three type of templates available:
o
Basic
o
Document Template
o
Meta Template
q
Basic
: This is a generic template based on different process templates
available i.e.: Agile, Scrum, CMMI, BABOK etc.
q
Document Template
: This template is a copy of an existing Smart Doc
created and saved by a user for reuse purposes.
q
Meta Template:
This is what system generates each time a user creates a new
customized template.
How to create a Smart Doc using Meta Template
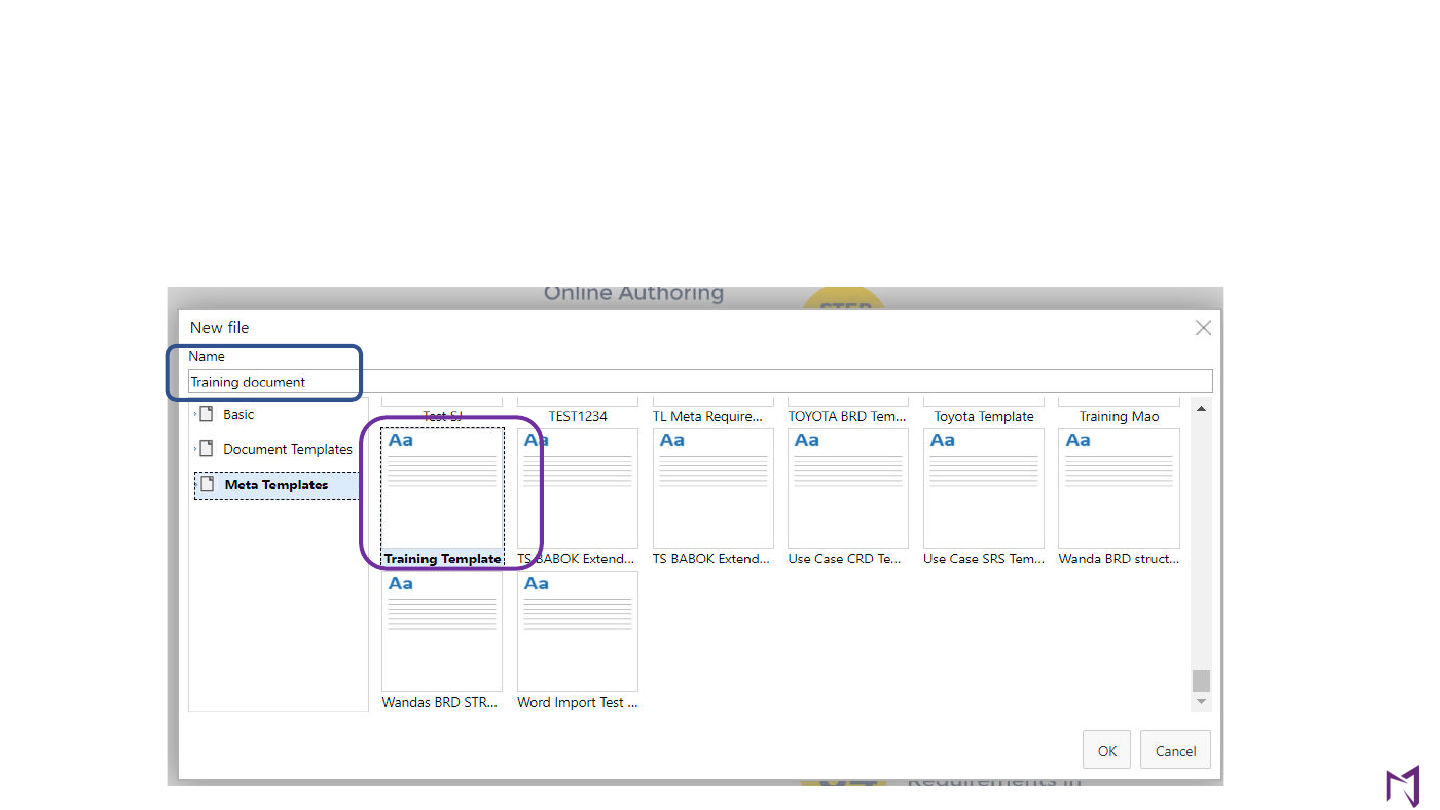
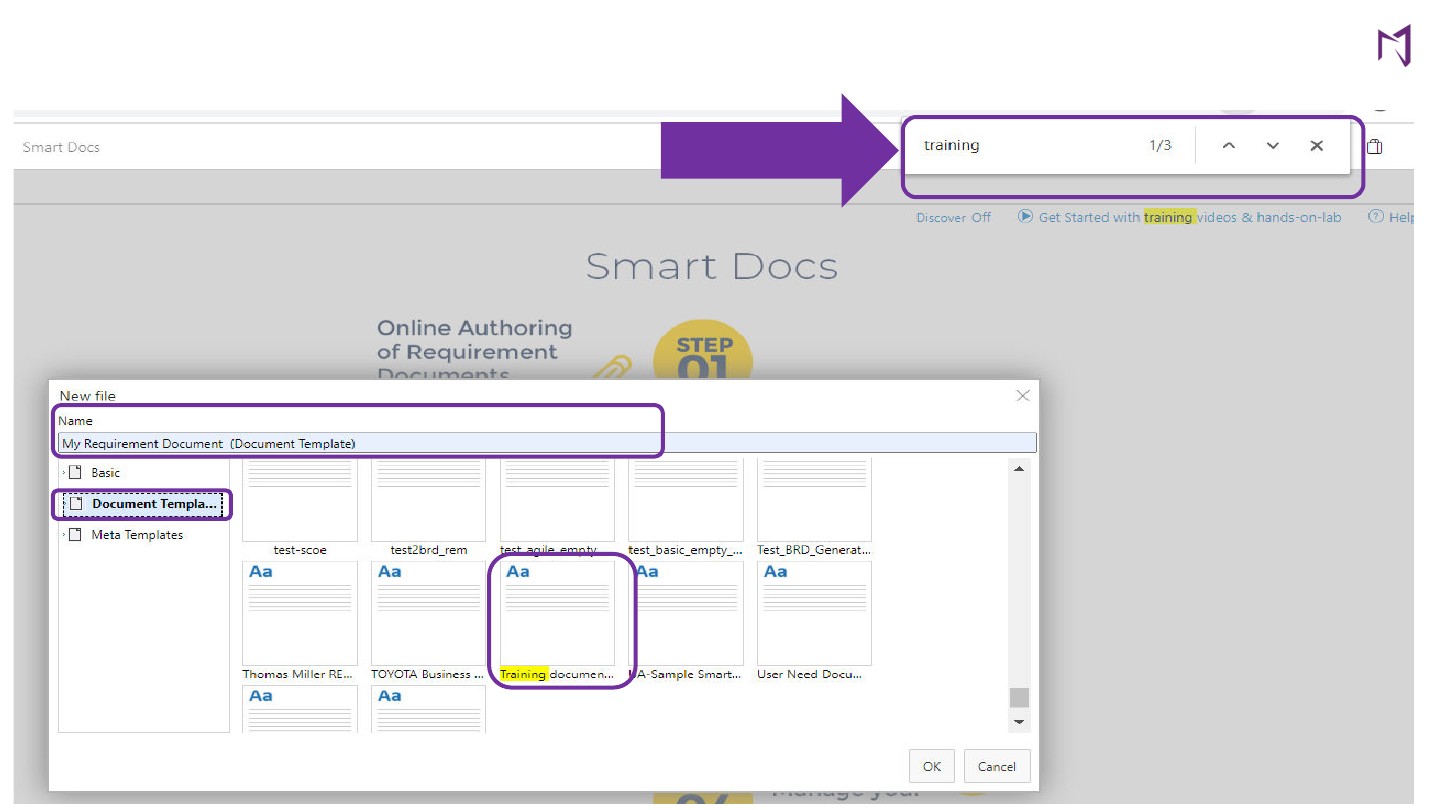
Since we created our own customized template, we will choose Meta Templates option.
• Search for the recently created template
• Select it
• Give your new document a name, here we have chosen “Training document” and click OK.
How to create a Smart Doc using Meta Template
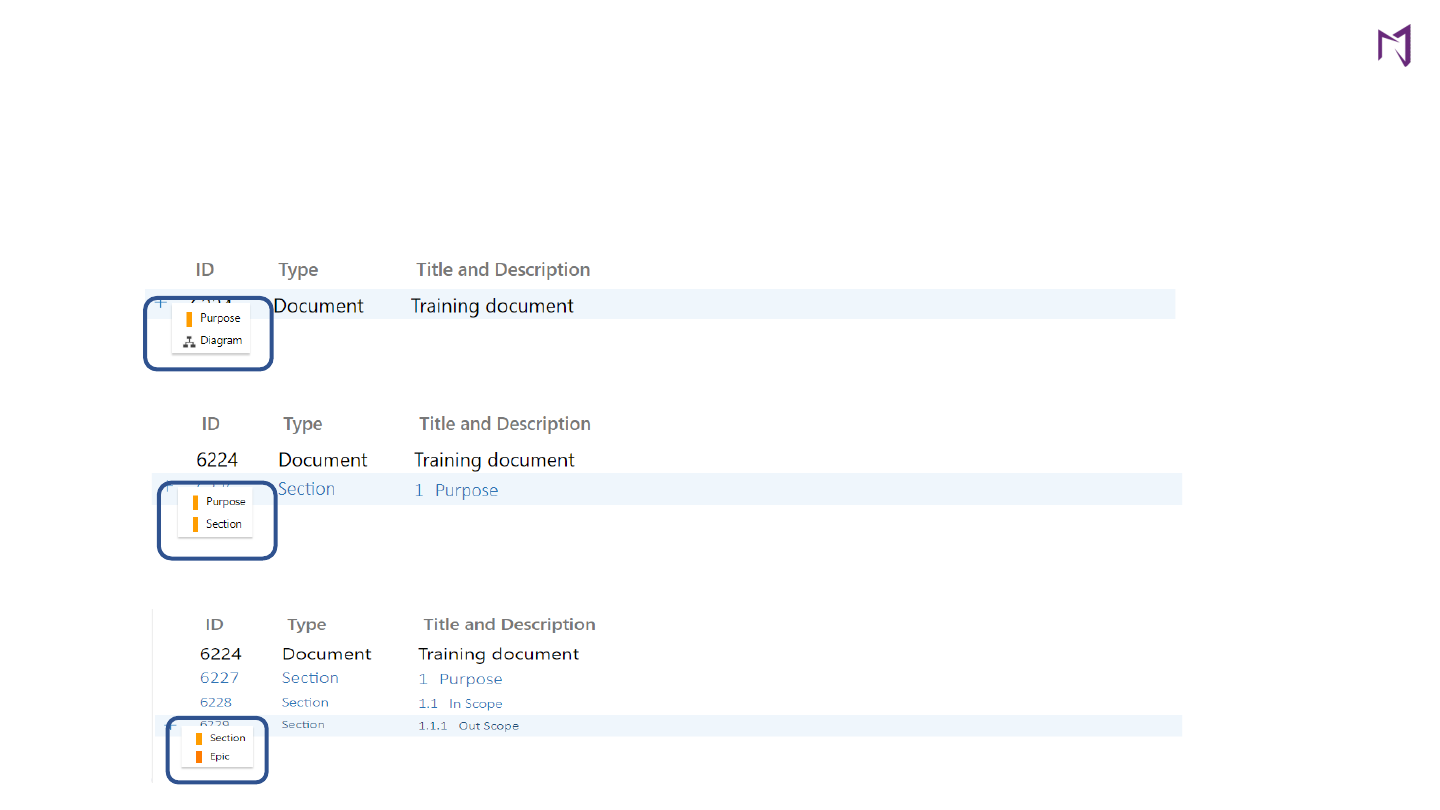
Now let’s start adding work items to our document. You can do this in two ways:
1. Click on the “+” sign next to the first system generated work item
* Work items will appear based on the hierarchy defined in Meta Template
How to add Work Items

2. Drag and drop existing work items. There are three different ways to search for existing
work items:
i. By Query
ii. By Work Item ID
iii. By Title Contains
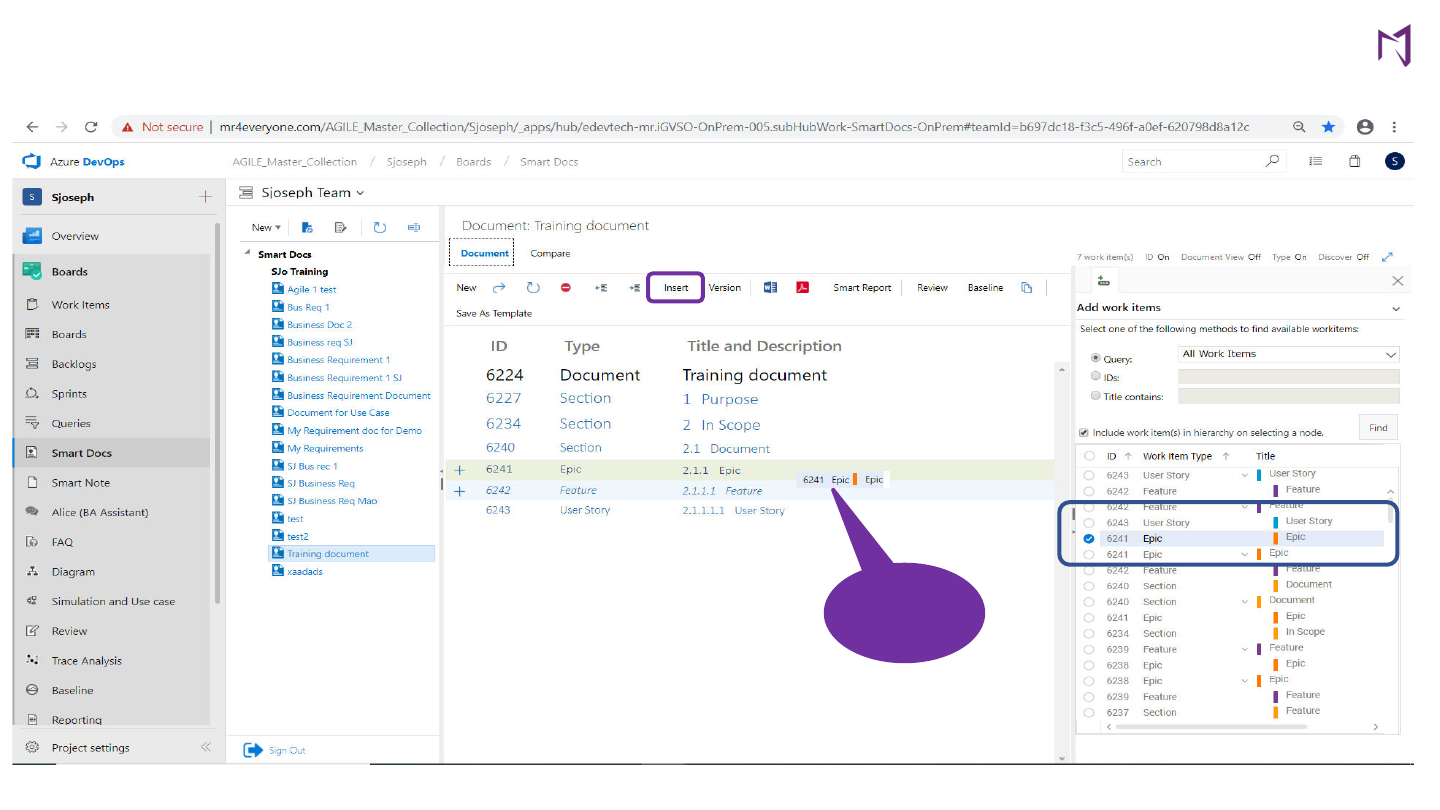
Step-by-step Instructions:
• Click on the “Insert” tab on top of your screen. A right panel UI will popup.
• Now select an option of your choice hit “find” and simply drag and drop existing work
items into your Smart document
How to add Work Items
Drag and
Drop Work
Items
How to add Work Items

How to create/edit properties to work items
You can edit or add properties to your work items in two ways:
I. By using Standard Editor
II. By using Smart Editor
q
Using Standard Editor (ADO Editor): C
lick on the arrow next to the new tab on
your menu bar. This will invoke standard editor. Add Description or make changes to
the work item and hit “Save and Close”.
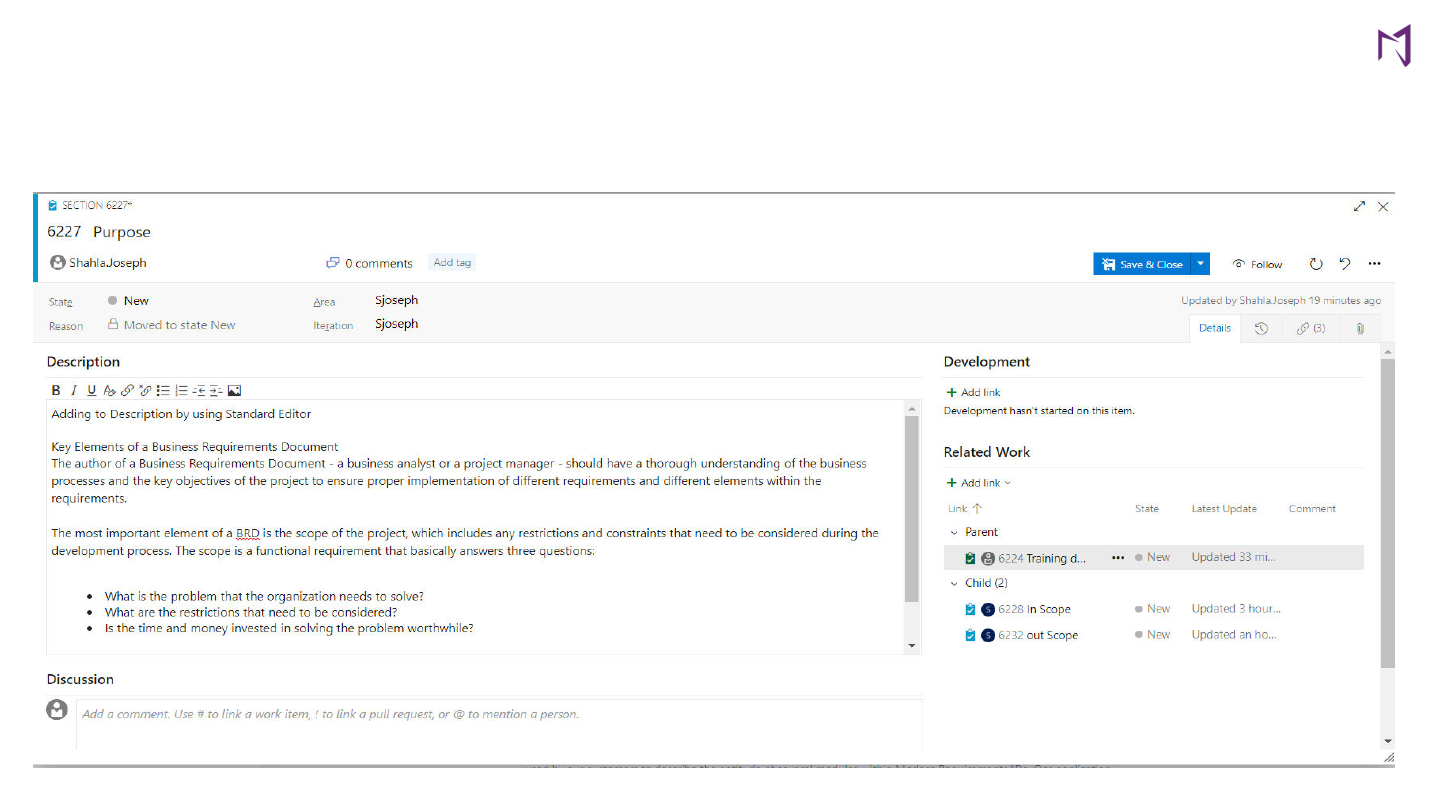
q
Using Smart Editor (Smart Doc Editor):
By double clicking on any work item, system
will navigate you to Smart Editor. This is a rich text editor that provides you a lot of
features that are not available in Standard Editor. Here, you can add free text, tables
or copy and paste existing data from a Word Document etc. Click “Save and Close”.
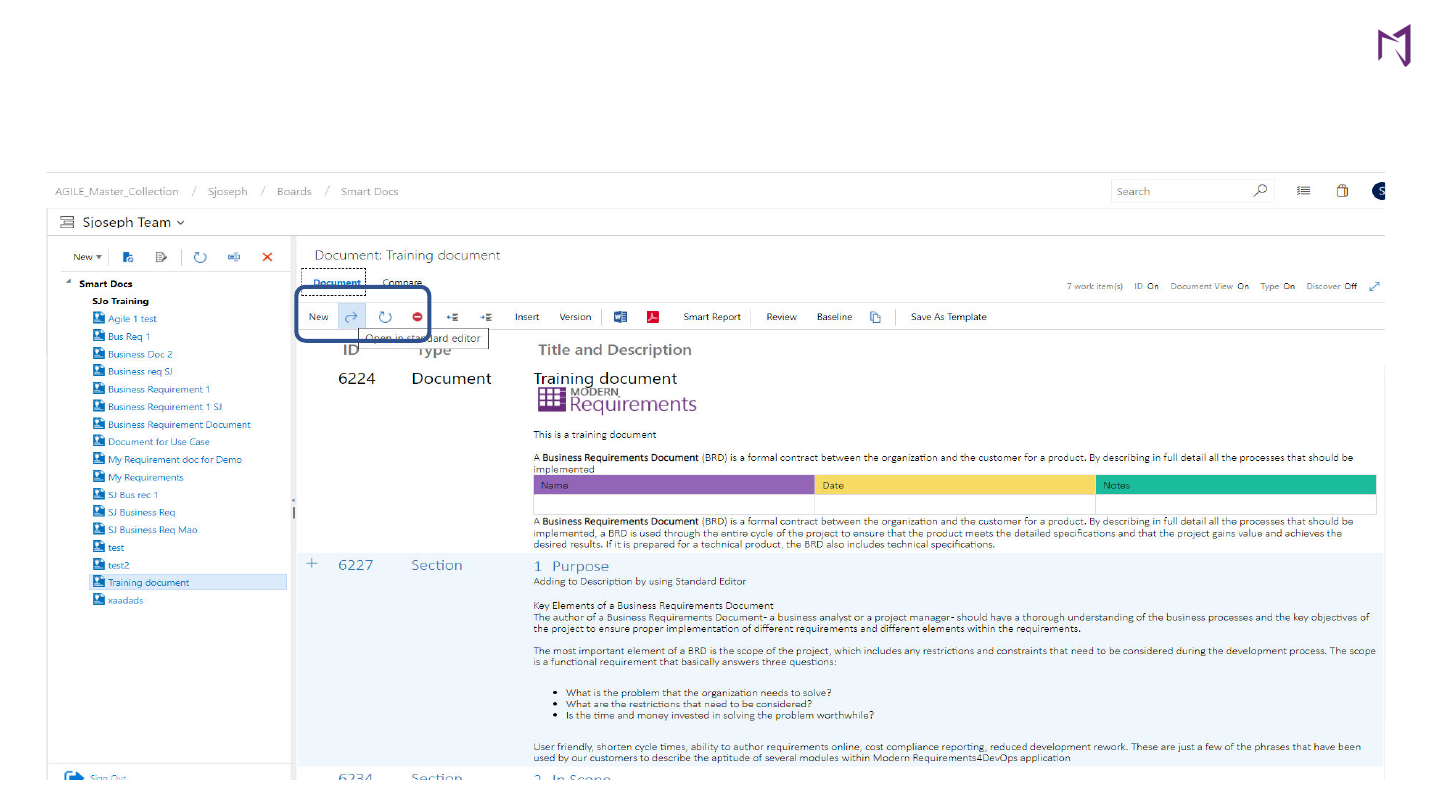
Standard Editor view
How to create/edit properties to work items
How to create/edit properties to work items
Standard Editor Popup Window

Add Table
Configure your
table right in smart
docs
How to create/edit properties to work items
Standard Editor View – Popup Window with Rich Text
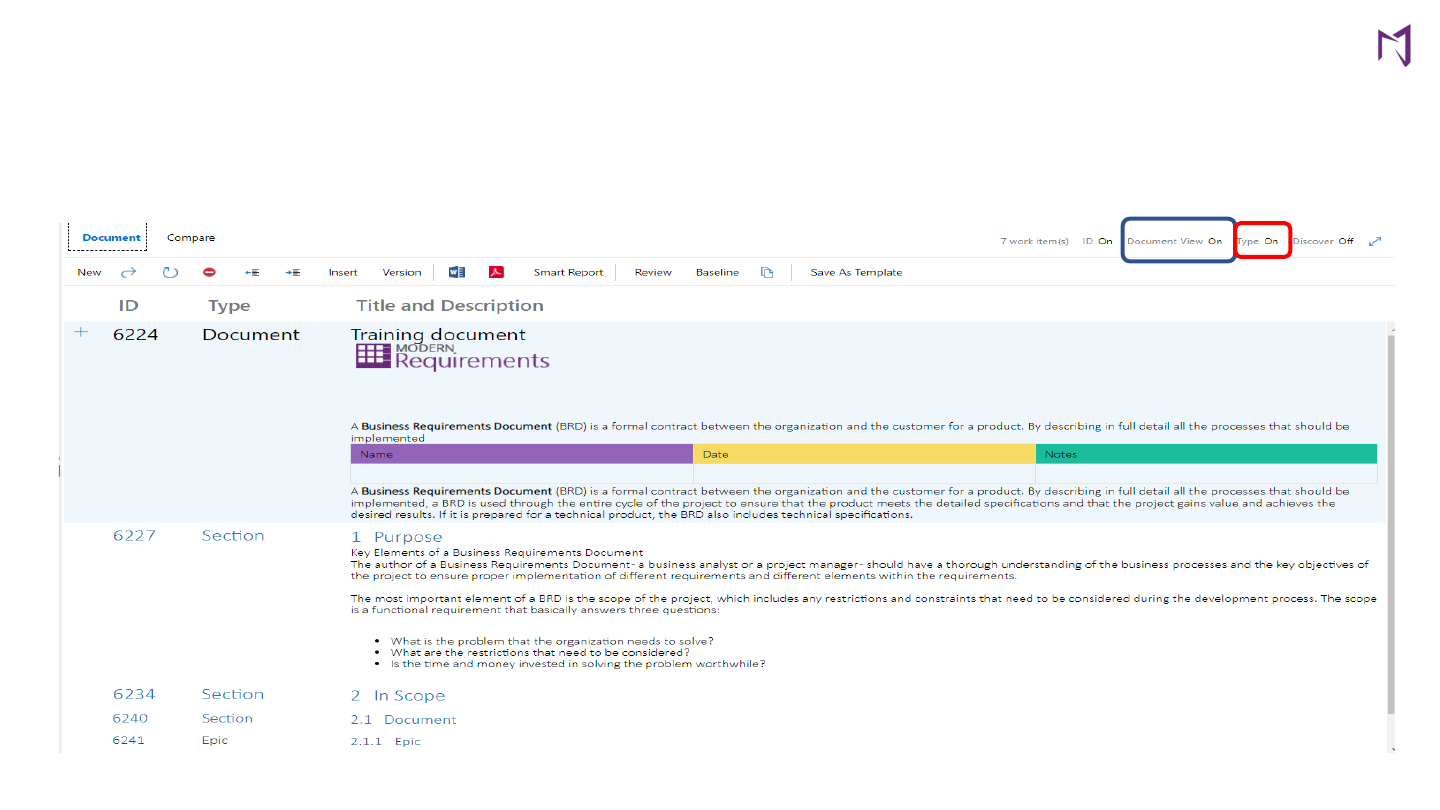
Smart Doc View
q To view your properties directly on smart doc user interface turn “Document View” = On
q To view Type of work item turn “Type” to On
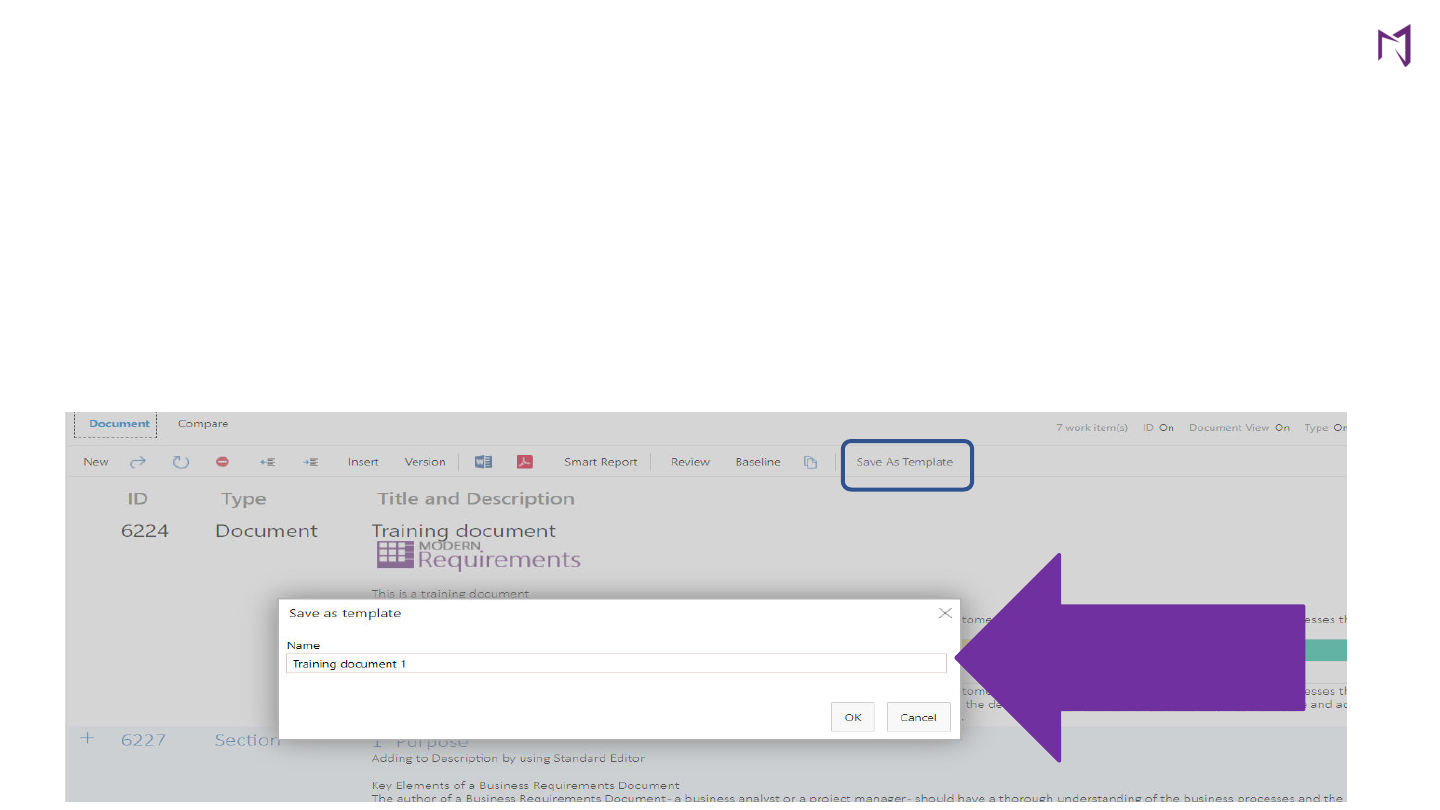
Now that you have added properties to your work item, you can save this as a document template for reuse purpose in
future. This allows you to reuse document structure and content within. It can be used by any team member who has access
to the given project. This will help users who are building a new BRD/SRS with same requirement needs.
Step-by-step:
• Click on Save “As Template” on the top right-hand side of the menu bar
• Give your template a name and click OK
• You now have a document template saved for future use
Give your template a new name
How to Create a Document (Reusable) Template
You can access your Document template from Meta Template designer tab.
Step-by-step:
- Click on Meta Template designer
- Scroll down to Document Template tab > Choose your desired Document Template
Note: When navigating from your Smart Doc to the template tab system will automatically bring you to the document template
associated to the specific Smart Doc.
Meta Template designer tab
How to Create a Document (Reusable) Template
Recently Saved Document
Template
How to Create a Document (Reusable) Template
You can now create a Smart Doc using Document Template
Step-by-step:
- Click on the “New” tab on the top left hand side of your menu bar
- Select Smart Doc from the drop down options
- A New File window will appear (same when creating smart doc using Meta Template)
- Select Document Template
- Select the appropriate document template, by clicking on it
- Name your new Smart Doc
- Click ok
Note: You may search for your document template by using “ctrl F” function
How to create a Smart Doc using Document
How to create a Smart Doc using Document
Template
Search bar “Ctrl F”

Version Management
You can create versions of your Smart Doc
•
Why create versions:
To keep a record of your smart doc in it’s original form at the start of a project
iteration etc.
•
When versions are created:
Typically at every iteration, release, or sending for review (system
generated) etc.
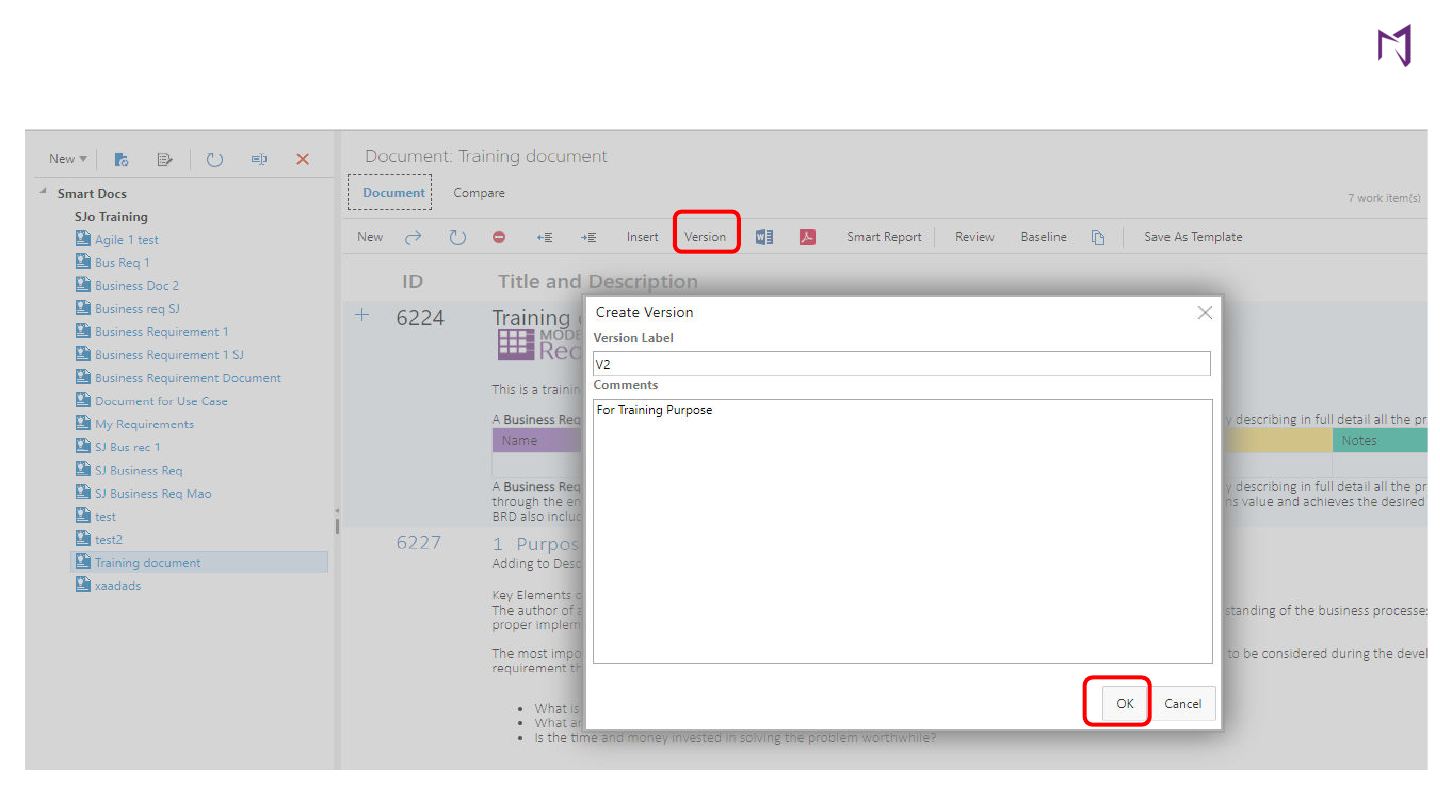
- Click on “Version” tab on the top menu bar
- Click on “Create Version”
- Name the version (add comments if required)
- You now have a version saved of your current document
The system will generate a version each time a document is sent for review or approval from Smart Doc
module.
Note: you can create as many versions as needed.
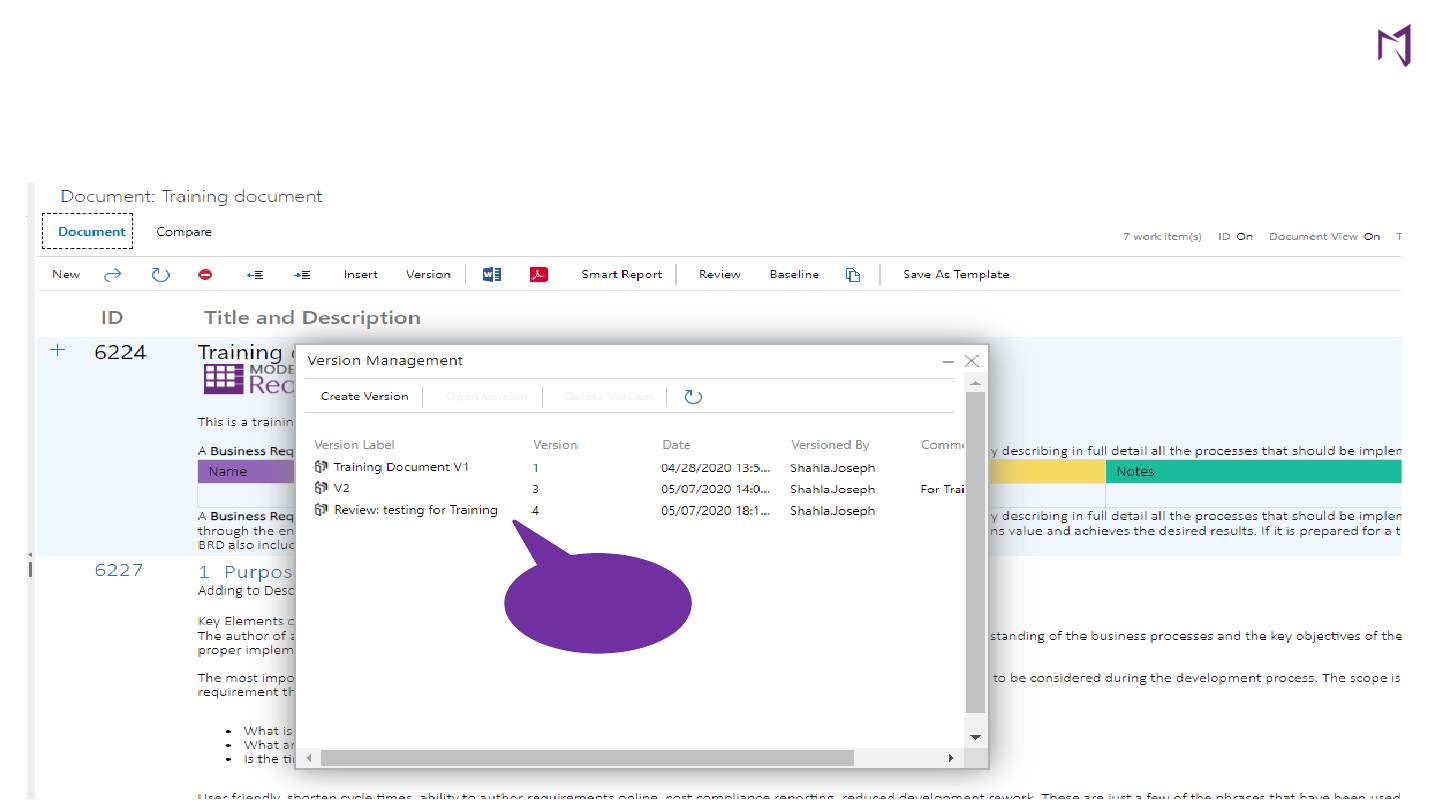
Versioning Your Smart Doc
Versioning Your Smart Doc
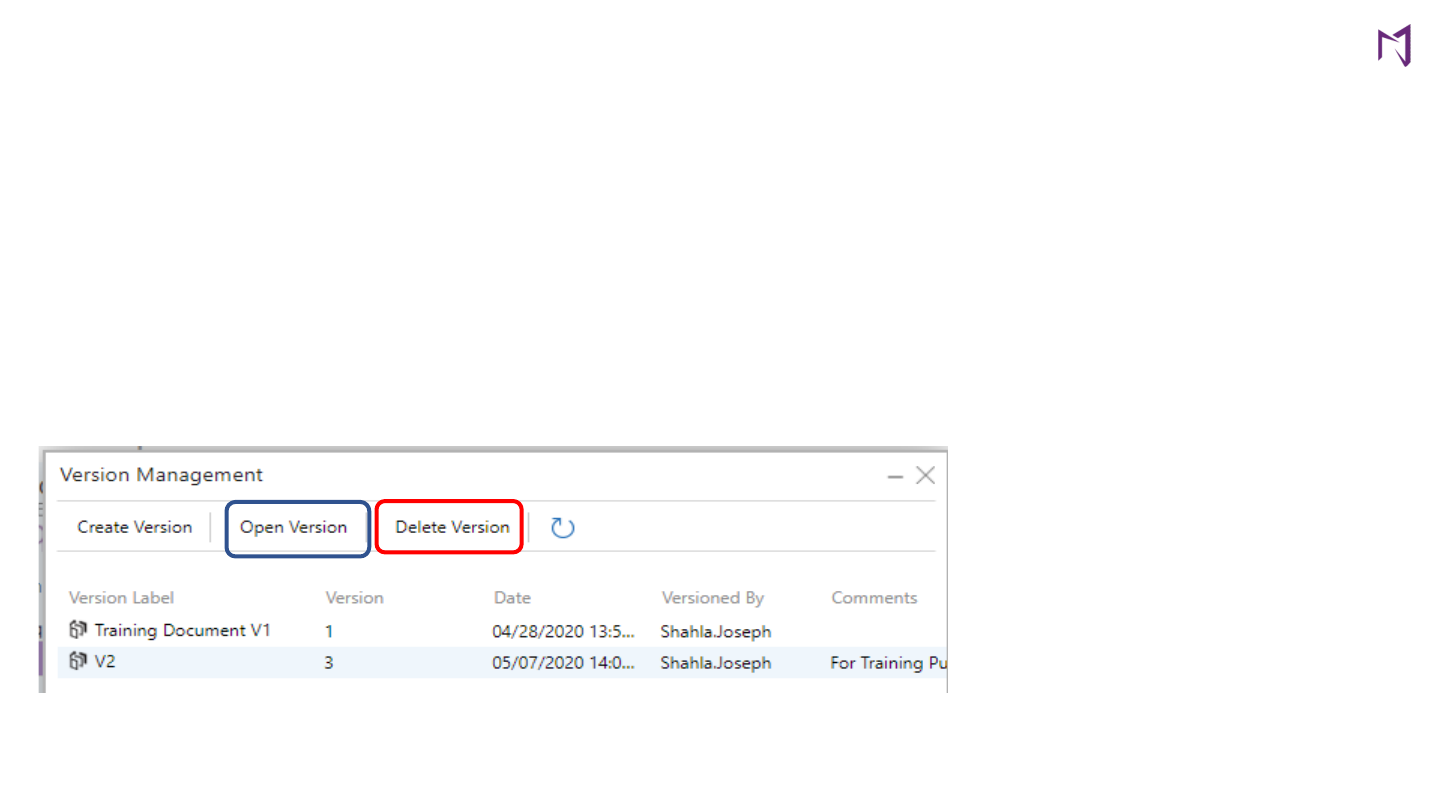
Accessing Versioned Smart Docs
To access an existing version click on the “Open Version” tab.
q Select the version you would like to view
q You can save versions as Word or PDF documents
q You can view changes made to your original document
To Delete a version click on “Delete Version” tab.
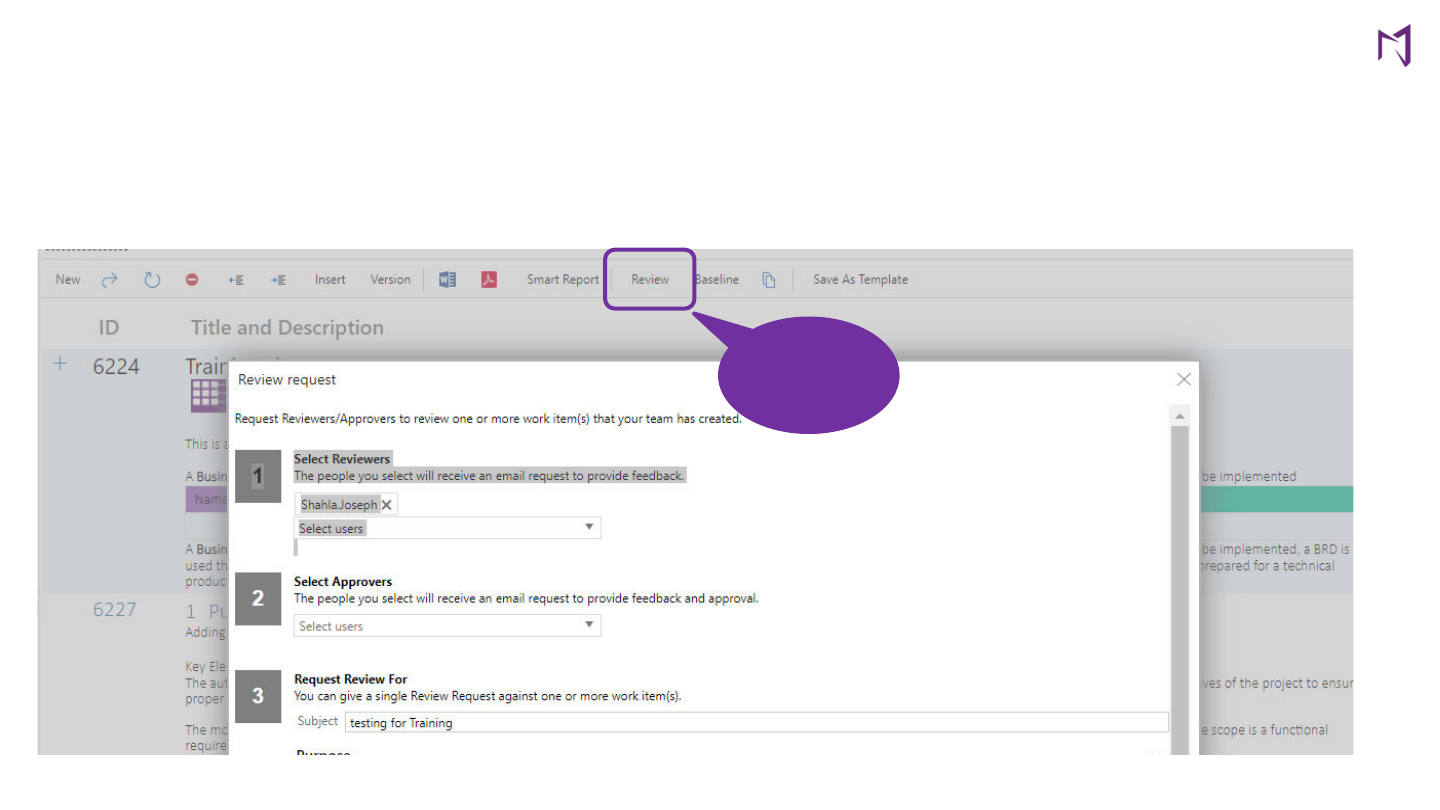
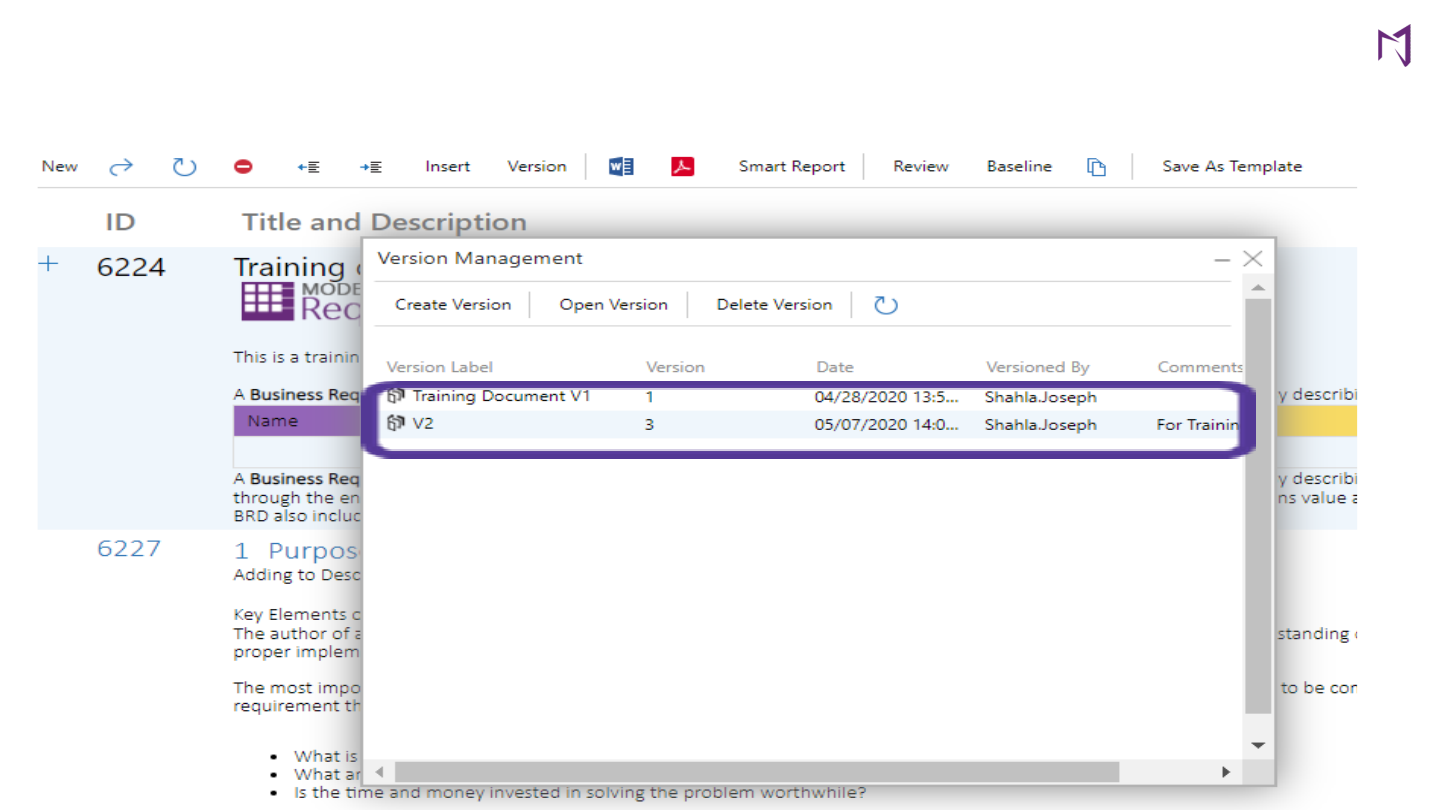
Versioning your Smart Docs Via Review
You can version your smart doc automatically.
q By creating a review, system will automatically save a version of the smart doc, being sent for review
(this can be accessed by version tab).
Create a
review by
clicking on
review tab
q A new version will be created under the version tab
New
version,
auto created
Versioning your Smart Docs Via Review
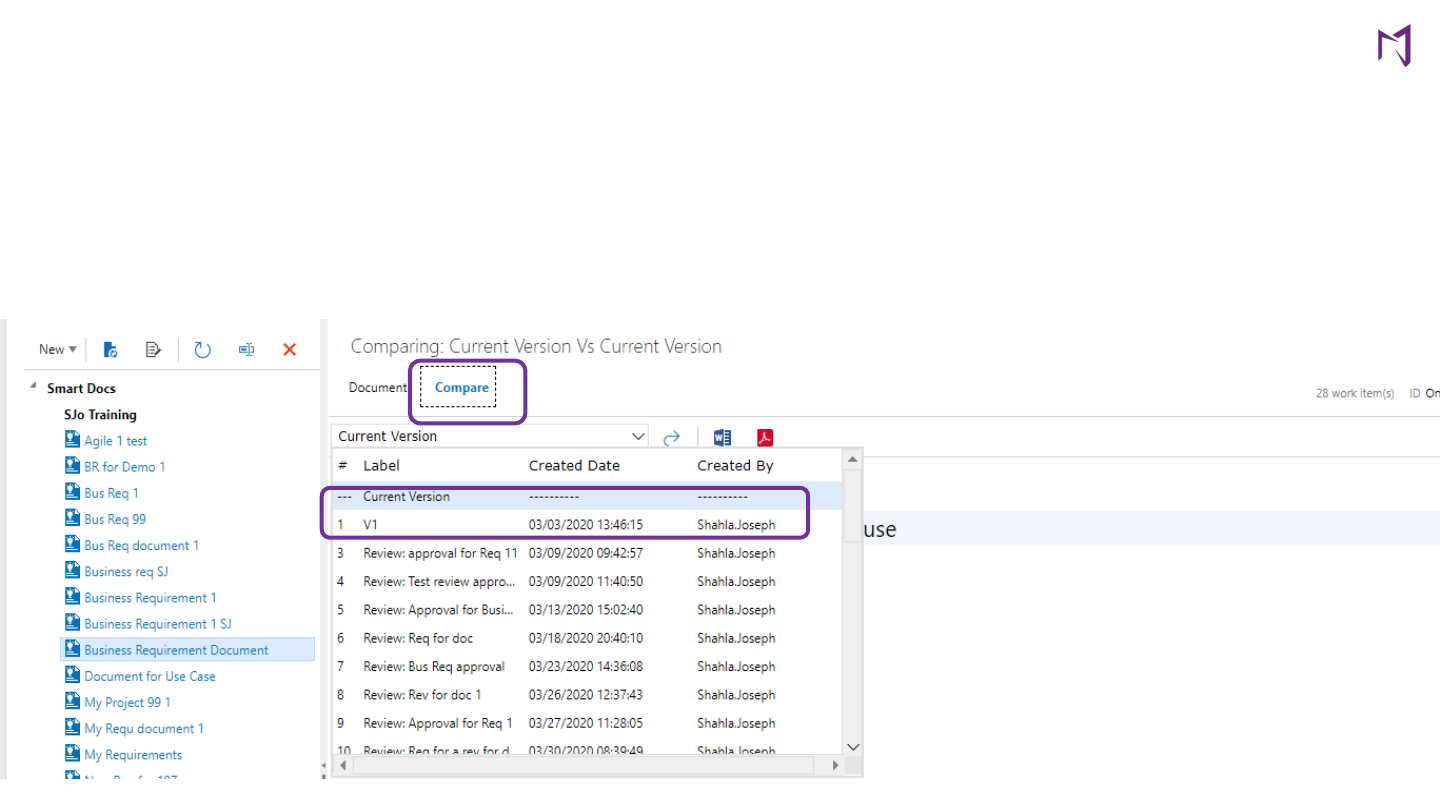
Comparing Smart Docs
You can compare your current version to any available version.
Step-by-step:
- Click on the compare tab
- Select the desired version that you would like to compare the current smart doc with
- You can now see a red line view highlighting any of the changes that took place for work items within the
smart doc
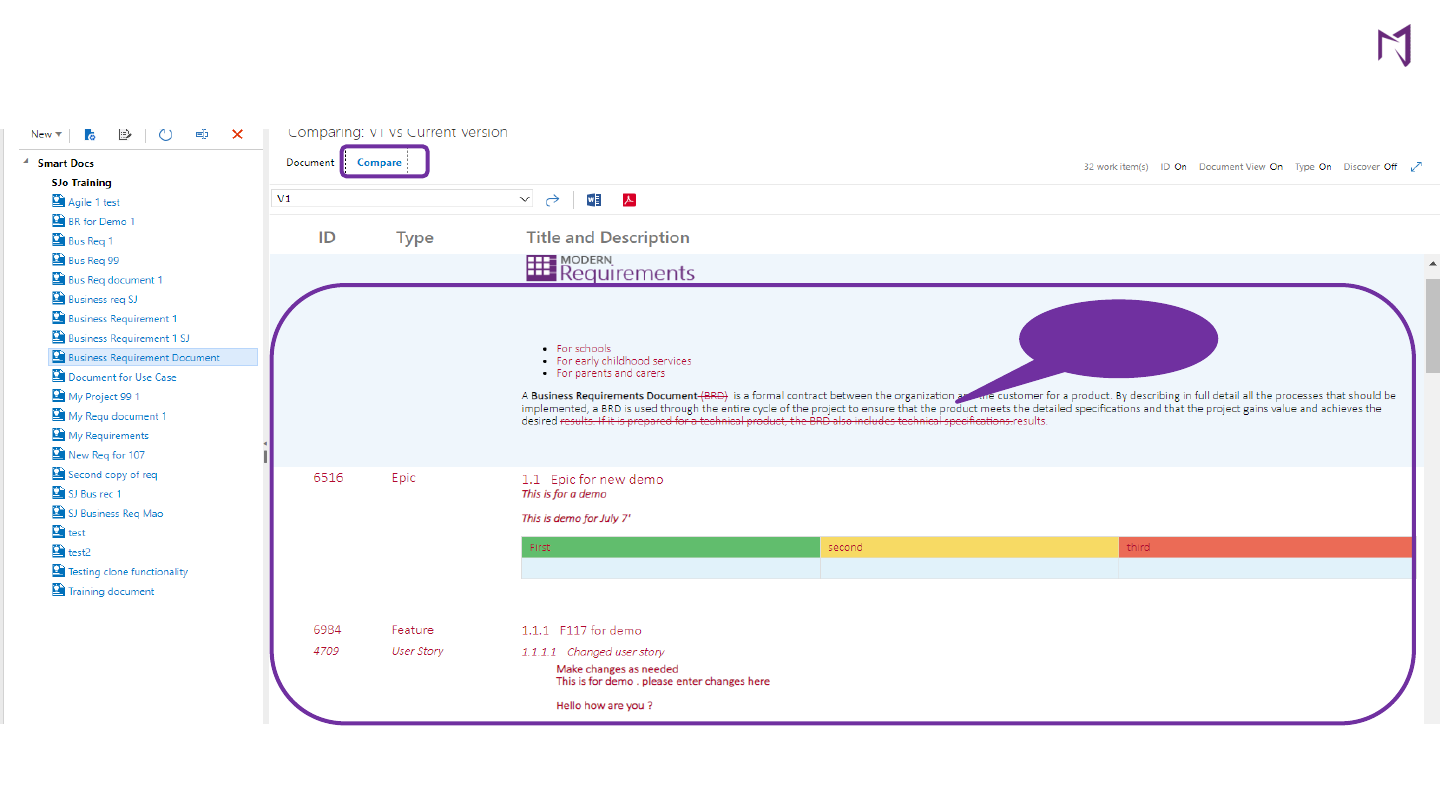
Comparing Smart Docs
Red line view
of the
changes
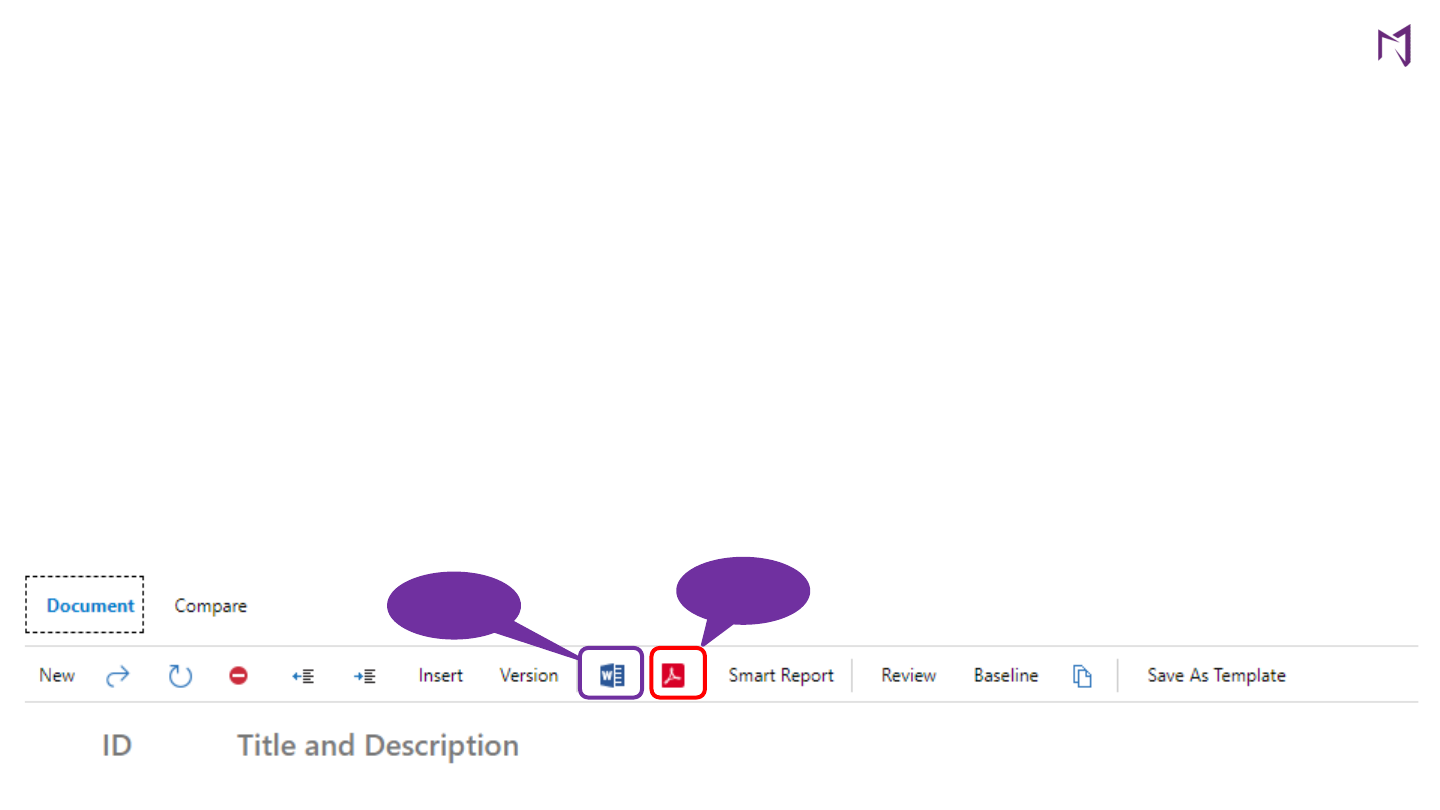
How to Create An Output for Smart Doc
Smart doc is not a reporting tool – it allows you to interphase your requirements in a document form. You
can create an output of your smart doc output in three ways:
- Word document output
- PDF output
- Smart Report output
Word Document Output: this allows you to output your document in the exact shape and form you see in
smart docs. This does not allow you customize your output to style or select specific items from the smart
doc.
PDF: Is the same as word document output just in PDF form
You can easily create an output in either form by clicking on the word document or PDF button in your
menu bar
Save
as word
Save
as PDF
How to Create for Smart Doc Output
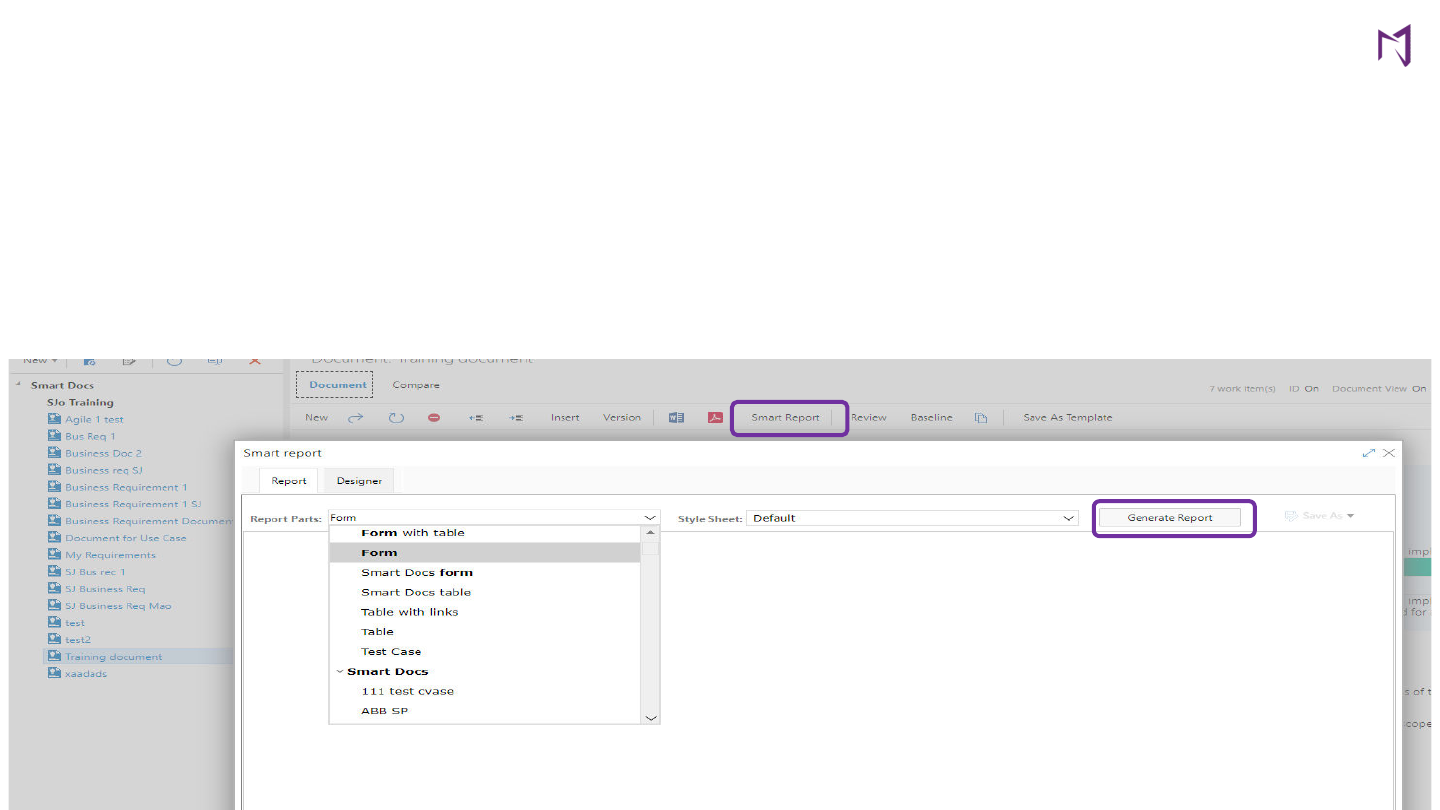
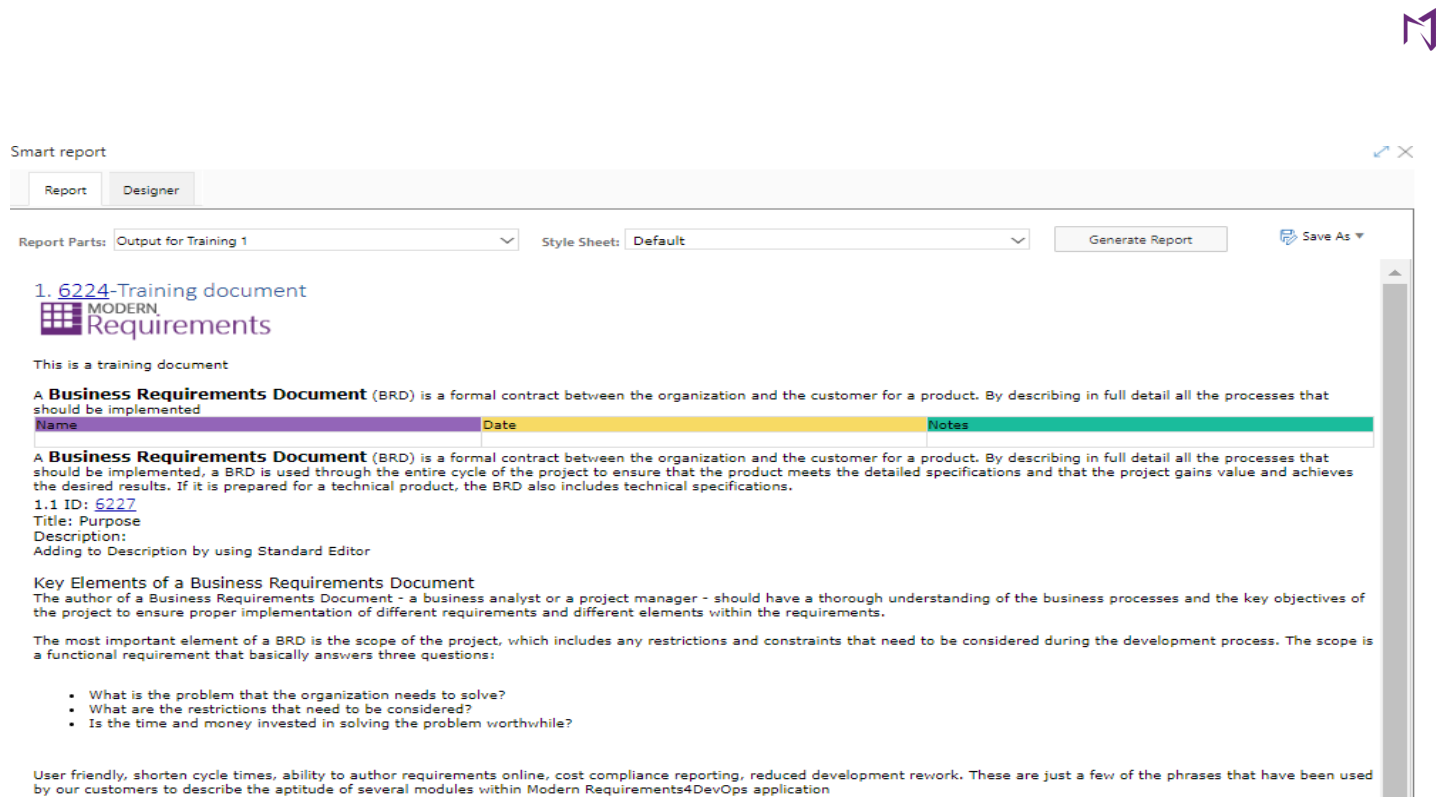
Smart Report output: Smart Report allows you to create an output by using a specific Report Part or customize your
document output format.
Step-by-step on using report part to generate a report:
- Click on the report tab from your Smart Doc UI
- Choose a Report part you would like to create your report in
- There are several options available for example: Form, Table, Smart Doc Table, etc.
How to Create Output for a Smart Doc
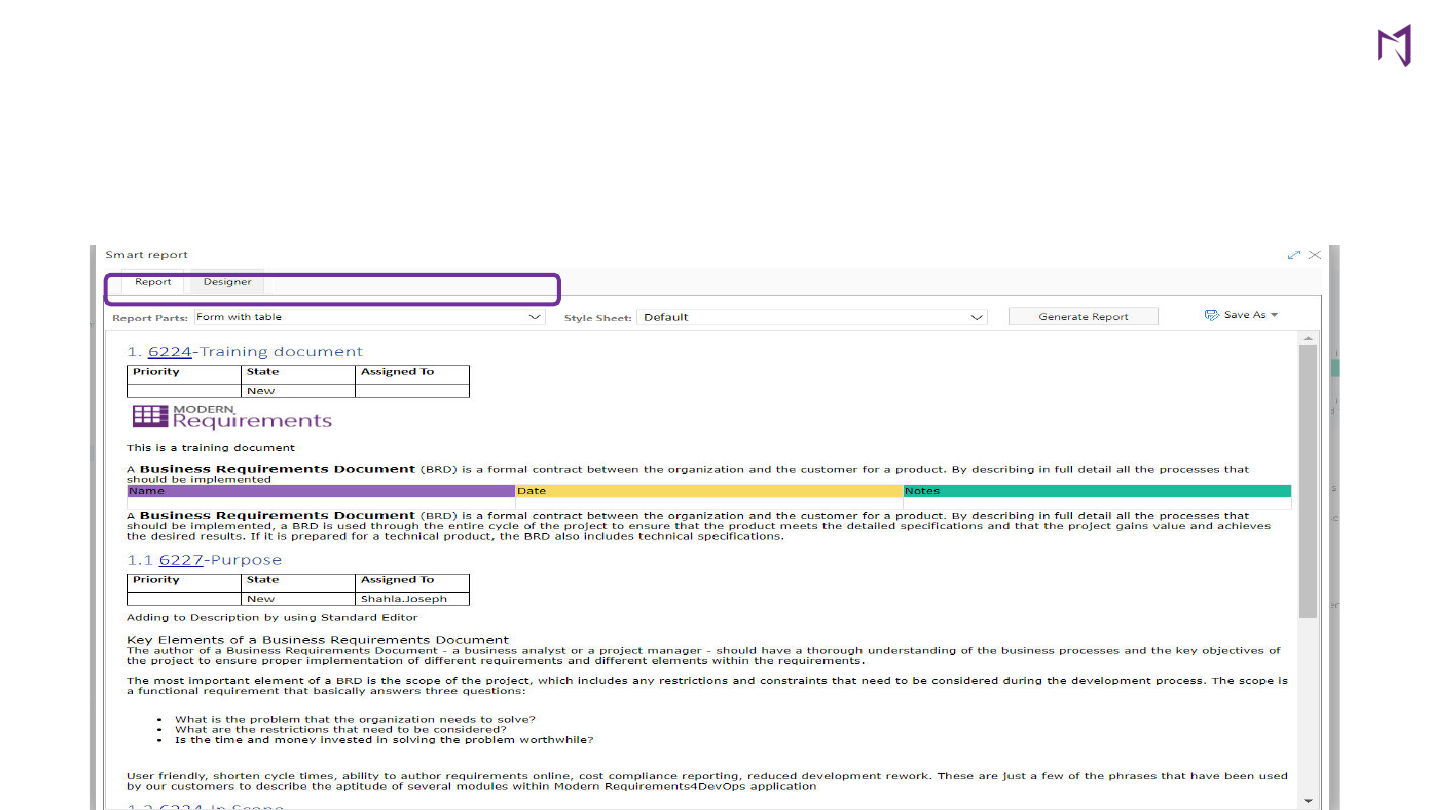
- Click on “generate report” to create a basic (not customized) report
Example below was created by selecting “form with table” Report part (the is a HTML preview of your report)

Admin User Experience
What will you learn:
q How to create a Meta Template
q How to create a “customized format smart report” to generate an
output for a smart doc

Meta template allows you to construct a structure of your document.
q You can build your Meta Template with Sections and Specific Requirements.
q Meta Template allows you the flexibility to configure where you can place
context elements (Sections), and where can you add specific requirements in
your document.
q Meta Template is reusable.
Note: Section is a placeholder for context such as: purpose, out scope, in scope, introduction, business
objective etc. This consists of contents that are not requirements, but they are part of the document.
Meta Template

First step in authoring requirements within Smart Docs is to create a Meta Template.
Here are steps outlining how:
Ø Create a project
Ø Within the project, from the left pane under Overview options select “Boards”
Ø Under Boards, go to Smart Docs Module
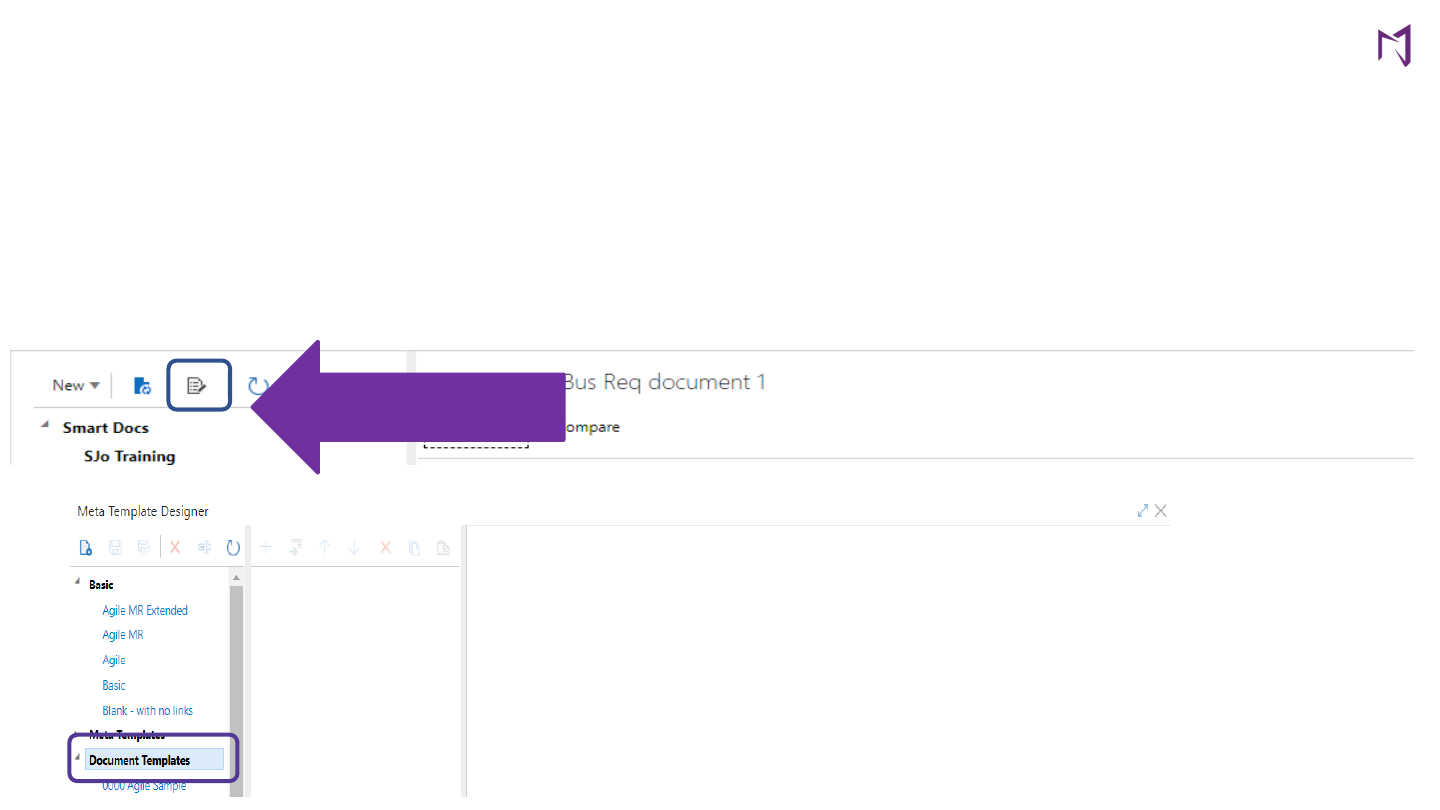
Ø Click on the template designer icon (top left-hand side)
Ø A Meta Template Designer window will popup
Ø In the new Meta Template designer window click on “New” tab (located on top left-hand side
of the screen)
Ø Add name for the template and click OK.
How to create a Meta Template

How to create a Meta Template

New Tab
How to create a Meta Template

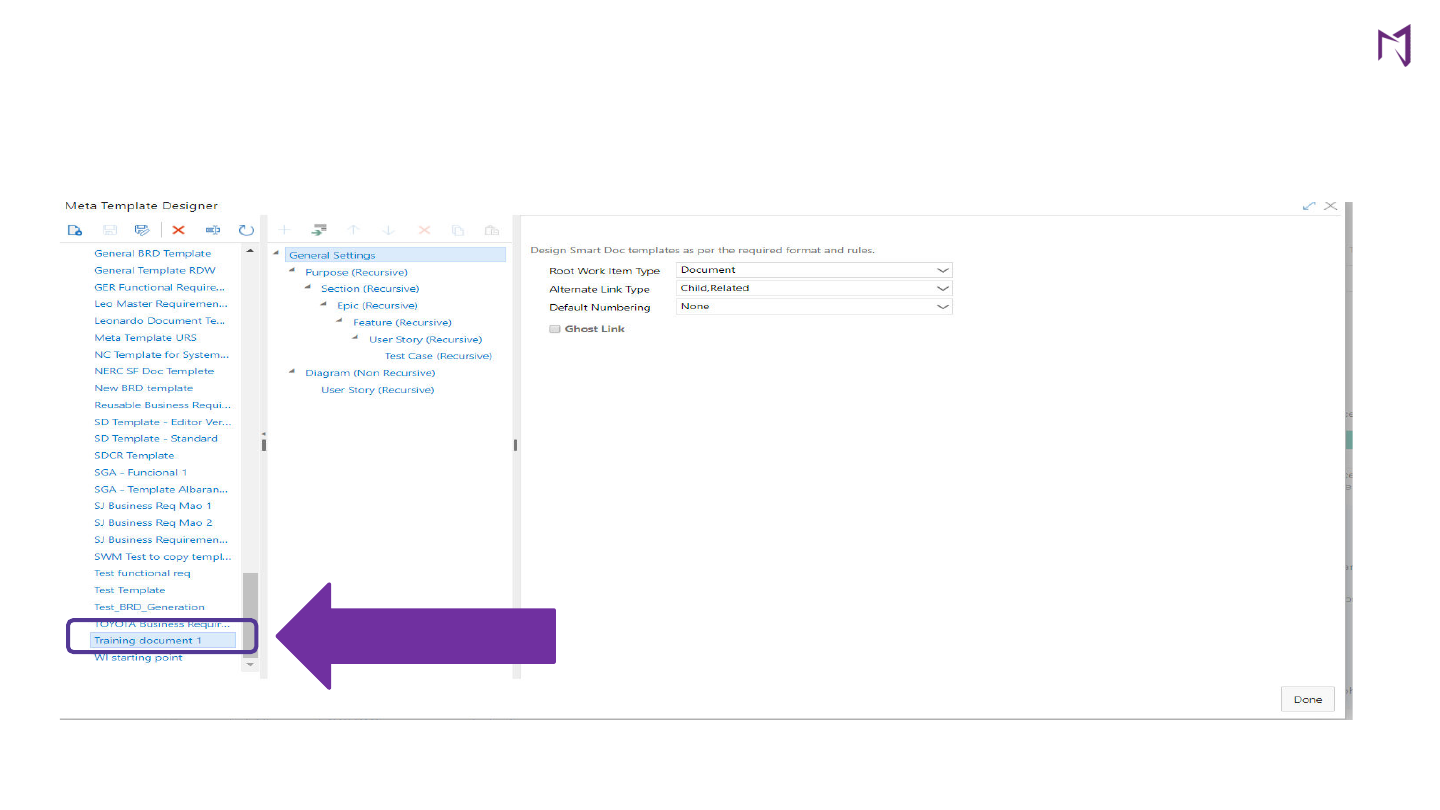
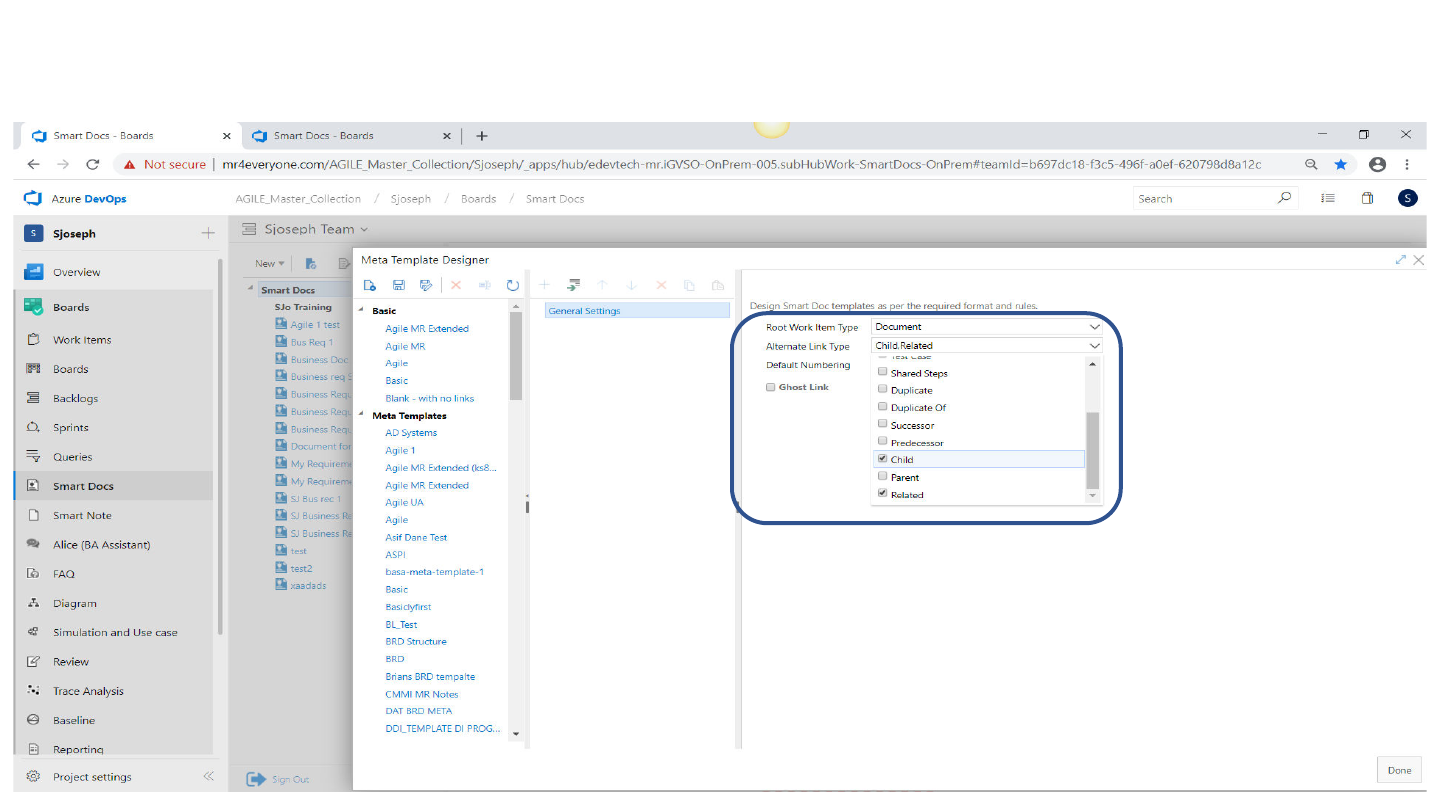
Ø Clicking OK will prompt General settings window.
Ø Under General Settings, you can design your template based on your requirement needs
For example, here are some suggestions:
o Root Work Item Type: “Document” (recommended)
o Alternate Link Type choose: Child/Related (recommended)
o For Default Numbering: None (recommended)
o Ghost Link: Leave unchecked (unless required) (recommended)
What is Ghost Link?
It allows you to create a work item without any links. Typically is used for structural
persistence, but linking of the work items is done the way user would like it to be.
Watch this webinar recording for further details:
https://www.modernrequirements.com/deep-dive-webinar-series/working-smarter-with-smart-docs/
How to create a Meta Template
How to create a Meta Template

Ø After setting your General setting you are now ready to configure work items
Ø To start adding work items click on the Add Child tab
How to create a Meta Template
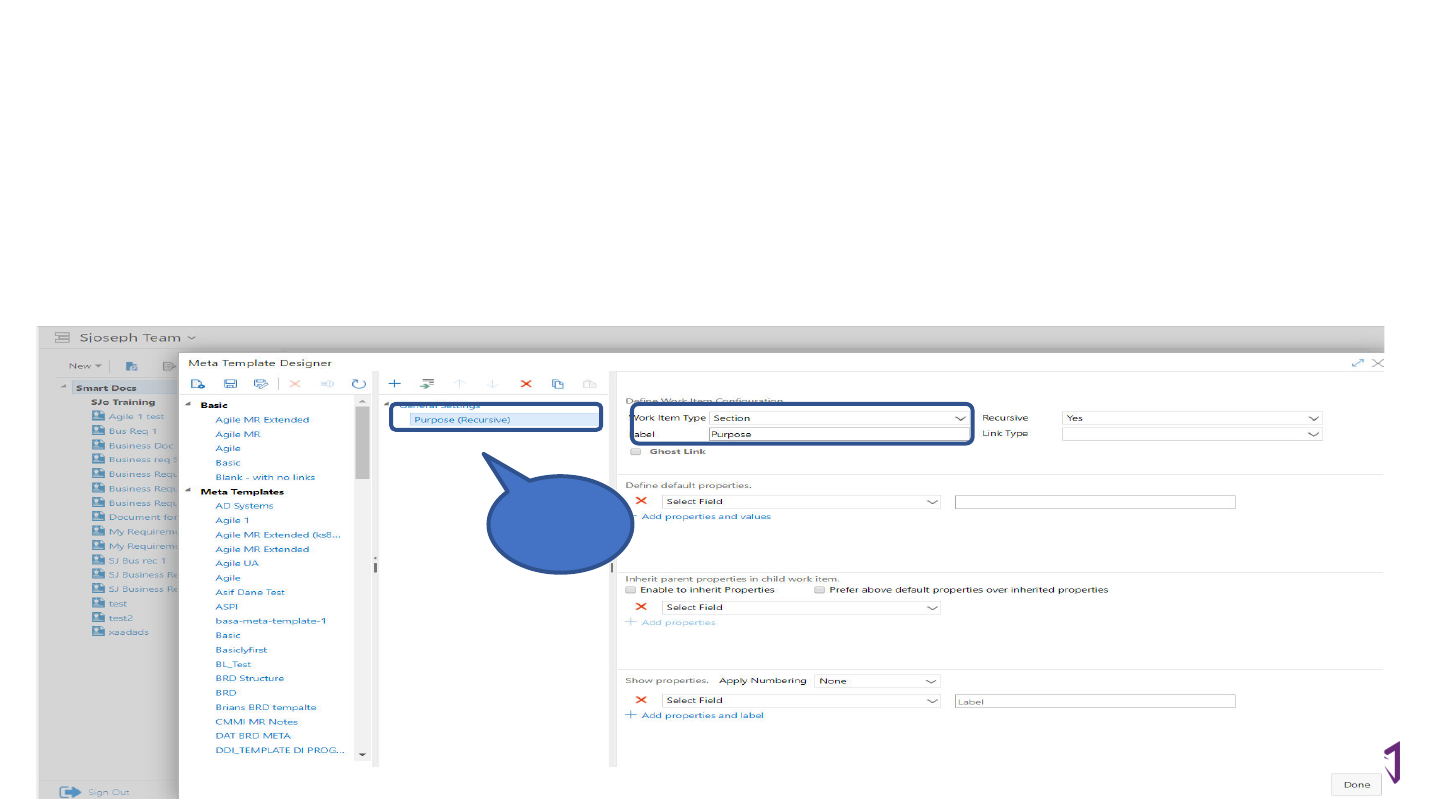
Ø After selecting add child work item, choose a work item type on the right pane of
this window.
Ø You may rename any work item by adding a different name in the label field. The
name will appear in the left pane.
Note: Remember this is where you can choose your first work item as section (as recommended)
Name
change
as per
label
How to create a Meta Template
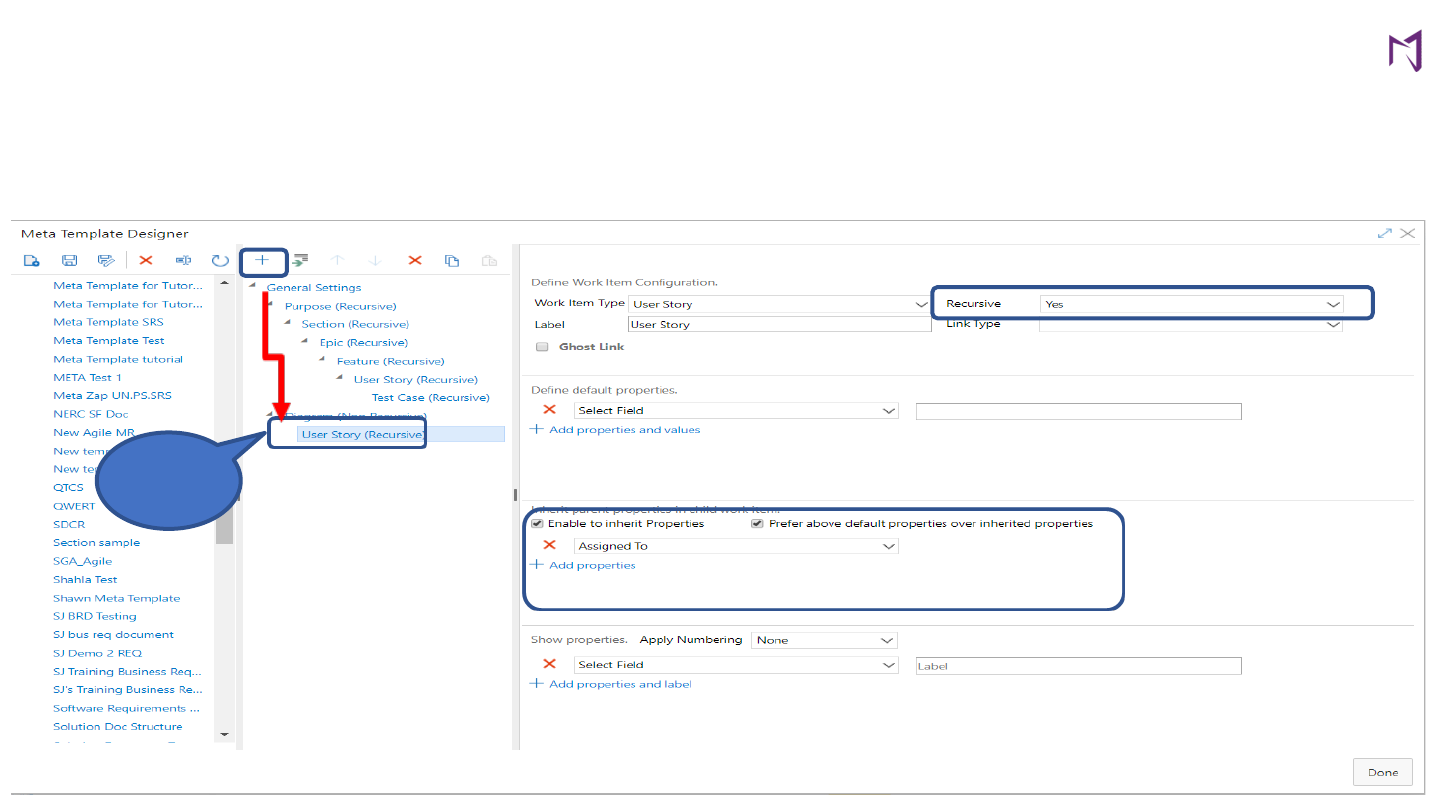
Ø Add Sibling work item by selecting the “+” sign
Ø Choose to inherit parent properties or individual properties for child work items
Ø Choose if a work item should be recursive or non-recursive
Sibling
work
item
How to create a Meta Template
How to create a Meta Template
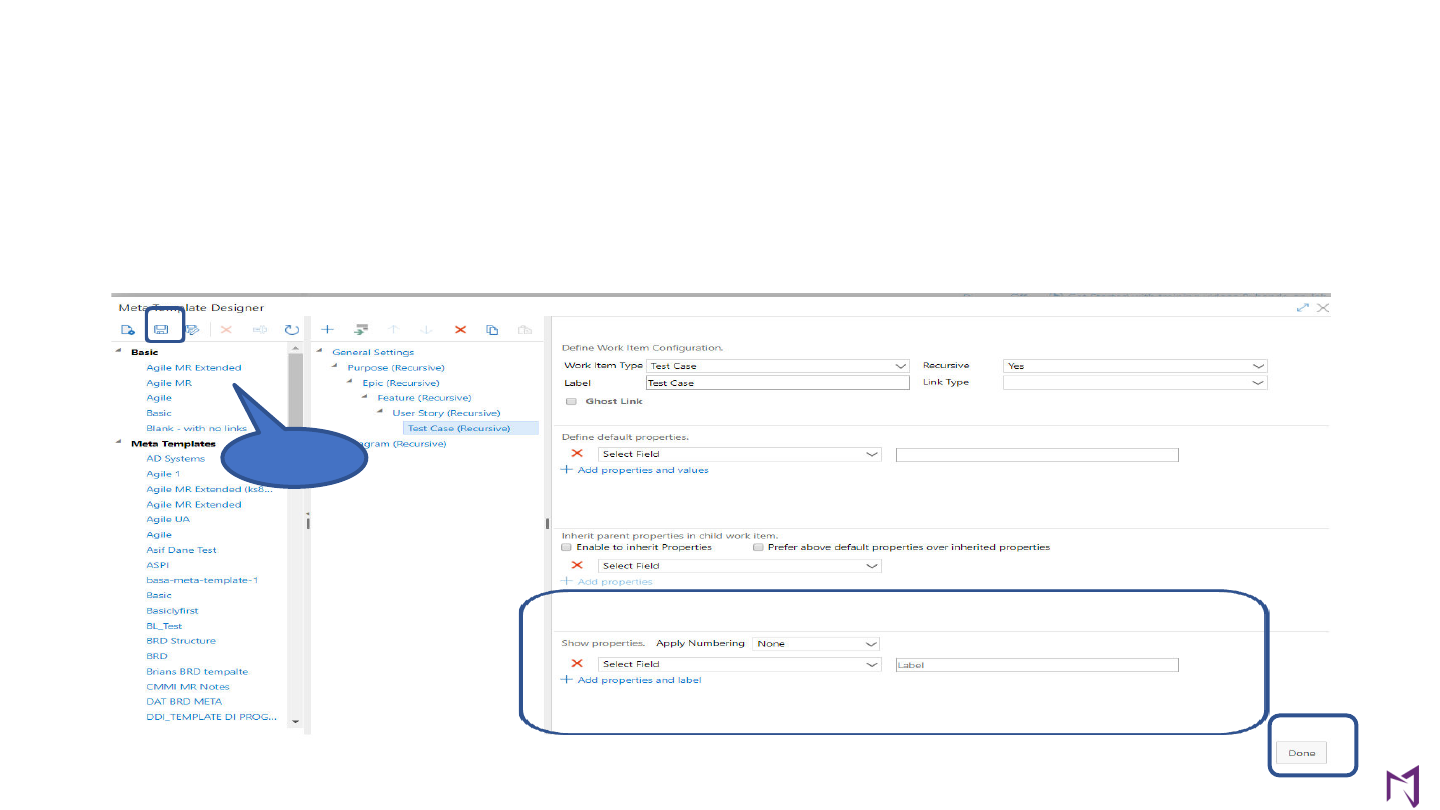
Ø You may select individual properties for each work item
Note: These properties will show up in the UI of the Smart Doc for that individual work item
Ø Once completed, click on the Save tab to the top left of the screen and hit done at the bottom right
corner.
Save
icon

Smart Report Creation

How to create Customized Output for Smart Doc
You can generate a customized output by using Smart Report.
Step-by-step:
- From smart report go to “Designer tab”
- Identify how you would like to customize your report (by running a basic report in form report part
format)
- Choose your work item that you want to show based on your Smart Doc.
- Add levels based on your Smart Doc
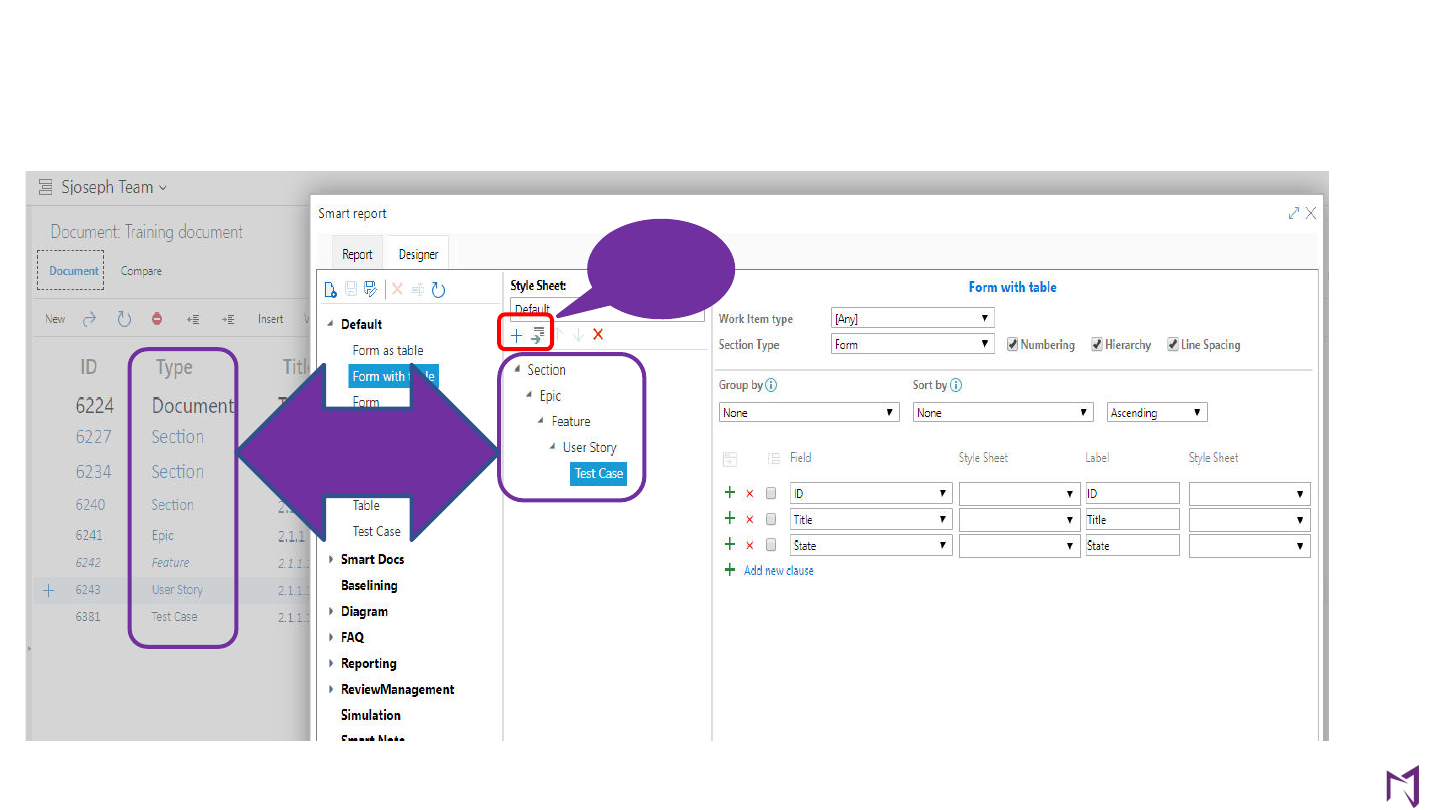
- Use the arrow button to add sub-sections and + to add Sections
- Name each section based on the work items in the output report
For example:
1- Section (Section by using + sign )
> Epic (Sub section by using green arrow)
> Features
> User Story
> Test Case
- Once the items have been added hit save and name your smart report
Note: you don’t need to add recursive items as smart report will treat work items at the same level the same i.e. if you have more
than one Section work item in your document, you only need to add it once.
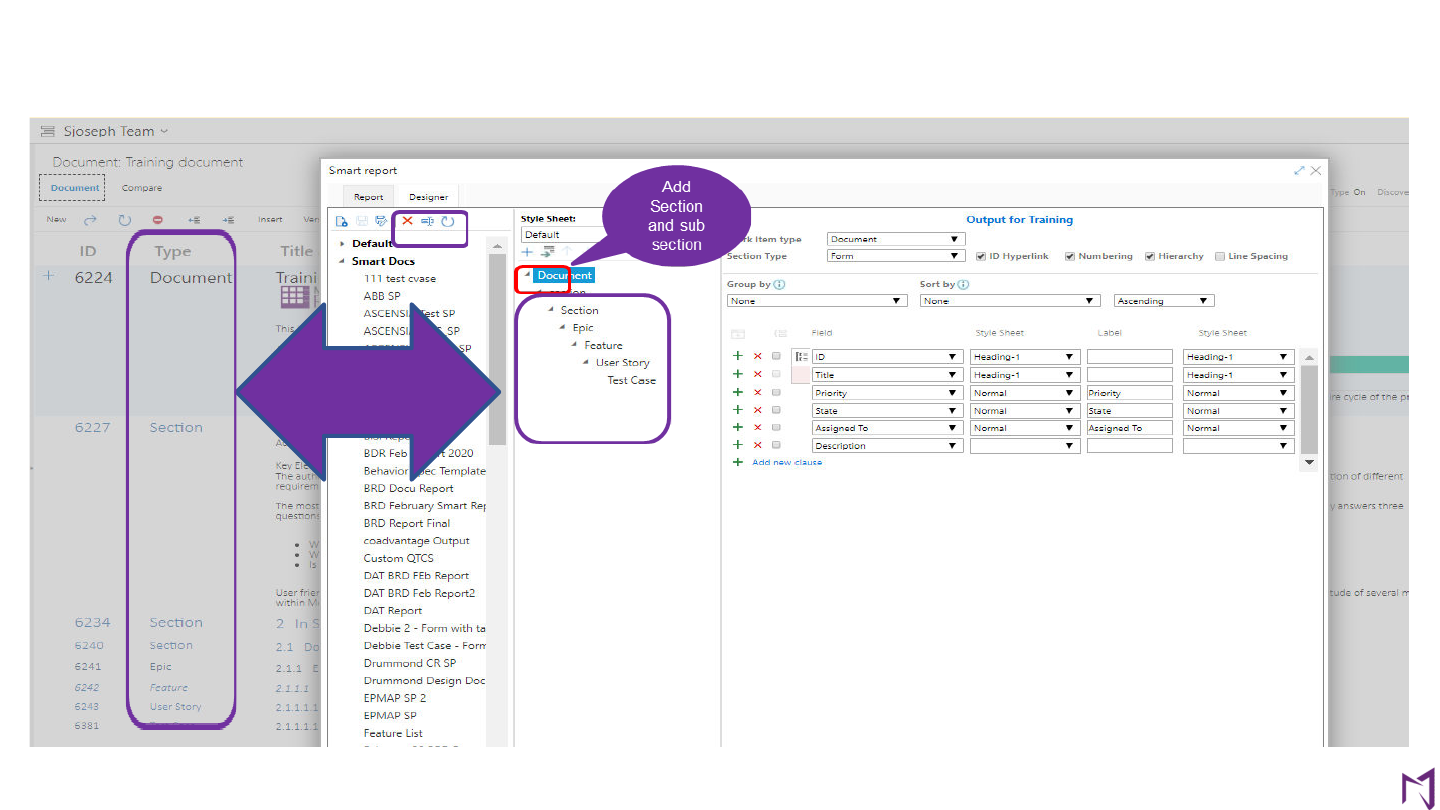
Sections /sub
created based on
Smart Doc work
item type
Add
Section
and sub
section
How to create Customized Output for Smart Doc
Sections /sub
created based on
Smart Doc work
item type
How to create Customized Output for Smart Doc
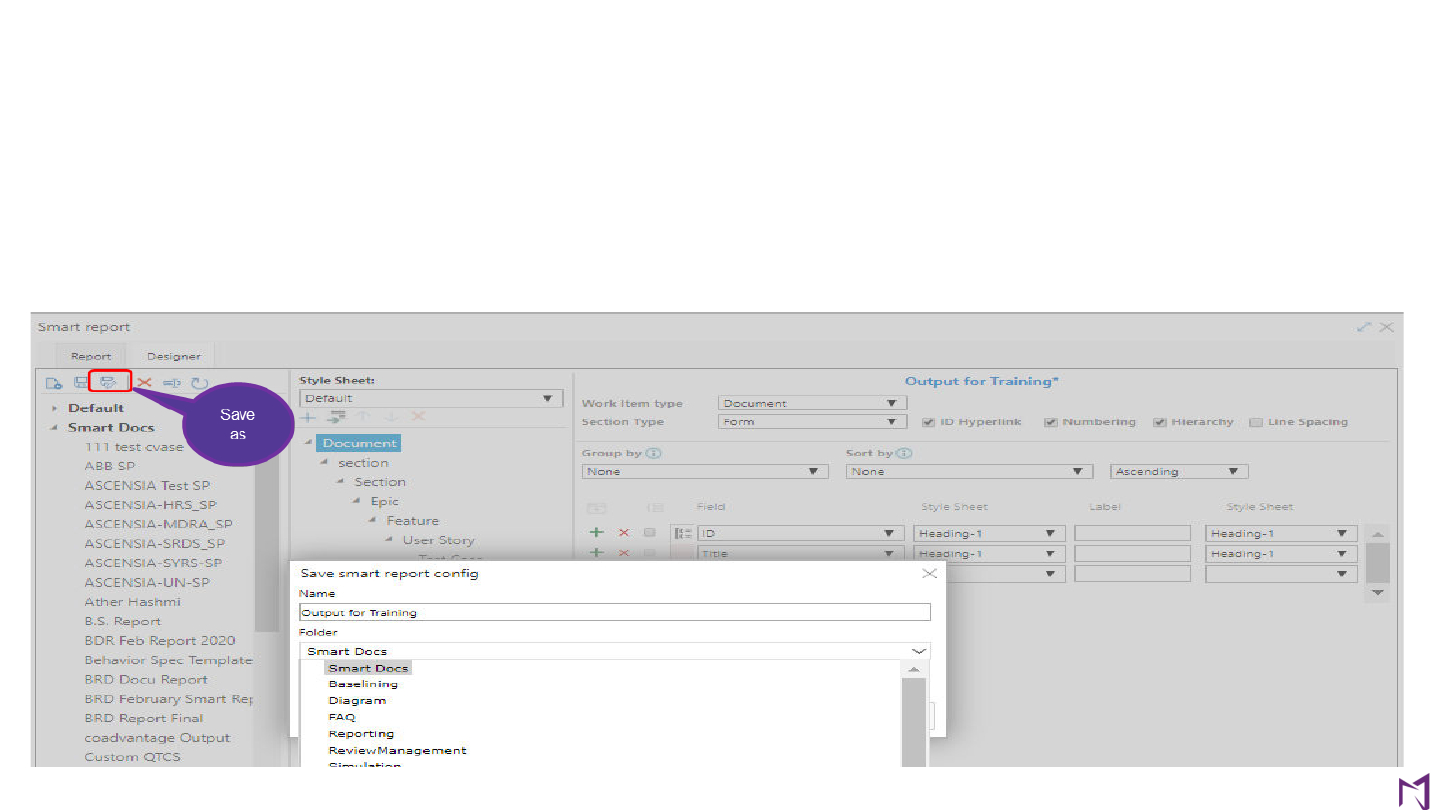
- Once you have selected all the sections / sub sections click on “Save As” button to save
your newly created smart report template
- Name your smart report
- Save it under “smart doc” folder
Note: this template can be used by any user globally
How to create Customized Output for Smart Doc

- Once the Smart Report has been saved go back to Report tab
- Click on “Generate Report” so see how your smart doc output would appear
How to create Customized Output for Smart Doc
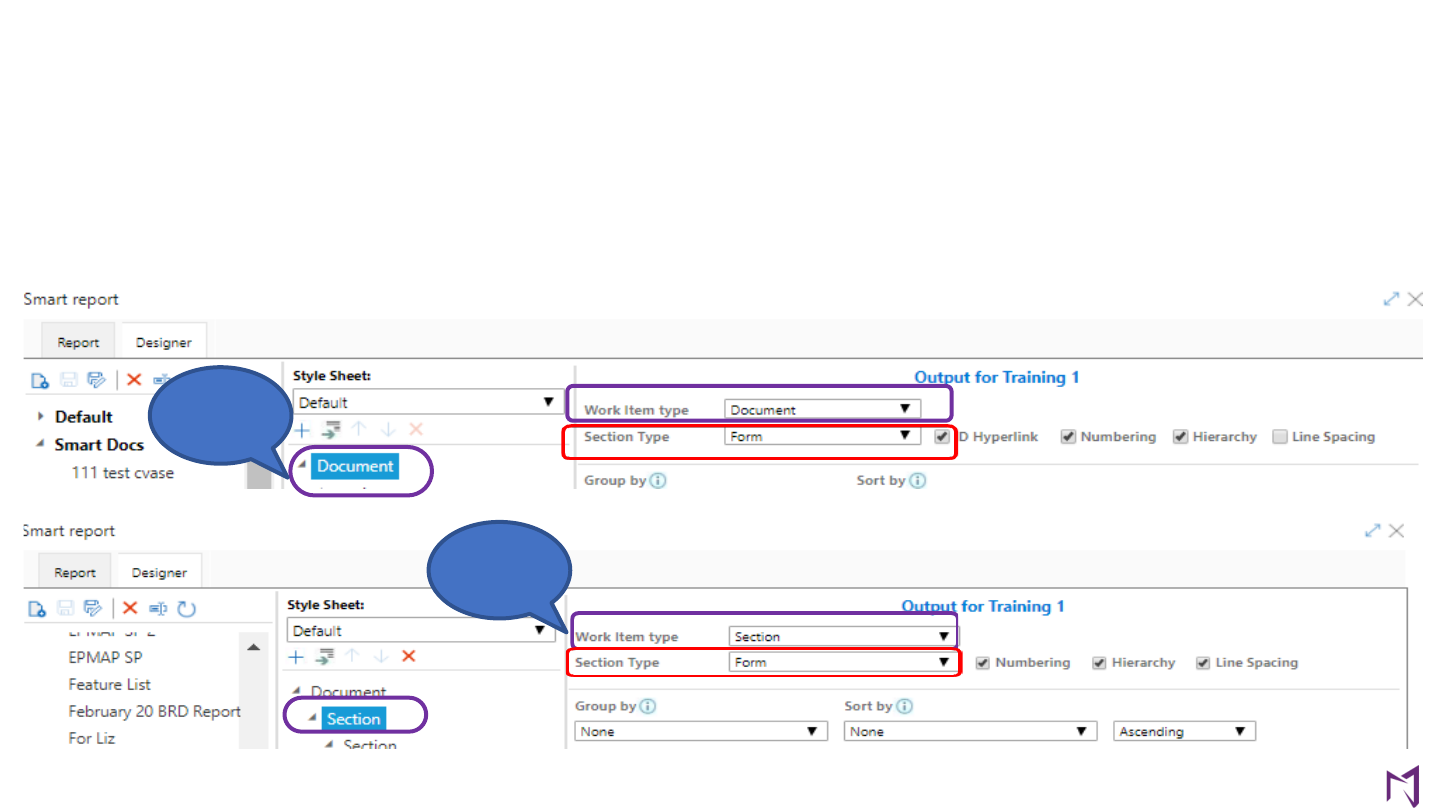
You can now further customize your report based on your desired output within the Designer Tab.
Step-by-step:
1 - Change the names to the section items based on your work items (optional)
2 - Name each one of the Work Item fields based on the section / sub sections created
3 - Select section type – Typically Form is used for most work item types, unless a table is required
Note: Repeat this step for all work items
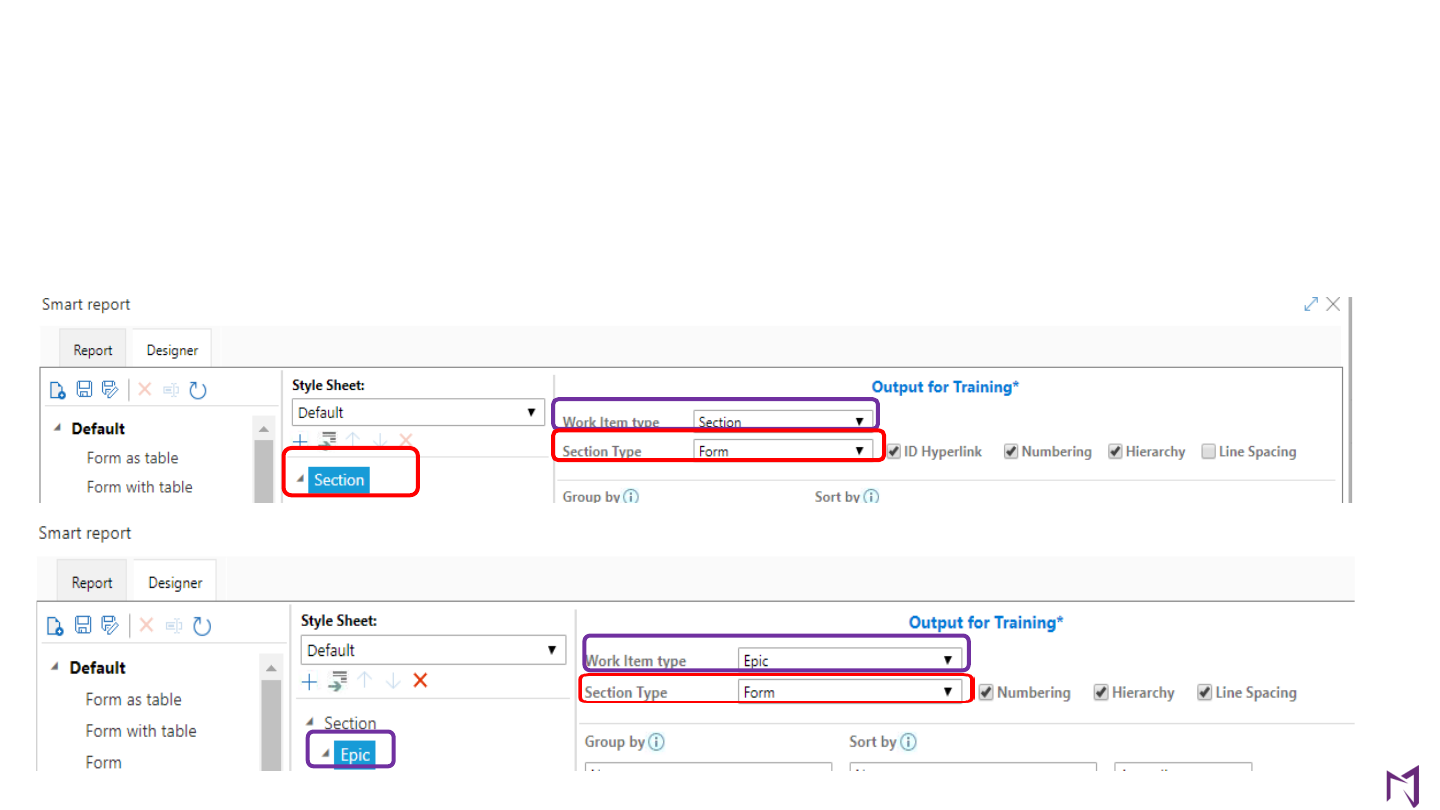
How to create Customized Output for Smart Doc
You can now further customize your report based on your desired output within the Designer Tab.
Step-by-step:
1 - Change the name of by double clicking the Section items based on your work items (optional)
2 - Name each one of the “Work Item field” based on the smart doc configuration
3 - Select section type – Typically Form is used for most work item types, unless a table is required
Section
/sub
section
item
Name
work
Item
Type
Note: Repeat these steps for all work items
How to create Customized Output for Smart Doc
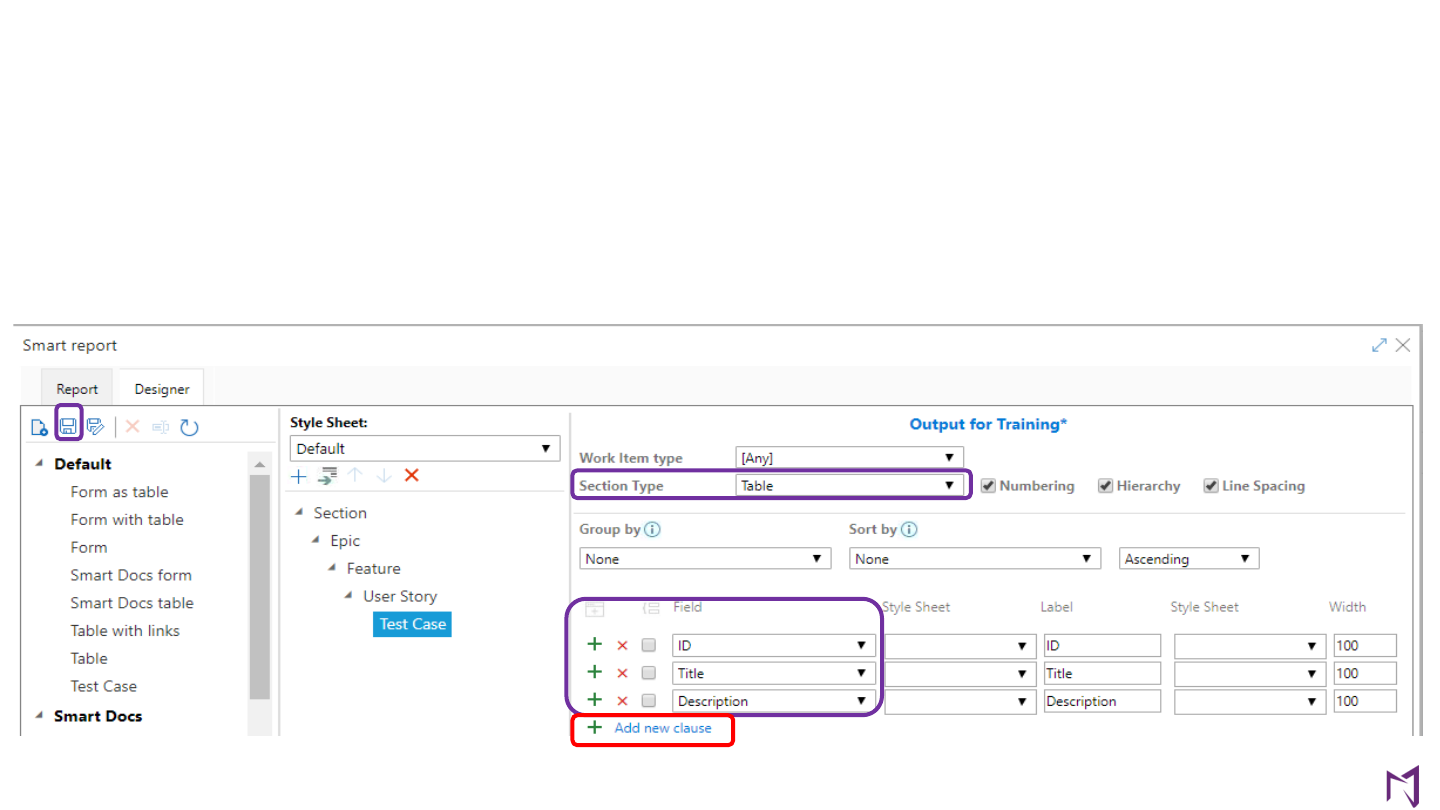
q Select fields for all work items (fields that would appear in your report/word document)
q Select fields based on your output document needs (general practice choose following)
1 – ID
2 – Title
3 – Description
q You can add additional fields by clicking on
“+ Add new clause”
option
Note: please ensure to save your changes by clicking on the save button to the left of screen
How to create Customized Output for Smart Doc
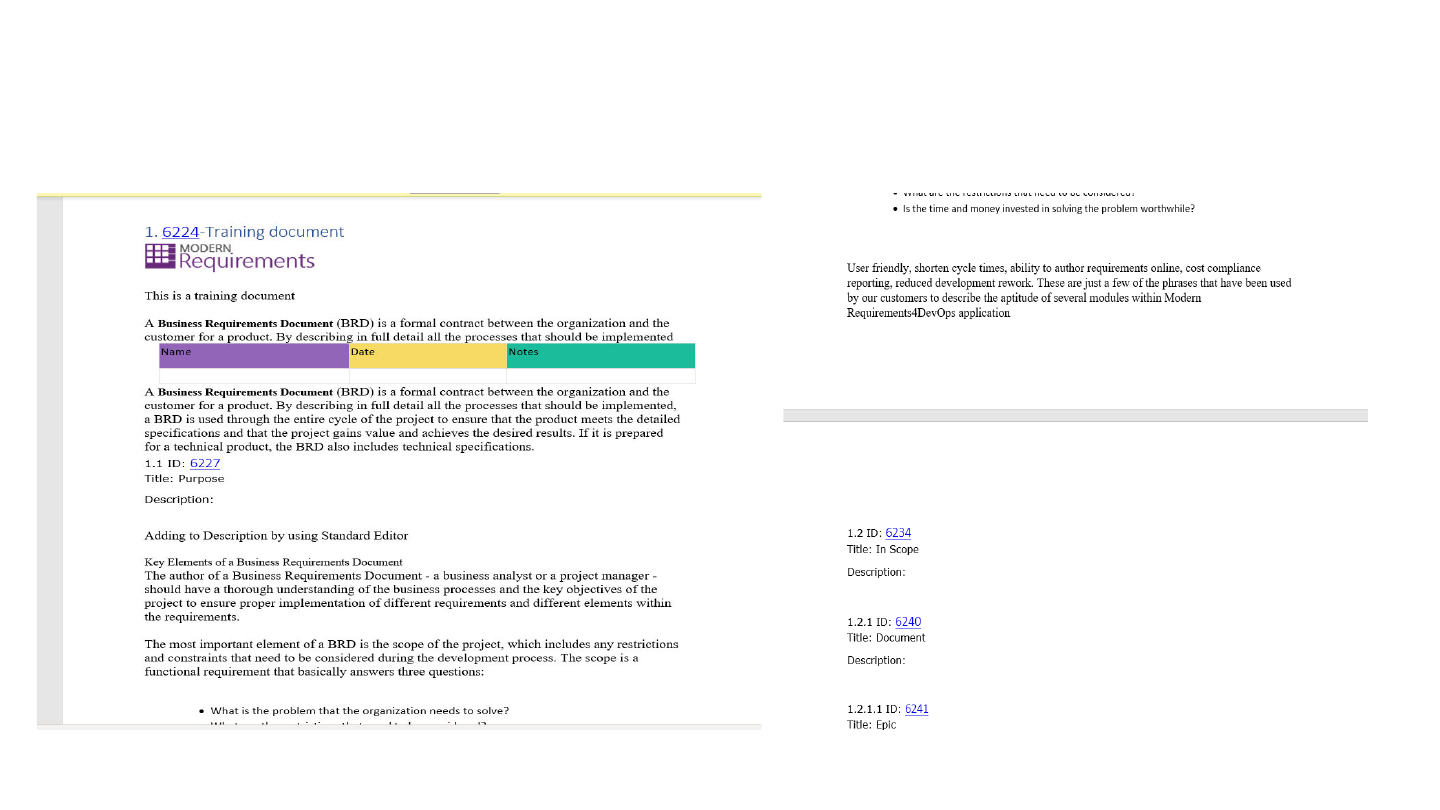
• You can now generate your report – (Below is the first half of the report)
How to create Customized Output for Smart Doc

(Below is the second half of the report)
Table selection
type
How to create Customized Output for Smart Doc
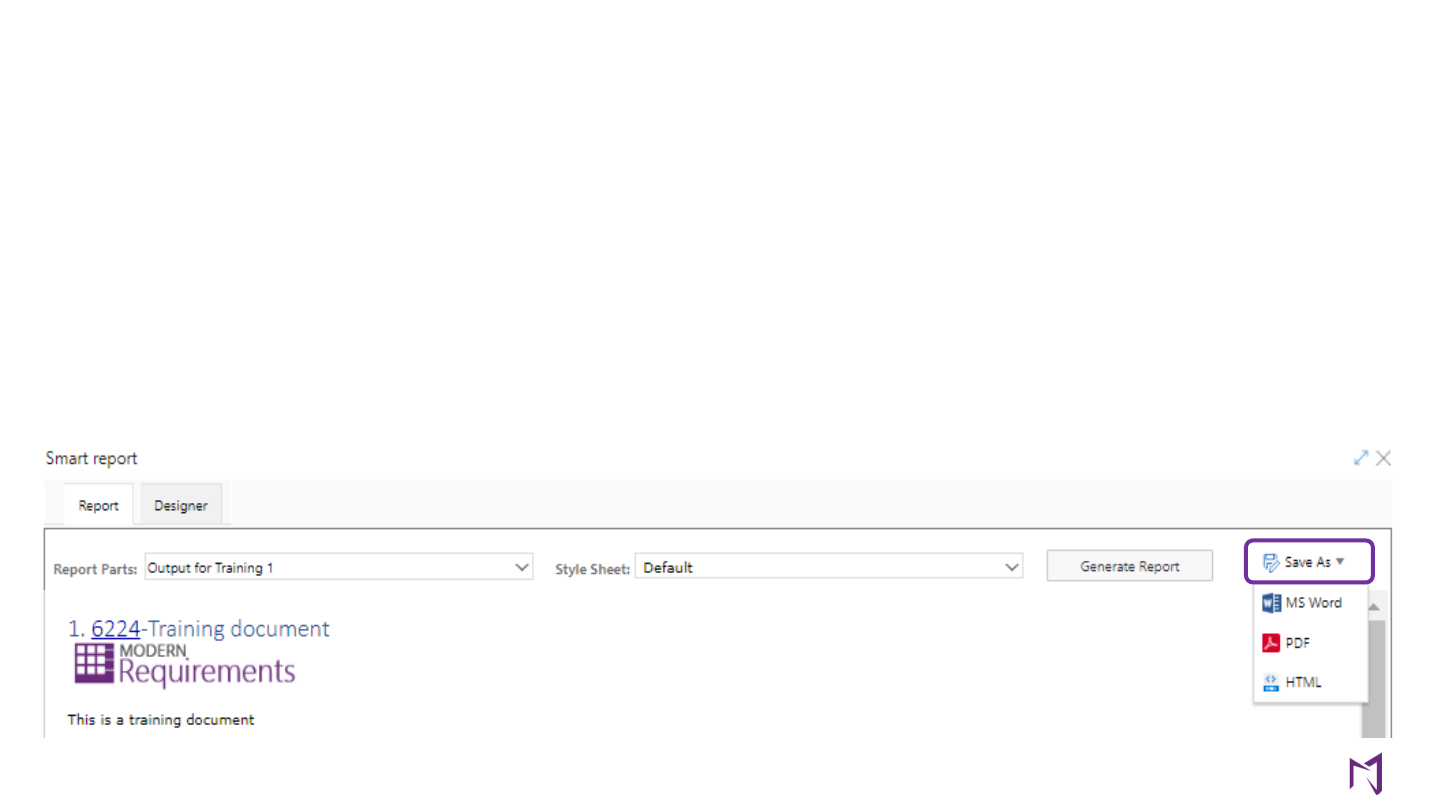
How to Export Smart Report (Output)
You can export your output in three ways:
• MS Word
• PDF
• HTML
Step-by-step:
- From Report tab click on desired “Save As” format
- Select desired format
Note: for MS Word you can upload to a blank template or to a customized template.
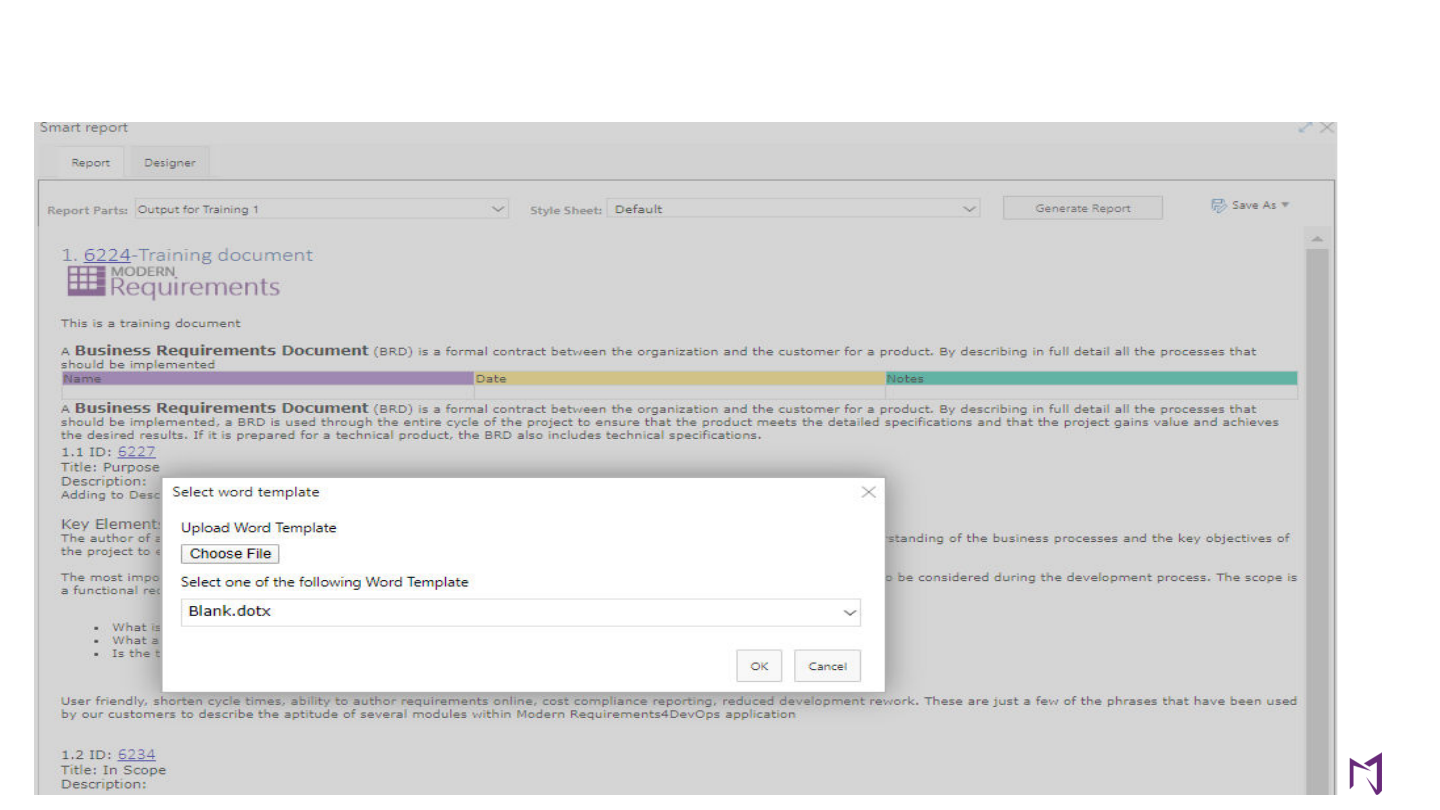
How to Export Smart Report (Output)
You may configure word document as needed.
For example: add table of contents – page numbers etc.
How to Export Smart Report (Output)

New Features: Smart Docs
New features have been added to Smart Docs:
o Full Screen Support
o Inherit Parent Properties Update
o Right Panel UI Update
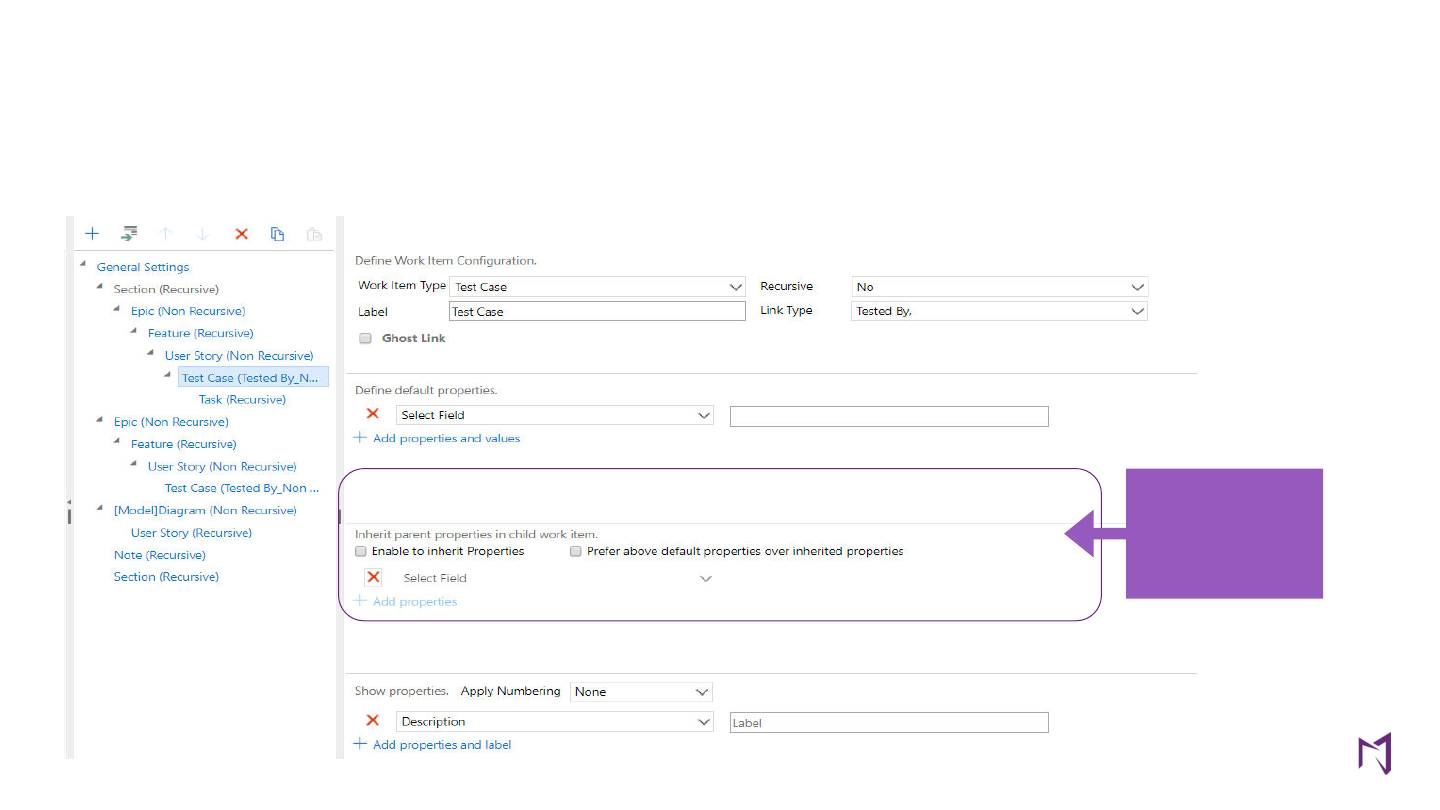
Unchecked by
default
By default, the check box to inherit parent work item properties in child work item will be shown ‘un-checked’ and if
no properties are selected from the “Properties Drop-down” then no property will be inherited in the child work
item.
Smart Docs
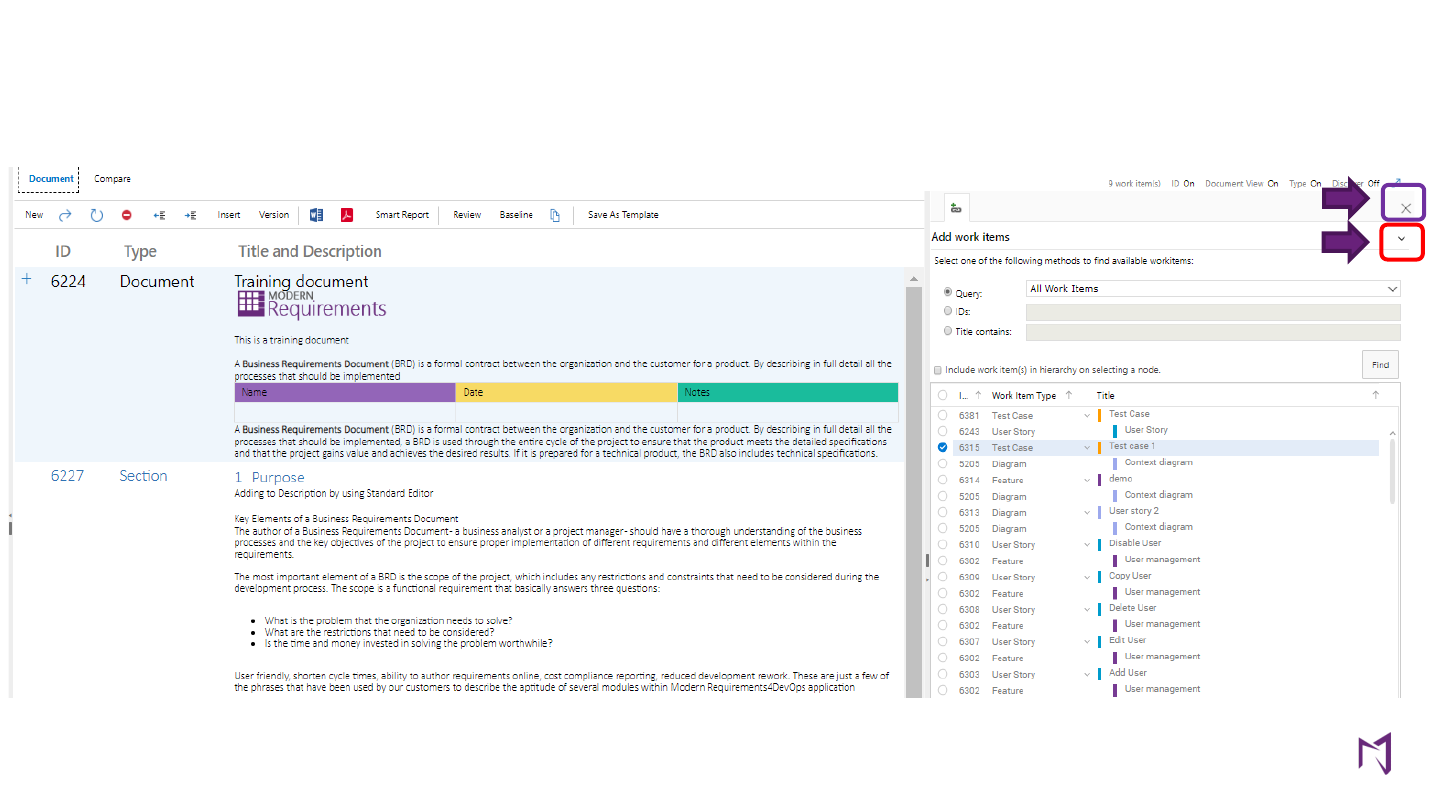
1- Users can close the right panel directly through the cross icon available at the top right-hand corner
2 - Users can also expand/collapse the ‘find query’ area for a better user experience.
1
2
Smart Docs
