
EZWrite 6
User Manual
Interactive Whiteboarding Software
V 5.1
i
Copyright and disclaimer
Copyright
Copyright 2024 BenQ Corporation. All rights reserved. No part of this
publication may be reproduced, transmitted, transcribed, stored in a
retrieval system or translated into any language or computer language,
in any form or by any means, electronic, mechanical, magnetic, optical,
chemical, manual or otherwise, without the prior written permission of
BenQ Corporation.
Disclaimer
BenQ Corporation makes no representations or warranties, either
expressed or implied, with respect to the contents of this document.
BenQ Corporation reserves the right to revise this publication and to make
changes from time to time in the contents thereof without obligation to
notify any person of such revision or changes.
The screenshots in this document are for reference only and may differ
from the actual design.
This document aims to provide the most updated and accurate information
to customers, and thus all contents may be modified from time to time
without prior notice. Please visit the website for the latest version of this
document.
Table of contents
Copyright and disclaimer .................................................................i
Introduction .................................................................................... 1
Access different platforms .......................................................................1
Save personal EZWrite settings with your AMS account .......................2
Interface overview .....................................................................................3
Settings .......................................................................................... 4
Import/export file quality ..........................................................................4
Check software version ............................................................................4
Report software issues .............................................................................4
Save files ........................................................................................ 5
Quick access to saving files ..................................................................... 5
Manage saved whiteboard files ...............................................................5
Save and share your project in different formats ....................................6
Change background....................................................................... 10
Add a custom color ..................................................................................10
Remove a custom color ........................................................................... 11
Add/Remove a custom background .......................................................11
Edit pages ...................................................................................... 12
Insert, delete or copy a page ...................................................................12
Chang page orders ................................................................................... 12
Preview canvas .............................................................................. 13
Annotation ..................................................................................... 14
Add custom colors ................................................................................... 14
Dual pen mode .........................................................................................15
Single pen mode.......................................................................................15
Turn on/off palm rejection .......................................................................16
Handwriting recognition ..........................................................................17
Shape recognition ....................................................................................18
Edit text ......................................................................................... 19
Text to speech ..........................................................................................19
Text translation language ........................................................................19
Erasers .......................................................................................... 20
Palm eraser ..............................................................................................20
Insert objects ................................................................................. 21
Add sticky notes .......................................................................................21
Adjust shapes ...........................................................................................22
Add a template .........................................................................................23
Control objects .............................................................................. 24
Editing tools .............................................................................................. 24
Detect text in an image (OCR) ................................................................. 25
Lock and unlock an object .......................................................................26
Add a hyperlink to an object ....................................................................27
Import files .................................................................................... 28
Access cloud files from EZWrite ............................................................. 28
Document camera ....................................................................................30
Add a link/YouTube link ...........................................................................31
Toolbox .......................................................................................... 32
Minimize tools ..........................................................................................33
Geometry tools ......................................................................................... 34
Scoreboard ...............................................................................................36
Random draw ...........................................................................................37
Team post .................................................................................................38
Browser ..................................................................................................... 40
Spotlight ....................................................................................................41
Calculator .................................................................................................42
Chrome browser & Google map ..............................................................42
Record video .................................................................................. 43
Live stream on YouTube ................................................................ 44
Stream settings ........................................................................................44
Cloud whiteboard .......................................................................... 46
Activate cloud whiteboard ....................................................................... 46
Join cloud whiteboard .............................................................................47
Manage participants ................................................................................ 48
Engage in class ........................................................................................51
Google Classroom in EZWrite 6 ..............................................................53
Disconnect your Classroom ....................................................................54
Function table of cloud whiteboard ........................................................57
EZ Floating Tool ............................................................................. 59
EZ Floating Tool overview ........................................................................59
Launch EZ Floating Tool ..........................................................................59
Keep EZ Floating Tool on/off screen ......................................................60
Take a screenshot with EZ Floating Tool ................................................61
Hot keys ......................................................................................... 62
Copy and paste ........................................................................................62
Connect to a second display ......................................................... 63
Recommended specifications ....................................................... 64
Supported browser version .....................................................................64
Supported file formats .................................................................. 65
Import files from local storage ................................................................65

1
Introduction
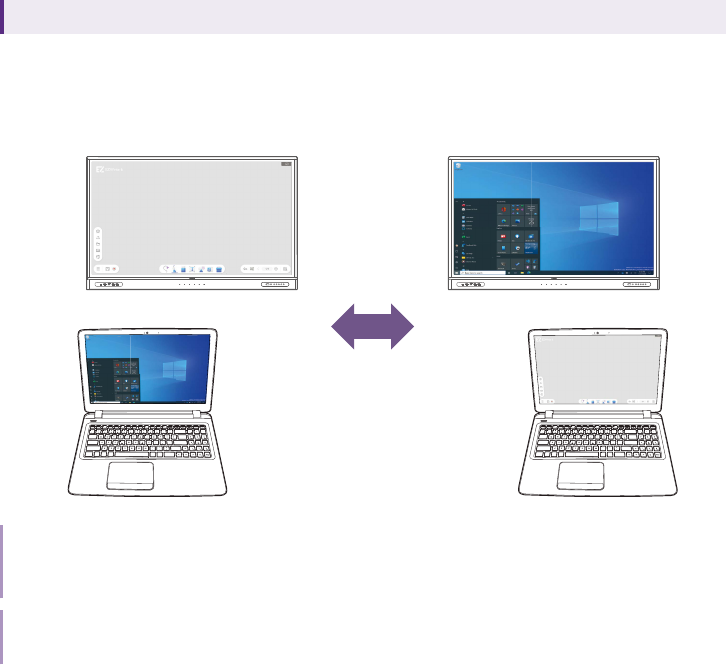
EZWrite 6 is an interactive whiteboard software solution that allows you to
turn your device into a digital canvas. EZWrite 6 supports multi-platforms
and allows users to collaborate easily with different devices.
Access different platforms
Windows &
MacOS version
Download the latest version of EZWrite from the
EZWrite 6 website. Check out Recommended
specifications before downloading the software.
Android version
(BenQ Board)
Built-in software in BenQ Board. Or go to BenQ App
Store in your BenQ Board to download.
Web version
Access the Web version of EZWrite 6 from the
EZWrite 6 website. Check out Supported browser
version before you start.
ChromeOS
version
In Google Play, search EZWrite 6 to install the
software.
Note
According to different platform limits, the function and interface of EZWrite 6 may vary.

2
Save personal EZWrite settings with
your AMS account
Supported versions: Android (BenQ Board)
By logging in to BenQ Board with your AMS account, EZWrite remembers
and saves your personal settings in the software.
Personal settings saved in each account are as follows:
• Whiteboards in the whiteboard list (see Manage saved whiteboard
files)
• EZWrite settings
• Single pen mode on/off (see Single pen mode)
• Customized pen color
• Customized background image and color
3
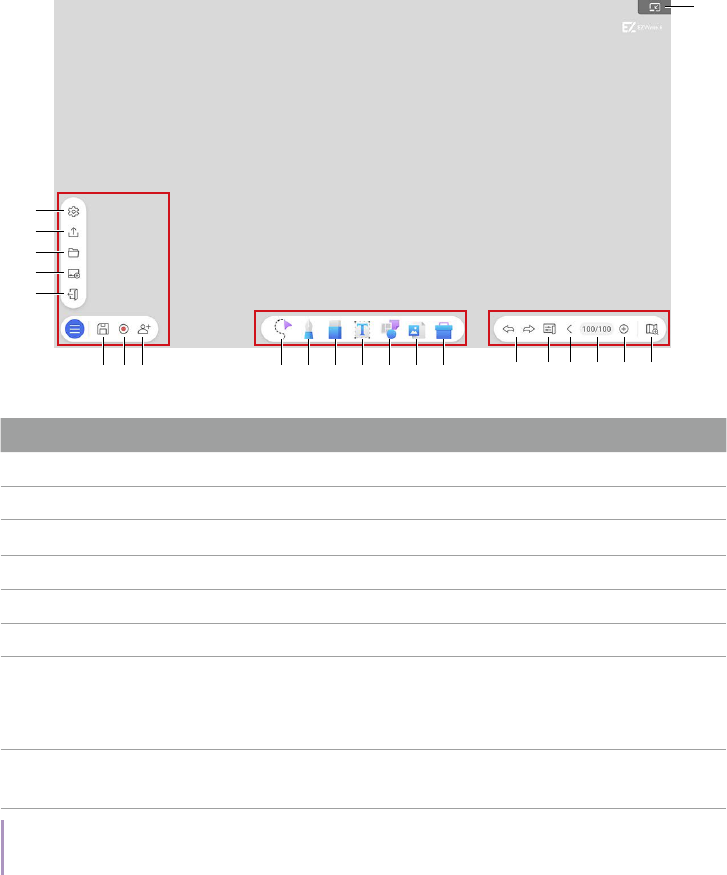
Interface overview
The interface of EZWrite 6 includes three main segments: Menu, Toolbar
and Navigation bar.
Menu
Toolbar
Navigation bar
6 9 12
18
7 10
16
13
19
8 11
17
14
20
15
21
2
1
4
5
3
22
Menu Toolbar Navigation bar
1. Settings 9. Select 16. Undo/Redo
2. Export 10. Pen 17. Change background
3. Open files 11. Eraser 18. Previous/Next page
4. New whiteboard 12. Text 19. Edit pages
5. Exit 13. Insert objects 20. Add a new page
6. Save 14. Import files 21. Preview canvas
7.
Recording
• Record video
• Go Live
15. Toolbox 22. Minimize window*
8.
Create cloud
whiteboard
Note
* Windows version only. See Launch EZ Floating Tool for details.

4
Settings
Import/export le quality
In Menu > Settings > Files > Maximum import resolution/
Maximum export resolution, select Full HD or 4K.
Note
For importing or exporting a file, the file smaller than the maximum resolution will remain the same
resolution. When exceeding the maximum resolution, it will be compressed to the set value.
Check software version
Go to Menu > Settings > General > Current version to check
whether the software is up to date.
Report software issues
• In Windows version, you can submit your problems by selecting
Menu >
Settings > Report issues to export log files.
• For Android version, contact BenQ Support for help.
5
Save les
Quick access to saving les
For Windows, macOS, Web, ChromeOS version
Select Save to save the session as .ezwrite.
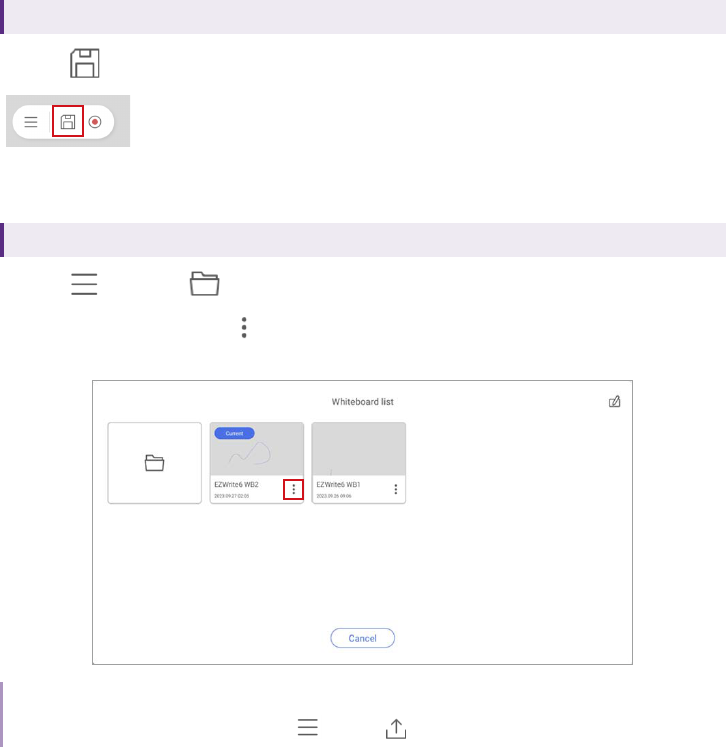
Manage saved whiteboard les
For Android (BenQ Board) version
Select Menu > Open files to find the automatically saved project.
• For each file, select
More to rename, delete or save the file as IWB/
EZWrite format.
Tip
To save your file in other formats, go to
Menu > Export.

6
Delete multiple whiteboard les
To delete multiple projects at once:
1. Select
Edit.
2. Select the projects you want to remove from the Whiteboard list.
3. Select Delete.
Save and share your project in
different formats
• Save as IWB/EZWrite
• Save as image/PDF
• Share by QR code
• Share by e-mail
• Share by print
7
Save your project as .iwb/.ezwrite
Supported versions: Windows, macOS, Android (BenQ Board), Web, ChromeOS
Select Menu > Export to save your project as IWB or EZWrite
format if you need to edit contents on the whiteboard in the future.
File differences between IWB & EZWrite format
Format Description
EZWrite (.ezwrite) Completely compatible with EZWrite 6.
IWB (.iwb)
Few objects can't be saved and reloaded for future
editing:
• Sticky notes and 3D shapes
• YouTube link
• URL link (Bookmark)
• Google Classwork
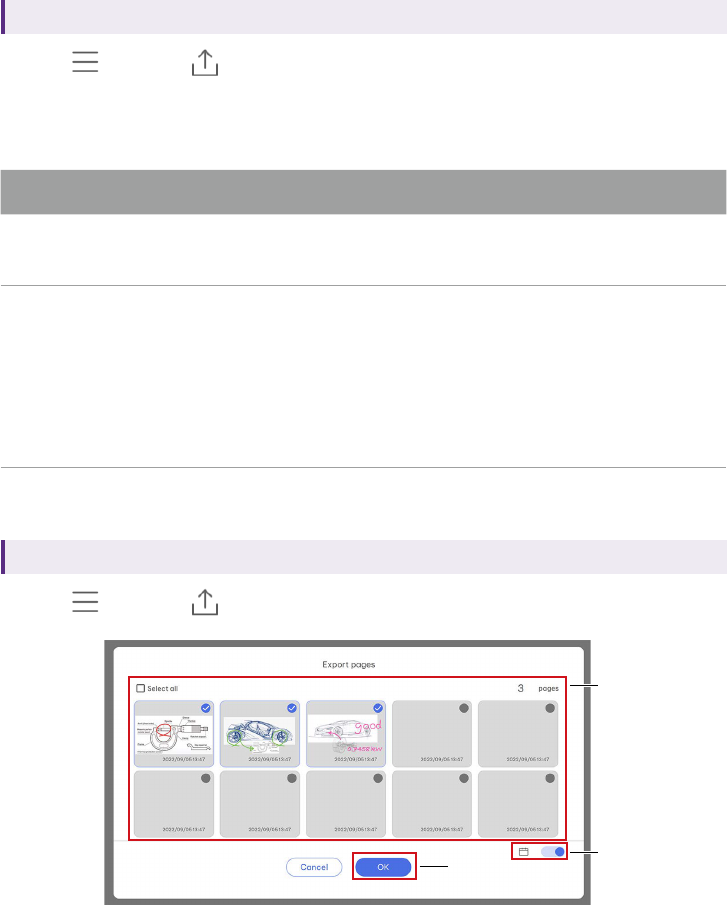
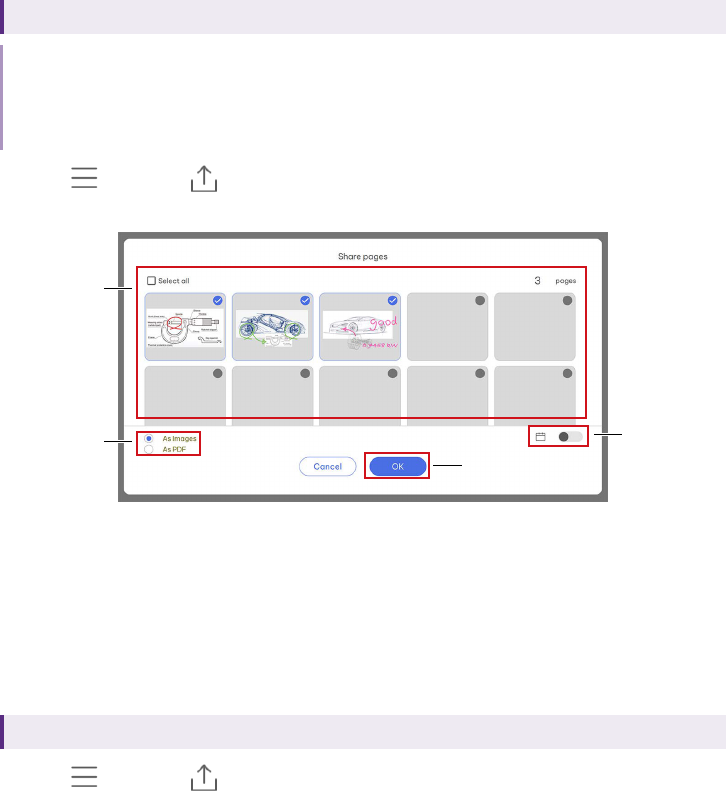
Save your project as image/PDF
Supported versions: Windows, macOS, Android (BenQ Board), Web, ChromeOS
Select Menu > Export to save your project as image or PDF.
1
2
3
1. Select the pages you want to save.
2. Enable/disable time stamp on your project.
3. Select OK to save.
8
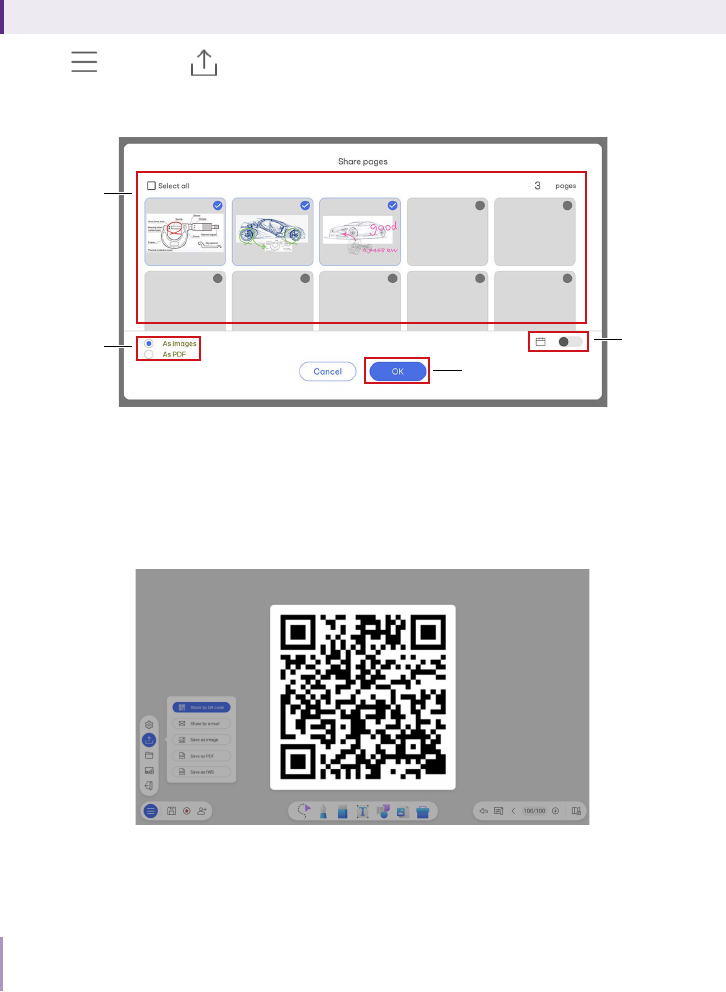
Share your project by QR code
Supported versions: Windows, macOS, Android (BenQ Board)
Select Menu > Export > Share by QR code to save the file in the
cloud for download.
1
2
4
3
1. Select up to 30 pages to share.
2. Choose to save as image or PDF.
3. Enable/disable time stamp on your project.
4. Select OK to generate the QR code.
Scan the QR code with a mobile device and the image/PDF will appear on
the device’s default web browser. Follow the browser’s saving procedure to
save the file.
Note
Files shared via QR code are available for download within 30 minutes only.
9
Share your project by e-mail
Supported versions: Windows, Android (BenQ Board: EDLA)
Note
Compatible e-mail software:
• Windows version: Microsoft Outlook
• Android (BenQ Board: EDLA) version: Gmail
Select Menu > Export > Share by e-mail.
1
2
4
3
1. Select up to 30 pages to share.
2. Choose to save as image or PDF.
3. Enable/disable time stamp on your project.
4. Select OK to open the email application on your device.
Share your project by print
Supported versions: Android (BenQ Board: non-EDLA)
Select Menu > Export > Share by print to connect with instaQPrint,
an app pre-installed on non-EDLA BenQ Board.

10
Change background
Select Change background to change the EZWrite background.
3
2
1
1. Patterns
Apply background patterns as reference lines. The patterns will not be
saved in your project.
2. Colors
Save up to 10 colors for later use. See Add a custom color and
Remove a custom color for details.
3. Background images
Choose from a collection of backgrounds. Or select
to add your
own. See Add/Remove a custom background for details.
Add a custom color
1
2
1. Select Add custom colors .
2. Use the color panel to select a color.
3. Select Save. The chosen color will appear in the color list.
11
Remove a custom color
2
1
1. Right-click a color from the color list.
2. Select
Delete to remove the color.
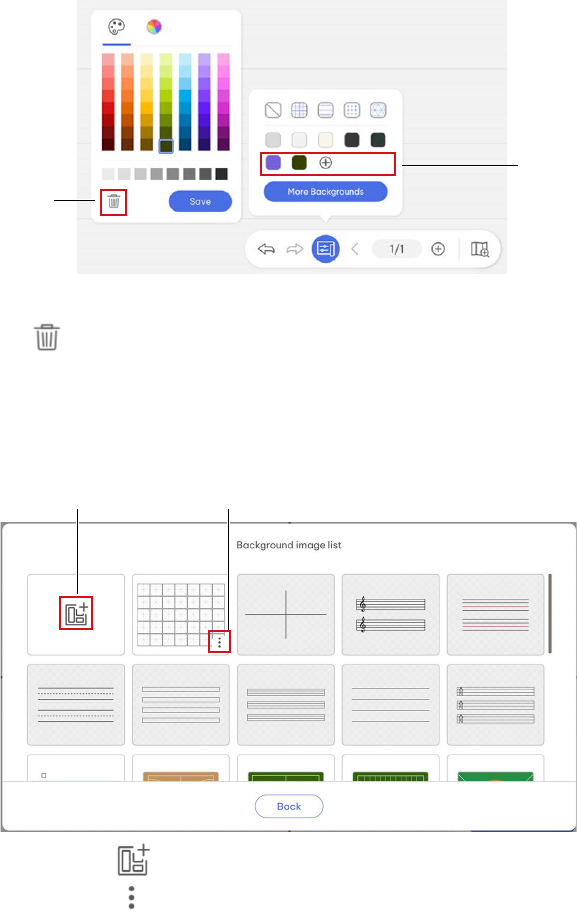
Add/Remove a custom background
You can add up to 30 custom backgrounds to the background list for quick
access.
21
1. Select the icon . Choose an image from your local storage.
2. Select the icon
on a custom background to delete the image.
12
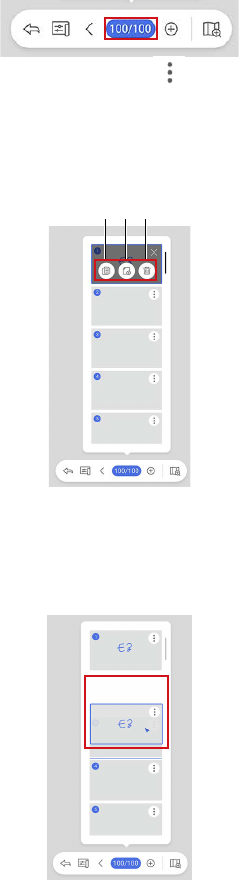
Edit pages
Insert, delete or copy a page
1. Select Page to view a list of all pages.
2. For the page you want to edit, select More for the following
options:
A. Copy the selected page and its content.
B. Insert a new page after the selected page.
C. Delete the selected page
A B C
Chang page orders
Select and hold a thumbnail for two seconds. Once the thumbnail turns
translucent, it can be moved to the desired position.
13
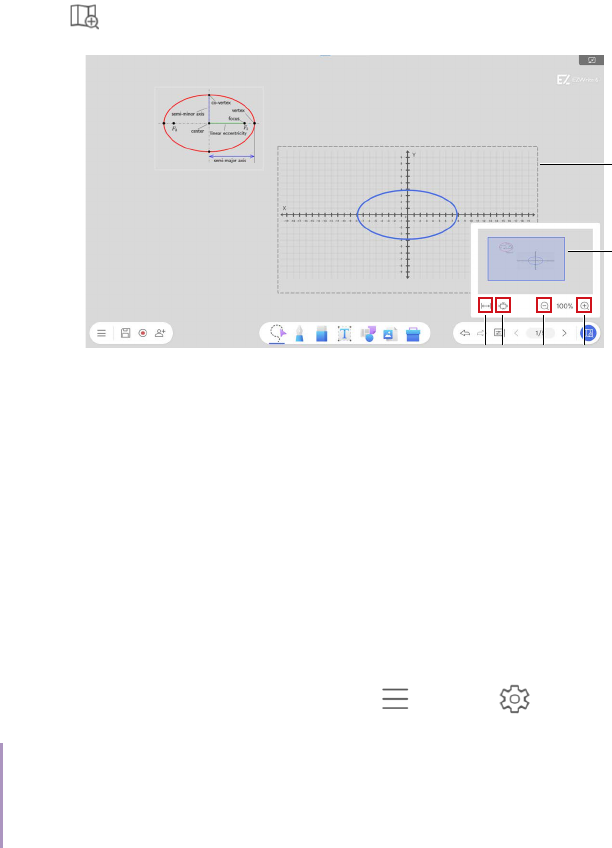
Preview canvas
Select Preview canvas to get a preview of the entire canvas.
1 2 43
5
6
1. Fit to screen
Scales the screen to show all content on the canvas.
2. Default
Sets the screen back to the original scale and position.
3. Zoom out
4. Zoom in
5. Blue rectangle area
Shows the area visible on the screen.
6. Default area
Outlines the original scale and position of the whiteboard. To show/
hide the default area outline, go to
Menu > Settings > General
> Outline default area.
Tip
Keyboard shortcuts for Windows
• Mouse scroll wheel: scale canvas
• Space + left mouse button: move canvas
14
Annotation
Select Pen to set the pen type, color and thickness. A total of 5 pen
types, 24 color options and 6 levels of thickness are available.
1
2
3
4
5
1. Pen
2. Highlighter
3. Dual Pen (Android only)
4. Brush (Windows*, macOS*, and Android only)
Note
* To write with the brush, make sure to connect your laptop with a drawing tablet.
5. Single pen mode (Android only)
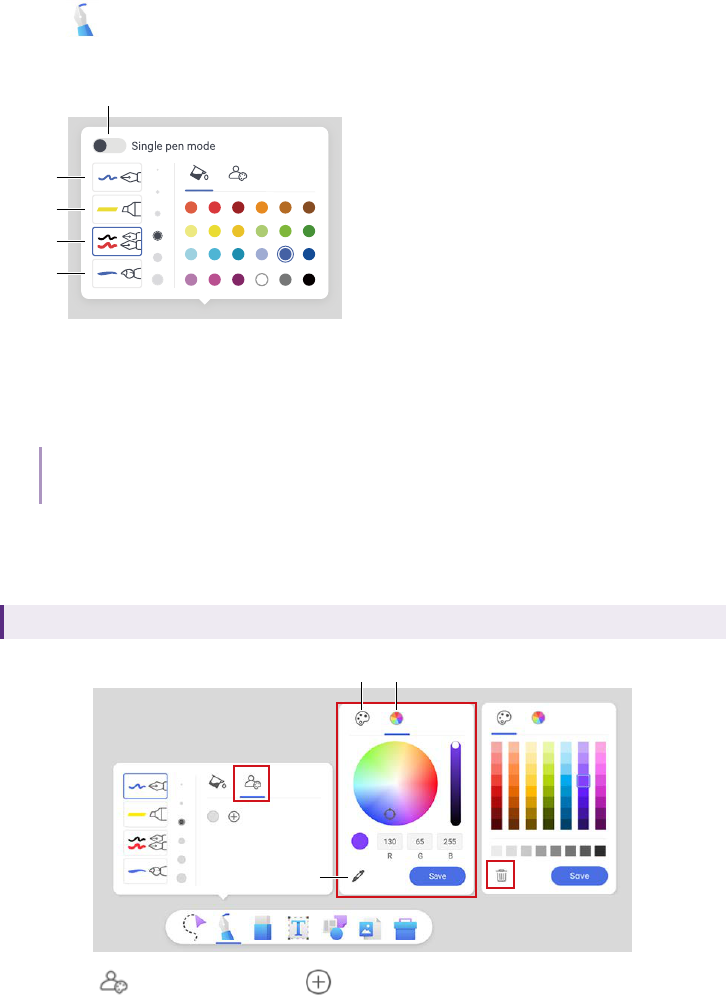
Add custom colors
Supported versions: Windows, macOS, Android (BenQ Board), Web, ChromeOS
2
1
B
A
C
3
1. Go to Custom colors > Add custom colors to add colors.
15
2. Use either tools below to choose custom colors and select Save.
A. Color swatches
B. Color wheel
C. Color picker
Note: Color picker is currently not available in Android (BenQ Board).
3. Right-click a color under Custom colors and select Delete to
remove the color from your list.
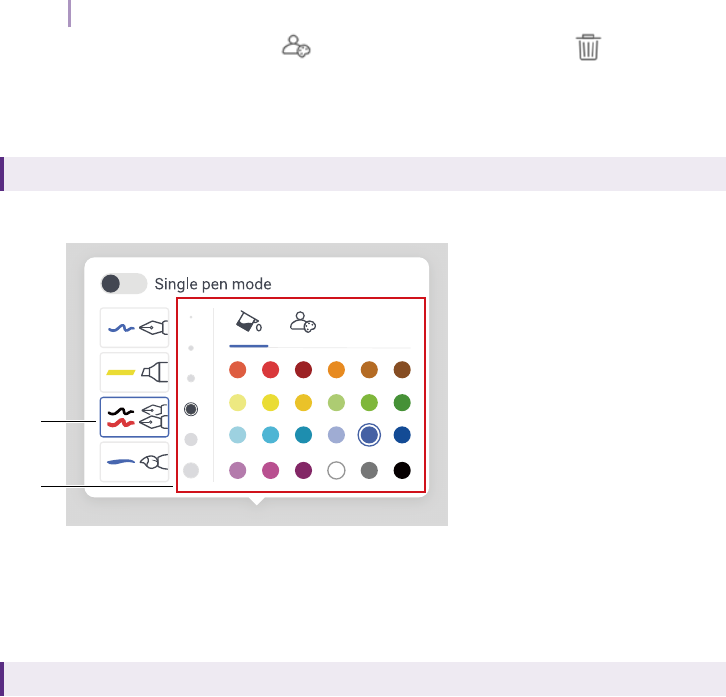
Dual pen mode
Supported versions: Android (BenQ Board)
Allows two users to write or draw with different colors simultaneously.
1
2
1. Select dual pen mode and check the color of your dual pen here.
2. Choose the color and thickness for each side of the pen.
Single pen mode
Supported versions: Android (BenQ Board)
When the single pen mode is enabled, only one user can write on the
board. Both the Dual pen and Brush modes are disabled.
In Single pen mode, the thin tip of the BenQ Board pen is for writing while
the thick tip is used as an eraser.

16
Turn on/off palm rejection
Supported versions: Android (BenQ Board)
If you want to avoid your palm or wrist from being recognized as pen, go to
Menu > Settings > General > Palm rejection to turn on the
function. In this way, palm eraser will be turned off automatically.
To turn off the function, go to the same path to disable palm rejection.
17
Handwriting recognition
Supported versions: Android (BenQ Board)
Handwriting recognition allows you to write letters on the display and
easily convert them into editable text.
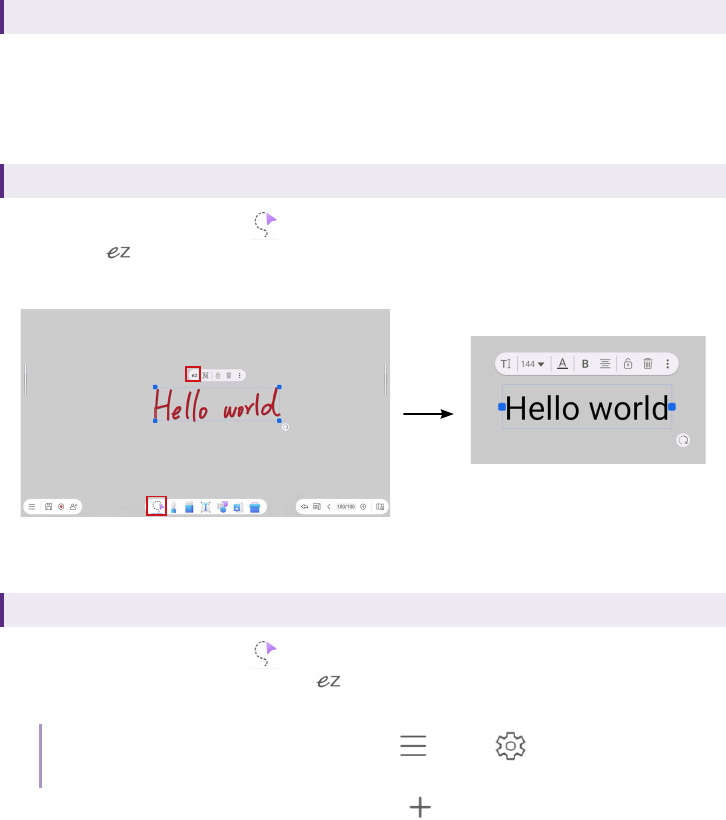
Turn writings into editable text
Supported versions: Android (BenQ Board)
1. Enter selection mode to select your writings
2. Select
Handwriting to text and wait for the annotation to turn into
text.
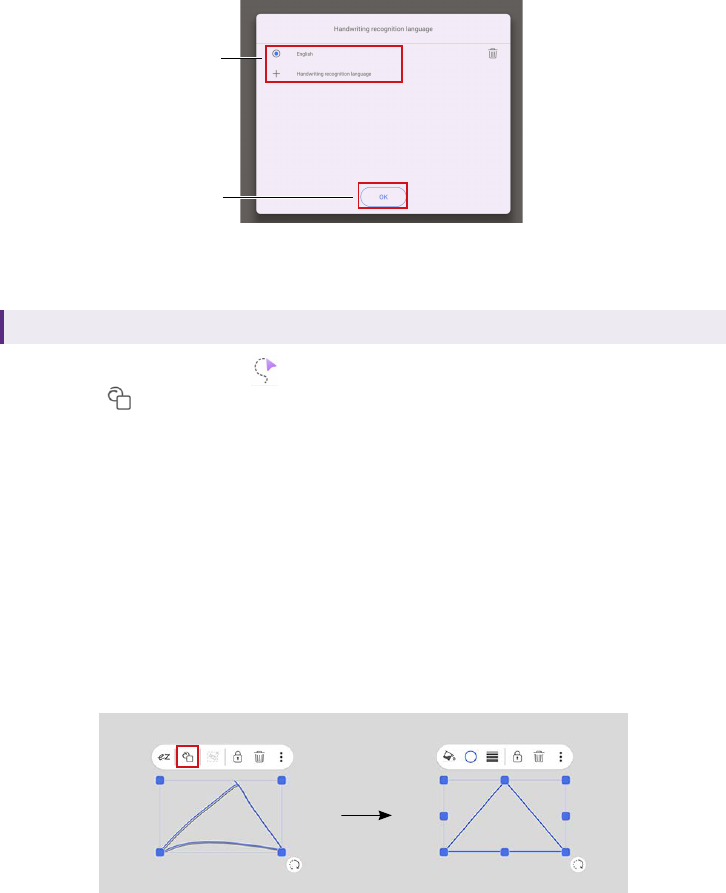
Handwriting language settings
Supported versions: Android (BenQ Board)
1. Enter selection mode to select your writings
2. In the text frame, long press
Handwriting to text to initiate language
settings.
Note: You can also find the language settings in Menu > Settings >
Handwriting and shape recognition > Handwriting recognition language.
3. Select a language on the list or select to download other languages.
4. Select OK to finish the settings.
18
2
3
Shape recognition
Supported versions: Android (BenQ Board)
1. Enter selection mode to select your drawing.
2. Select
Shape recognition and wait for the drawing to turn into
shapes listed as below.
• Line
• Rectangle
• Circle
• Triangle
• Hexagon
• Star
• Moon
• Heart
• Lightning
19
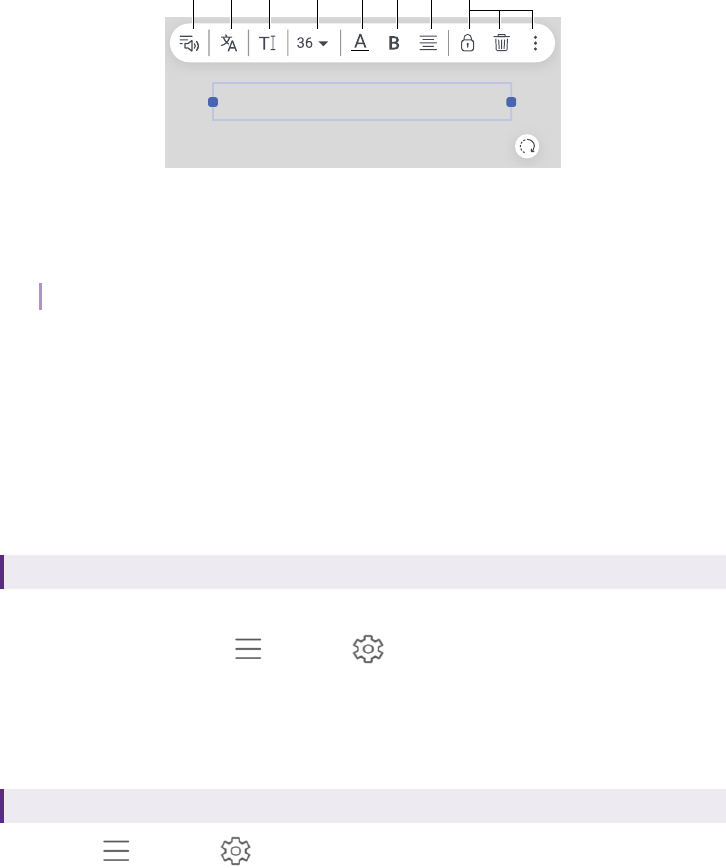
Edit text
Hello
2 51 43 76 8
Use the editing options listed below:
1. Text to speech *
2. Translate text *
Note: * In Android (BenQ Board) version, long press the icon to initiate the language settings.
3. Select all text
4. Text size
5. Text color
6. Text styles (bold/italic/underline)
7. Text alignment
8. See Control objects
Text to speech
Supported versions: Windows, Android (BenQ Board), Web (except Safari)
Manage your voice options and speed in the following path:
• For Windows: Go to
Menu > Settings > General >
Text to Speech.
• For BenQ Board: Go to System > Language & Input > Text to Speech.
Text translation language
Supported versions: Android (BenQ Board)
1. Go to Menu > Settings > Google translate.
2. Choose the languages to translate to and from.
3. Select Back to finish the settings.
20
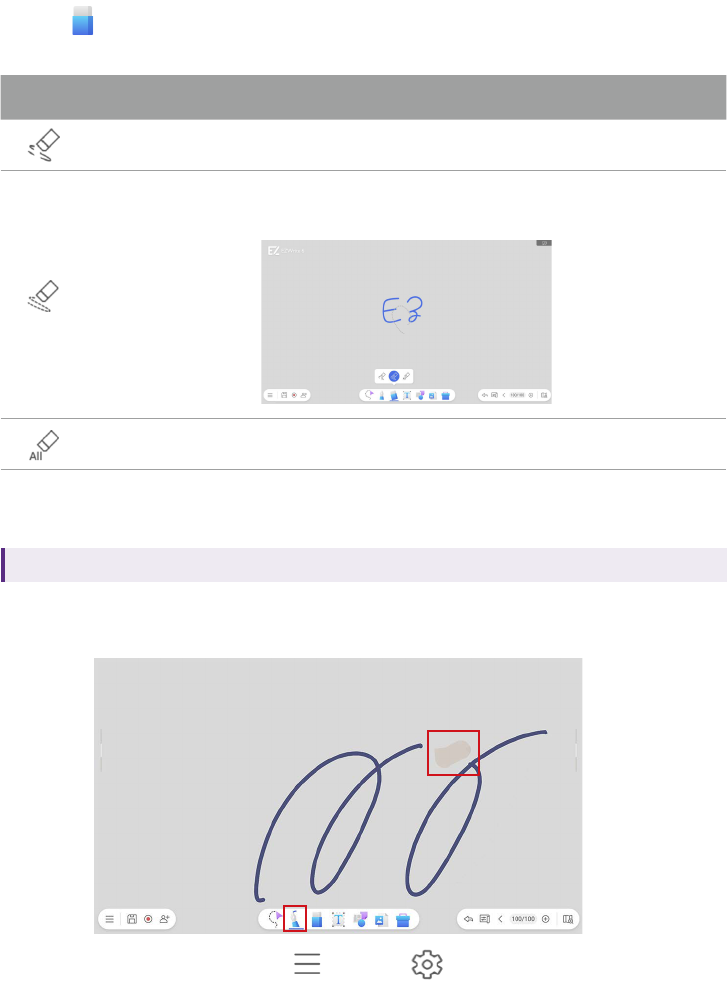
Erasers
Select Eraser to open the eraser toolbar. Three erase types are
available: finger eraser, strikethrough eraser, and erase all.
Icon Function Description
Finger eraser Erase a path with your finger.
Strikethrough
eraser
Erase an entire segment of handwriting by
touching or striking through it.
Erase all Erase all content from the current page.
Palm eraser
Supported versions: Android (BenQ Board)
While you are writing, you can touch the BenQ Board with your palm to
activate palm eraser.
To disable the function, go to Menu > Settings > General.
21
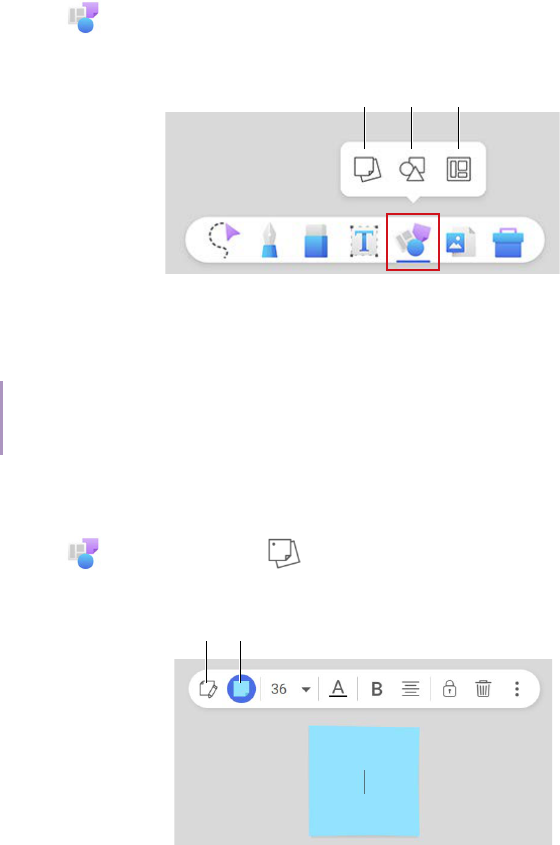
Insert objects
Select Insert objects to add sticky notes, shapes, and pre-designed or
custom templates.
21 3
1. Sticky notes
2. Shapes
3. Templates
Note
Save your file as EZWrite rather than IWB format to keep sticky notes and 3D shapes for future
editing.
Add sticky notes
Select Insert objects > Sticky notes to add a sticky note onto the
whiteboard.
1 2
1. Select text in the sticky note.
2. Change a color for the sticky note.
22
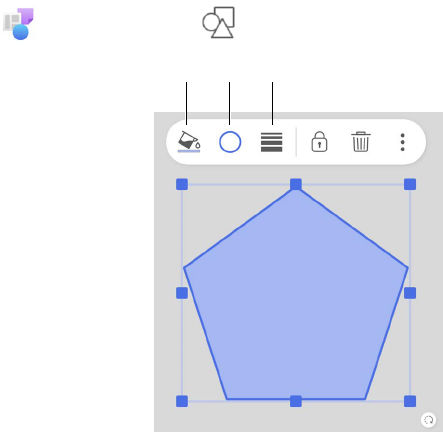
Adjust shapes
Select Insert objects > Shapes to add a shape.
1 2 3
1. Fill a shape with the color.
2. Change the color of the border.
3. Adjust the thickness of the border.
23
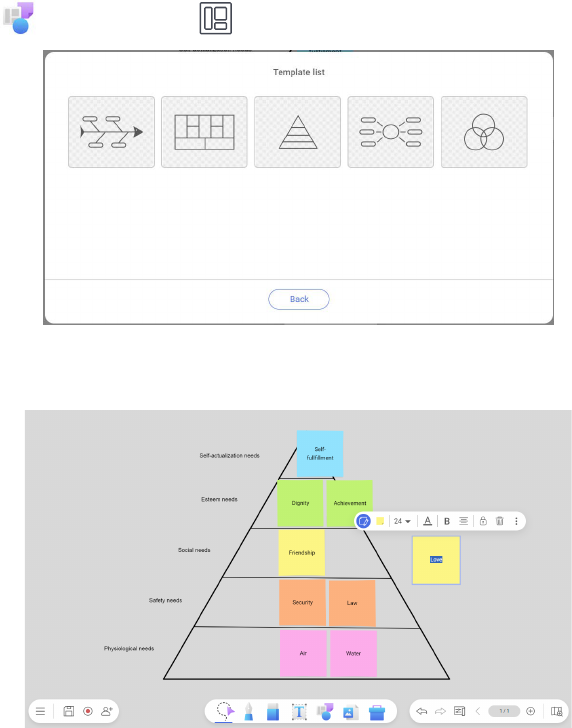
Add a template
Select Insert objects > Template to add a template.
All elements in a template are adjustable. You can customize the content
for different scenario.
24
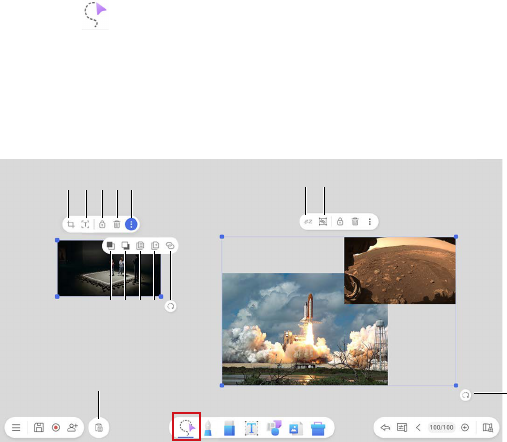
Control objects
In selection mode , you can select, rotate, move, duplicate, delete, and
scale multiple objects at the same time. You can also adjust object layers
by pinning objects to top or bottom layers.
Editing tools
1 2 3
12
11
4 5
13
76
14
8
910
1. Crop
2. Detect text
3. Lock
4. Delete
5. More
6. Bring to front
7. Send to back
8. Copy
9. Duplicate
10. Add a hyperlink
11. Paste
12. Handwriting to text
13. Group/Ungroup
14. Rotate
25
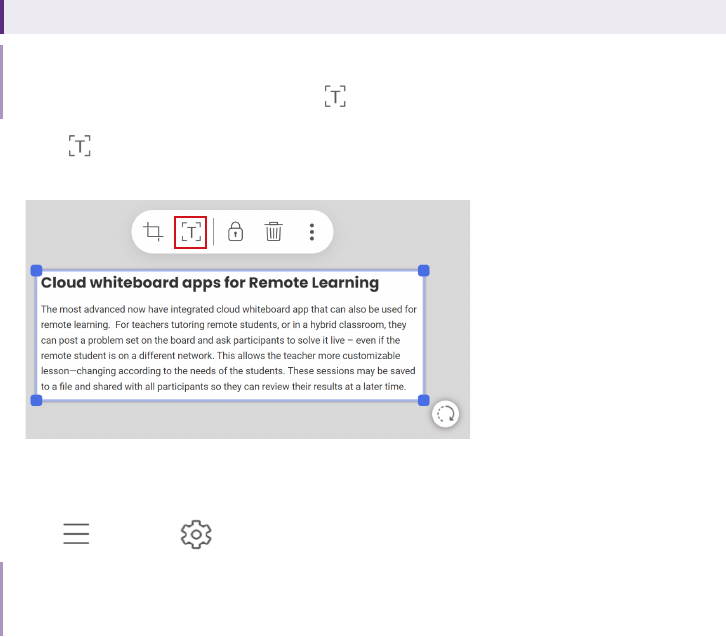
Detect text in an image (OCR)
Supported versions: Android (BenQ Board), Web, ChromeOS
Note
In Android(BenQ Board) version, long press
Detect text (OCR) to initiate the OCR settings.
Select Detect text (OCR) in the editing tool bar. EZWrite recognizes text
in an image based on your language settings in EZWrite.
Change recognition language
Go to Menu > Settings > language for a different language option.
Note
For languages besides English, EZWrite recognizes the selected language + English. For example, if
you choose Japanese, the detection language will be Japanese + English.
26
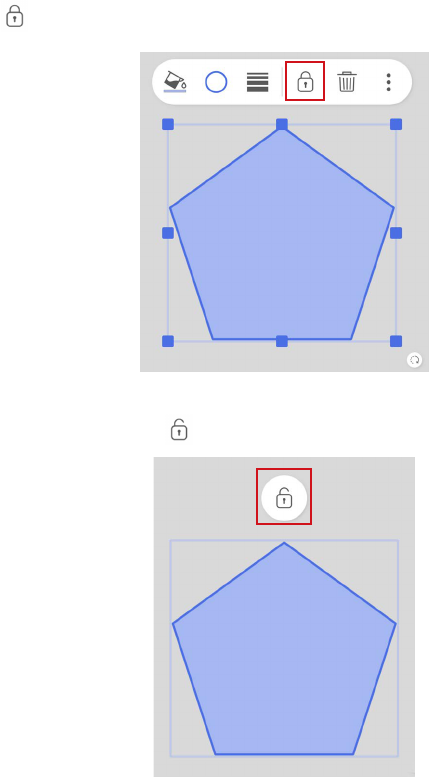
Lock and unlock an object
Choose Lock to lock the selected object.
To unlock an object, select the object and hold for 2 seconds. The Unlock
icon will show up. Select
Unlock to unlock the object.
27
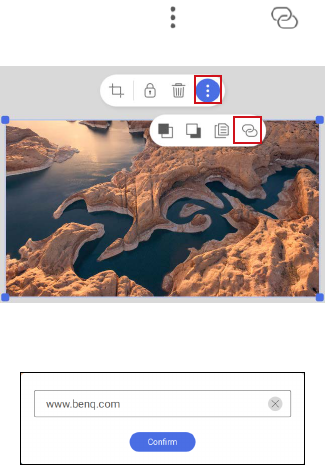
Add a hyperlink to an object
You can add a hyperlink button to any object and links it to an external
webpage when clicked.
To add a hyperlink to an object:
1. Select an object and then select
More > Hyperlink in the object
menu.
2. Enter the URL for the webpage that you want the object to link to and
then select Confirm.
28
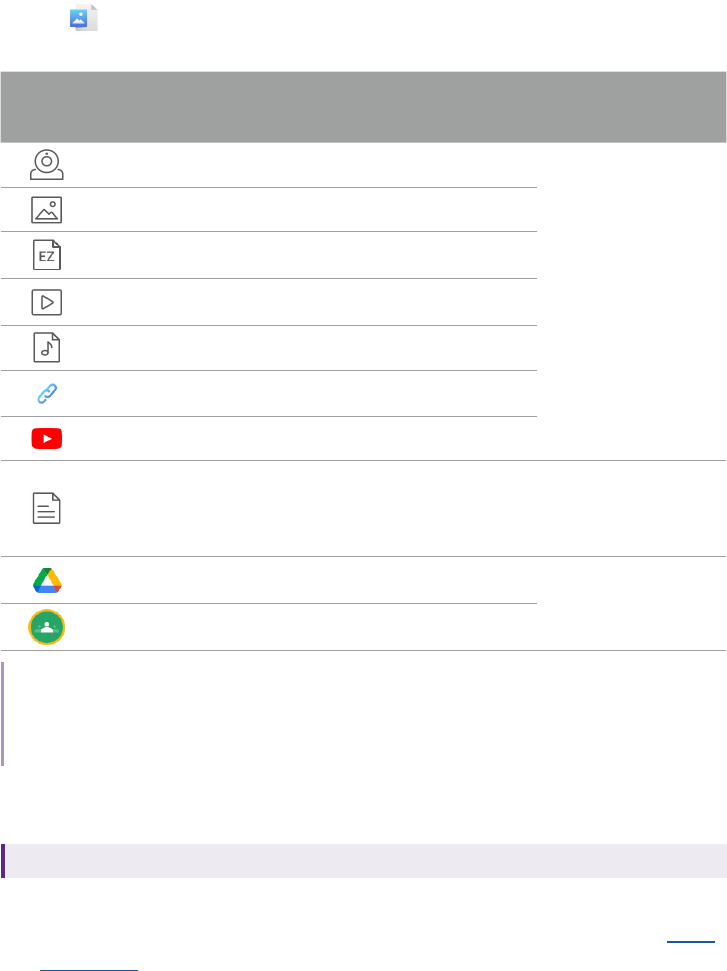
Import les
Select Import files to import links, or files stored on your local storage
or a connected storage device.
Icon Function
Available
platforms
See Document camera¹
• Windows
• macOS
• Android (BenQ Board)
• Web
• ChromeOS
Import image files²
Import .ezwrite, .iwb or .notebook files²
Import video files²
Import audio files²
Import URL links
Import YouTube links
Import Office files (as image)²
• Windows
• Android (BenQ Board)
• Web
• ChromeOS
Import Google drive files
• Web
• ChromeOS
Import materials from Google Classwork³
Note
1. Available for devices with camera sources.
2. See Supported file formats for more information.
3. Available for accounts connected with Google Classroom.
Access cloud les from EZWrite
Supported versions: Web, ChromeOS
To access your personal cloud files from EZWrite:
1. Ensure that your BenQ account is linked to your cloud storage in ams.
benq.com.

29
2. Log in to EZWrite Web/ChromeOS with your BenQ account.
3. Select Import files to access all synced cloud storage.
30
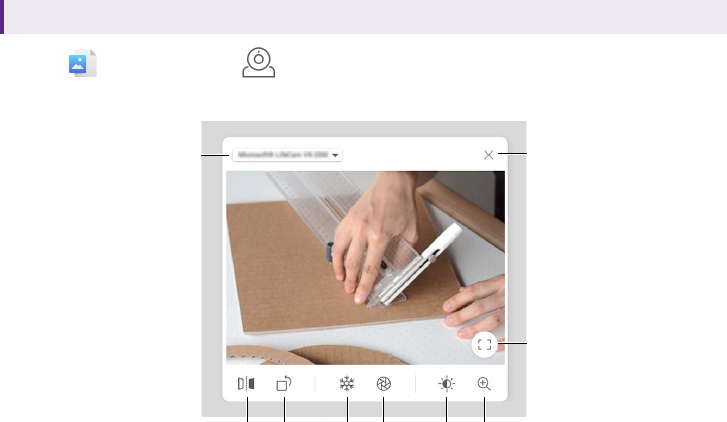
Document camera
Supported versions: Windows, macOS, Android (BenQ Board), Web, ChromeOS
Select Import files > Document camera to open the document
camera window.
1
2 53 6*4 7*
8
9
1. Select camera source
2. Mirror
3. Rotate
4. Freeze
5. Take screenshot
6. Brightness *
7. Zoom in/out *
8. Resize window
9. Close window
* Windows & macOS only
31
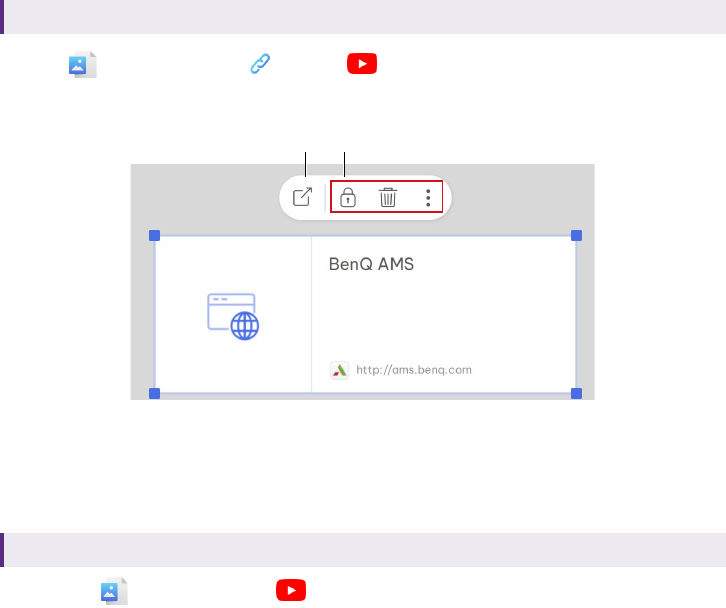
Add a link/YouTube link
Supported versions: Windows, macOS, Android (BenQ Board), Web, ChromeOS
Select Import files > Link / YouTube to add a link to
whiteboard.
1 2
1. Open link in your browser
2. See Editing tools for details
Search for a YouTube video
For Android (BenQ Board)
1. Go to Import files > YouTube
2. Enter a keyword instead of a link.
3. Tap OK.
4. This brings out the YouTube page on your BenQ Board browser. You
can then search for the video you want.
32
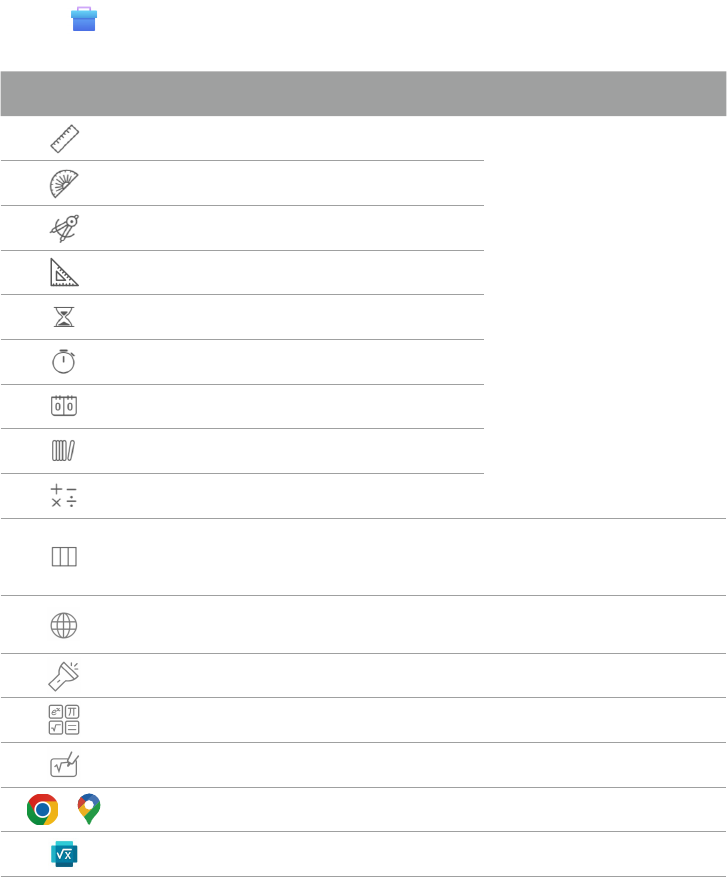
Toolbox
Select Toolbox to open a selection of education and collaboration
tools.
Icon Function Available platforms
Ruler
• Windows
• macOS
• Android (BenQ Board)
• Web
• ChromeOS
Protractor
Compass
Set square
Timer
Stopwatch
Scoreboard
Random draw
Calculator
Team post
• Windows
• macOS
• Android (BenQ Board)
Browser
• Windows
• macOS
Spotlight
• Android (BenQ Board)
Windows calculator
• Windows
Math input panel
• Windows
/ Chrome browser & Google map
• Android (BenQ Board: EDLA)
Microsoft math solver
• Android (BenQ Board)

33
Minimize tools
For tools with the Minimize icon , you can select the icon to minimize
the tool into a movable floating bar for quick access.
34
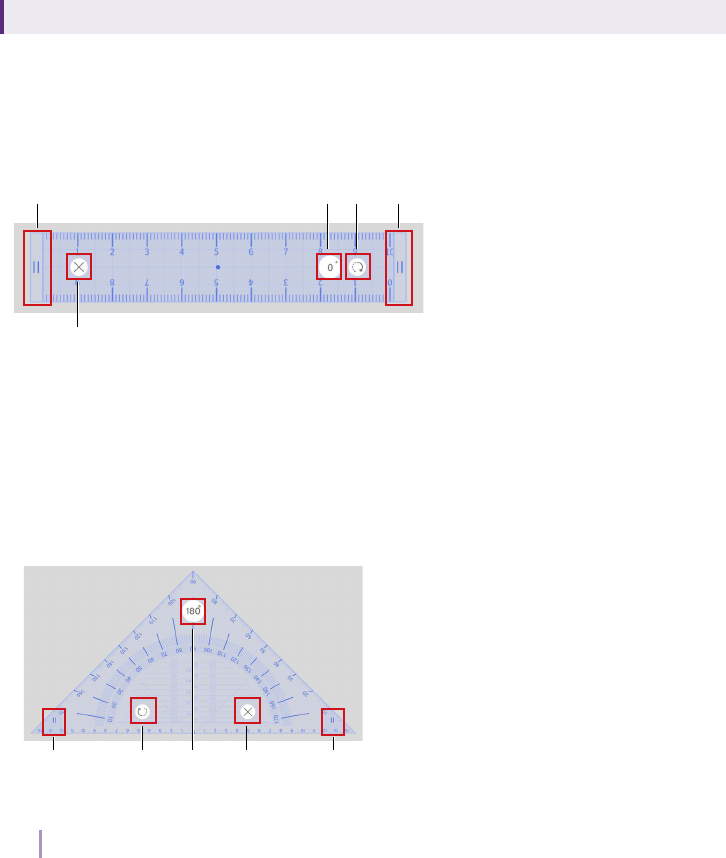
Geometry tools
Supported versions: Windows, macOS, Android (BenQ Board), Web, ChromeOS
There are four geometry tools available in the toolbox: ruler, protractor,
compass and set square.
Ruler
4
3 21 1
1. Select one end of the tool to adjust the length.
2. Drag the icon to rotate.
3. Enter a number into the angle field to set the tool to the desired angle.
4. Close the tool.
Set square
1 1
2 4
3
1. Select one end of the set square to adjust its size.
Note: Available for Windows, macOS, Android (BenQ Board).
2. Drag the icon to rotate.
3. Enter a number into the angle field to set the tool to the desired angle.
4. Close the tool.
35
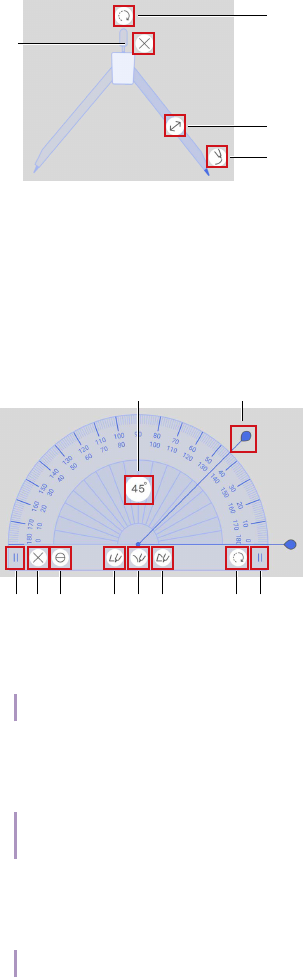
Compass
2
3
1
4
1. Drag to rotate.
2. Drag to adjust the angle of the compass.
3. Drag to draw a circle.
4. Close the tool.
Protractor
79 68 45 33
1 2
1. Enter a number into the angle field to set the tool to the desired angle.
2. Drag the knob to a adjust the angle before drawing.
Note: Available for Windows, macOS, Android (BenQ Board).
3. Select one end of the protractor to adjust its size.
4. Drag to rotate.
5. Draw a sector.
Note: You can click on the sector to change colors of the shape and its border. See Adjust
shapes for details.
6. Draw an arc.
7. Draw a designated angle.
8. Switch between a 180-degree or 360-degree protractor.
Note: Available for Windows, macOS, Android (BenQ Board).
9. Close the tool.
36
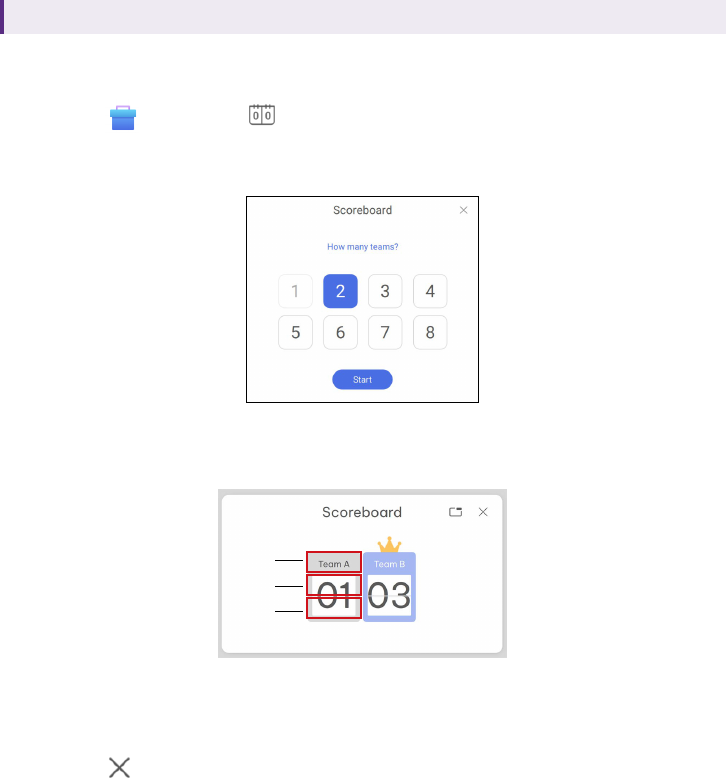
Scoreboard
Supported versions: Windows, macOS, Android (BenQ Board), Web, ChromeOS
The scoreboard keeps track of scores for up to eight teams during
collaborative games.
1. Select
Toolbox > Scoreboard to add a scoreboard to the
whiteboard.
2. Select how many teams will be participating in the game.
3. Once the number of teams is set, the following actions can be
performed:
A
B
C
A. Edit the team name.
B. Select the top half of a team score to add a point.
C. Select the bottom half of a team score to remove a point.
4. Select
Close to close the tool.
37
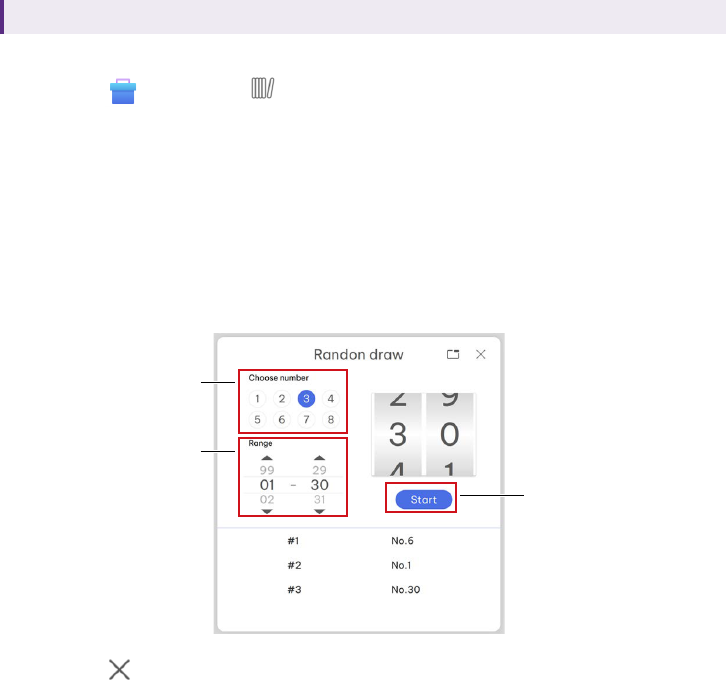
Random draw
Supported versions: Windows, macOS, Android (BenQ Board), Web, ChromeOS
The random draw randomly generates numbers for collaborative games.
1. Select
Toolbox > Random draw to add the tool to the
whiteboard.
2. Follow the steps below to begin a draw:
A. In the Choose number section, select how many numbers you want
to generate at a time.
B. In the Range section, select the upper and lower limits (from 1 to
99) for the number(s) you want to generate.
C. Select Start to draw the number(s). Generated numbers appear in
the bottom half of the random draw window.
A
B
C
3. Select Close to close the tool.

38
Team post
Supported versions: Windows, macOS, Android (BenQ Board)
1. Select Toolbox > Team post to create up to three separate
drawing posts for teams-based collaborative games.
2. Select how many teams will be participating in the game. This
determines the number of drawing posts.
3. Once the number of teams is set, you can begin drawing using the
drawing tools in each post. The side bar on the screen features the
following options:
A
D
B
E
C
F
G
A. Recording (Record video/Go live)
Note: Check out supported platform from Record video and Go live.
B. Screenshot
C. Clear all drawings
D. Change team post background (BenQ Board only)
E. Add a question to all team posts
F. Minimize the team post tool to a floating bar
G. Exit team post
39
Save your team post screen
Select Screenshot and select how you want to save your team post
screen.
1. Share to Whiteboard
Paste the screenshot onto the EZWrite whiteboard for further
annotation.
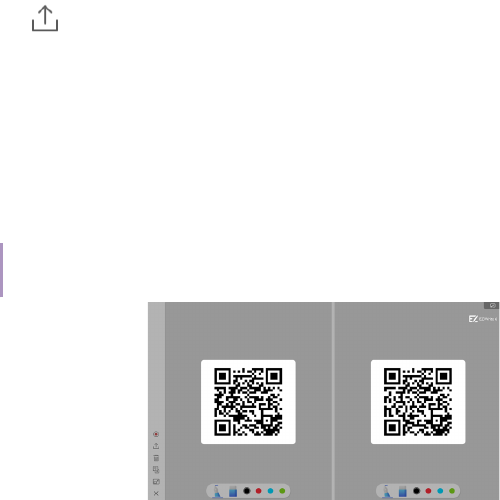
2. Save as image
3. Share by QR code
Generate a QR code for each drawing board shown.
Note
Files shared via QR code are available for download within 30 minutes only.
40
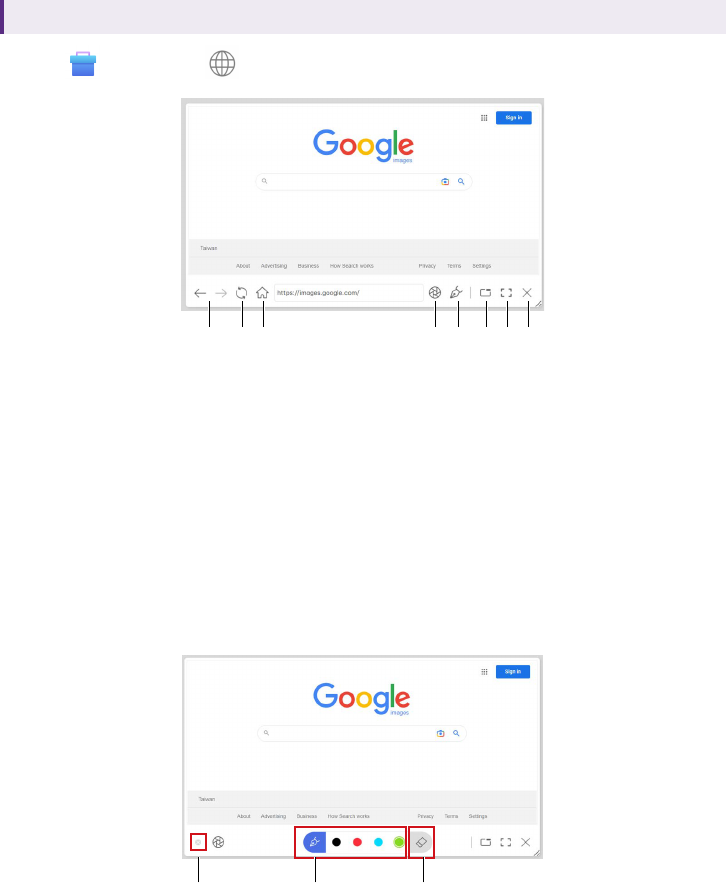
Browser
Supported versions: Windows, macOS
Select Toolbox > Browser to open a web browser.
21 43 5 6 7 8
1. Previous/Next page
2. Refresh
3. Home page
4. Screenshot
5. Pen
6. Minimize
7. Maximize/Restore down
8. Close browser
Annotate on browser
213
1. Tap to switch different pen colors.
2. Opens the eraser toolbar for different eraser types.
3. Closes the annotation toolbar.
41
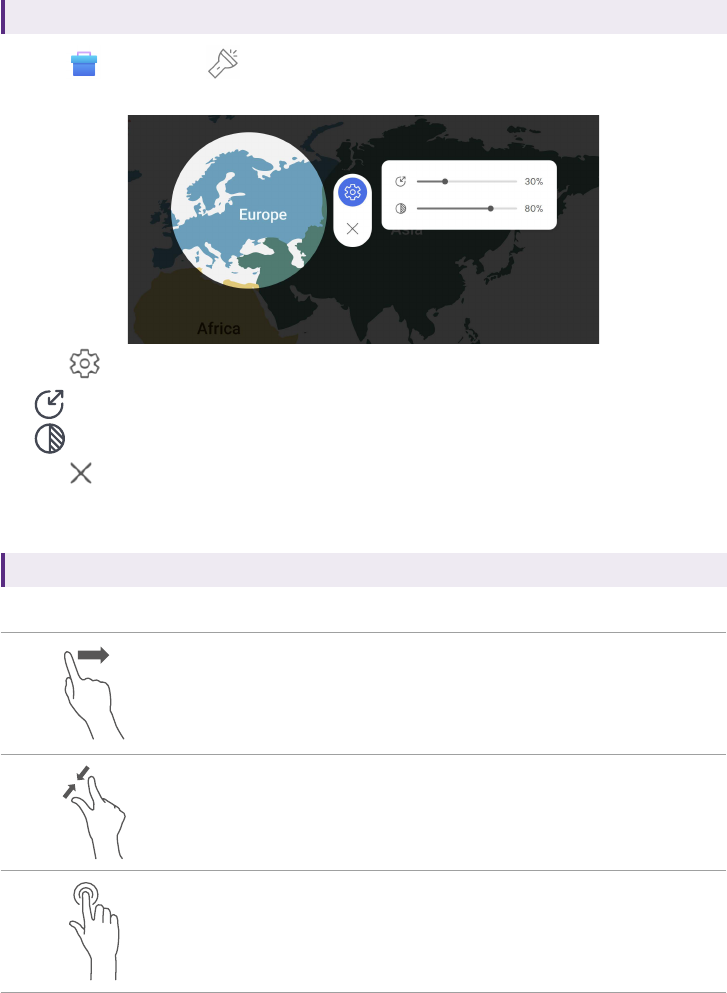
Spotlight
Supported versions: Windows, Android (BenQ Board)
Select Toolbox > Spotlight to highlight and hide parts of the
screen.
Select Settings to open settings.
•
: Adjust spotlight size
•
: Adjust shadow opacity
Select
Close to close spotlight
Control spotlight by gesture
Supported versions: Android (BenQ Board)
For BenQ Board, control spotlight with gesture listed as follows:
1. Move
Tap and drag to move the highlight area.
2. Resize
Pinch to decrease or spread to increase the
highlight area.
3. Jump to area
Tap and hold a different area.
42
Calculator
Supported versions: Windows, macOS, Android (BenQ Board), Web, ChromeOS
EZWrite provides different tools for calculation.
Calculator
EZWrite built-in calculator
Windows calculator ¹
Scientific calculator from Windows
Math input panel ¹
Handwriting panel for math formula. Insert the formula as
image to EZWrite.
Microsoft Math Solver ²
Answers math questions with step-by-step solutions.
¹
Windows only;
²
Android (BenQ Board) only
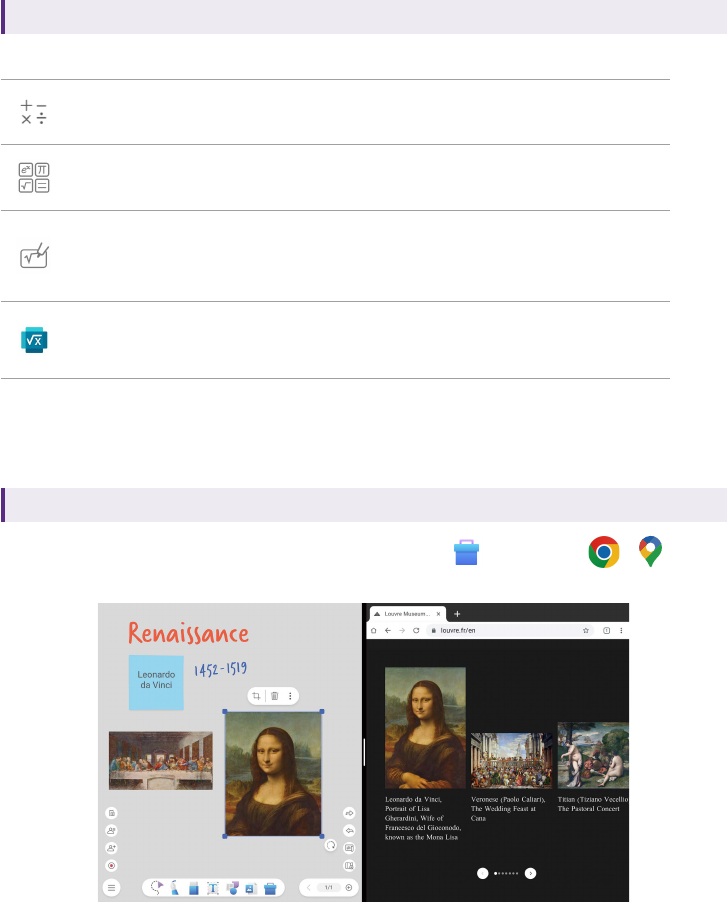
Chrome browser & Google map
Supported versions: Android (BenQ Board: EDLA)
For BenQ Board with EDLA certificates, select Toolbox > / to
open Chrome/Google map in a split screen.
• Control the split-screen size by dragging the divider .
• Hold the text or image you want in the browser and drag it onto the
whiteboard directly.

43
Record video
Supported versions: Windows, Android (BenQ Board), Web, ChromeOS
Select Recording > Record video to start recording. See Supported
recording formats for details.
You can also find the video recording options in the following path:
•
Toolbox > Team post > Recording
See Team post for details.
Supported versions: Windows, Android (BenQ Board)
• EZ Floating Tool > Recording
See EZ Floating Tool for details.
Supported versions: Windows, Android (BenQ Board)
44
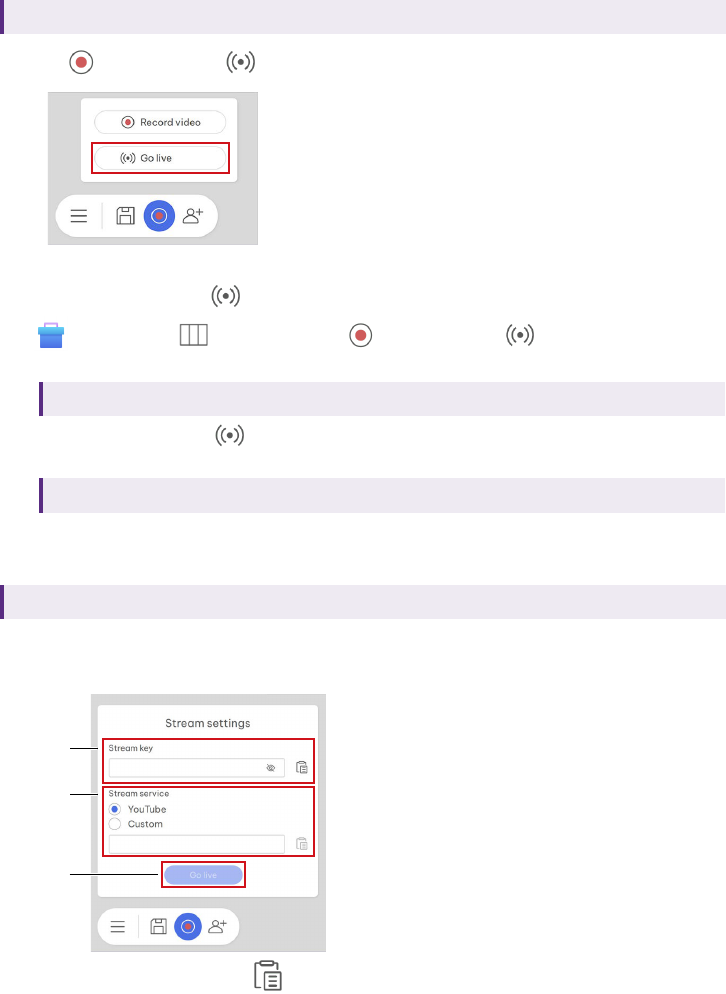
Live stream on YouTube
Supported versions: Windows, Web, ChromeOS
Select Recording > Go live to start live streaming.
You can also find the Go live option in the following path:
•
Toolbox > Team post > Recording > Go live
See Team post for details.
Supported versions: Windows
• EZ Floating Tool > Go live
See EZ Floating Tool for details.
Supported versions: Windows
Stream settings
Supported versions: Windows, Web, ChromeOS
If it's your first live stream from EZWrite, a stream settings window will
show up.
1
2
3
1. In Stream key, select Paste to enter your stream key from
45
YouTube Studio.
Note: Learn more on where to find the stream key from YouTube.
2. In Stream service, select YouTube or select Custom to paste your
Stream URL from YouTube.
3. Select Go live. The stream will start right after the countdown.
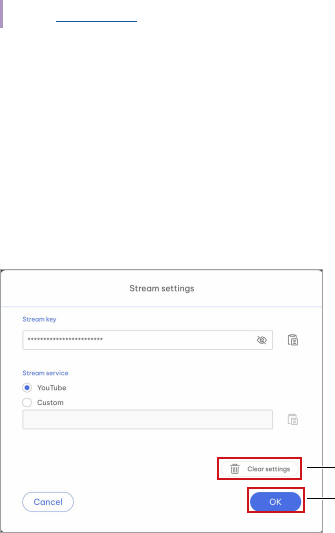
Reset stream settings
If you've live streamed before, your previous stream settings will be saved
in EZWrite. To clear your stream key record, go to Settings > General >
Stream settings.
1
2
1. Select Clear settings.
2. Select OK to save the changes.

46
Cloud whiteboard
Supported versions: Windows, macOS, Android (BenQ Board), Web, ChromeOS
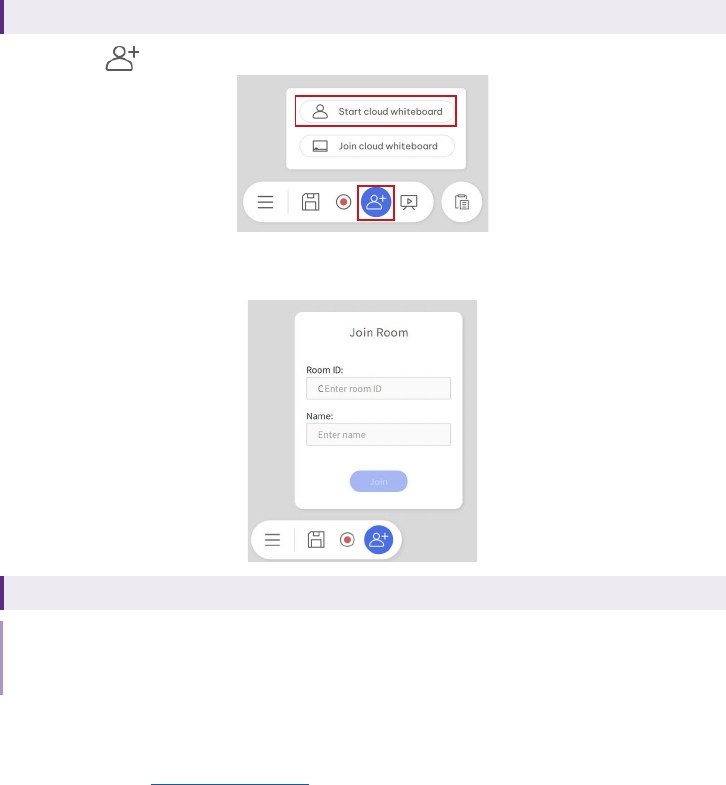
Activate cloud whiteboard
Note
1. If your whiteboard exceeds 30 pages, you will be asked to select no more than 30 pages before
initiating cloud whiteboard.
2. To activate Google Classroom, see Google Classroom in EZWrite 6 Web.
1. Choose one of the following options:
• Windows & Android: Select
Create cloud whiteboard >
Start cloud whiteboard to activate cloud whiteboard.
• Web & ChromeOS: Select Create cloud whiteboard to activate
cloud whiteboard.
2. A window will pop up and display necessary information for
participants to join the whiteboard.
• The host can choose Copy link to get the link to the room and share
it with the participants.
• Participants can scan the QR code to directly enter the website or
go to the URL and enter the Room ID. See Join cloud whiteboard for
details.
3. Select outside the pop-up window to close the QR code.
47
Join cloud whiteboard
For Windows, Android (BenQ Board) version
1. Select Create cloud whiteboard > Join cloud whiteboard.
2. Enter both the Room ID and Name and select Join to enter the cloud
whiteboard.
For Web, ChromeOS version
Note
EZWrite Web now supports Chrome, Firefox, Safari and Edge. See Supported browser version for
details.
1. Use either options to enter the EZWrite website.
• Scan the QR code provided by the host to directly enter the website.
• Go to the EZWrite website > Join room and enter the Room ID.
2. On the website, choose to Join with Google or Join as guest.
• Join with Google: Enter your Google account and password to sign
in.
• Join as guest: Enter your name and select Join to enter the cloud
whiteboard.

48
Manage participants
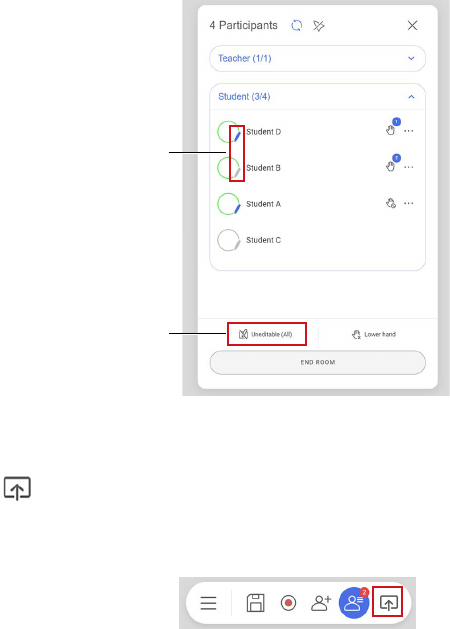
Once cloud whiteboard is activated:
1. Select
Participants list to view all participants.
2. Select
Share screen to keep all students' whiteboard the same
scale and position as the teacher's.
3. Select
Refresh to update the member list.
4. Select
Show users' cursors/Hide users' cursors to show or hide
user names on the whiteboard.
5. Use the control panel to grant/remove editing permissions, lower
hands or drop out selected participants.
6. Select Leave room to end the cloud whiteboard. All participants will be
dropped out except the host.
1
3 4
2
6
5
49
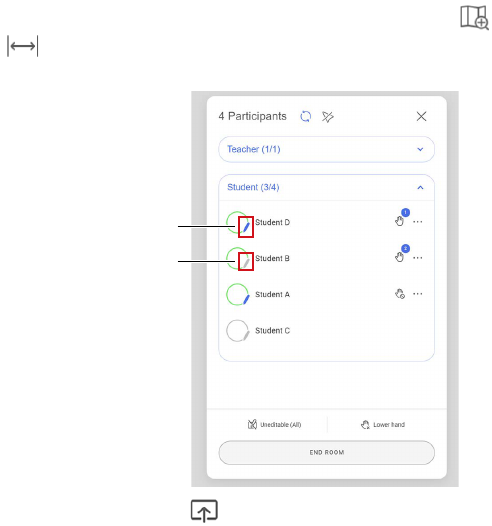
Grant/Remove editing permissions
1. Select the pencil icon to give editing permissions to students. Select
again to remove permissions.
2. Select Enable editing (All)/Disable editing (All) to sync the editing
permission status.
1
2
Synchronize all participants' screen
Select Share screen to keep all students' whiteboard the same scale
and position as the teacher's. In the meanwhile, students will not be able
to edit or control the canvas.
50
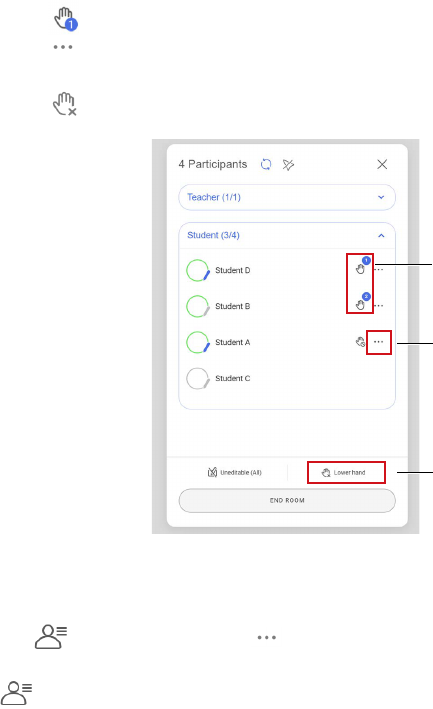
Lower hands
The hand icon will appear with a number, representing the order in which
the student raises their hand.
1. Select
Lower hand to lower the student's hand.
2. Select
More > Disable hand raising to stop the student from raising
their hand.
3. Select
Lower all hands to clear all requests.
1
2
3
Drop out selected participants
• Go to Participants list > More > Drop out to remove a
participant from the cloud whiteboard.
• In
Participants list, select Leave room to drop out all participants
at a time.
51
Engage in class
View and edit the canvas
1. Allow editing
Students with editing permissions can navigate between different
pages on their own and edit contents on the whiteboard.
2. Viewing only
Students with no editing permissions can select
Preview canvas
>
Fit to screen to scale the screen to show all content on the
canvas. See Preview canvas for details.
1
2
3. Share screen mode ( )
If the teacher selects Share screen to synchronize all students' screen,
students will not be able to edit or move the canvas.
52
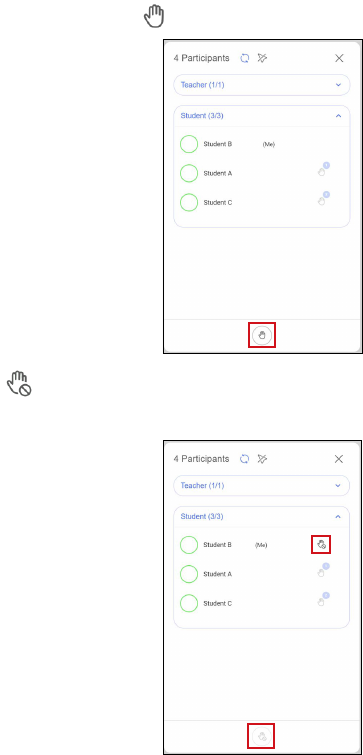
Raise hands
1. Students can select Raise hand to interact with the Host.
2. When Disable hand-raising appears, students are not allowed to
raise their hand.
53
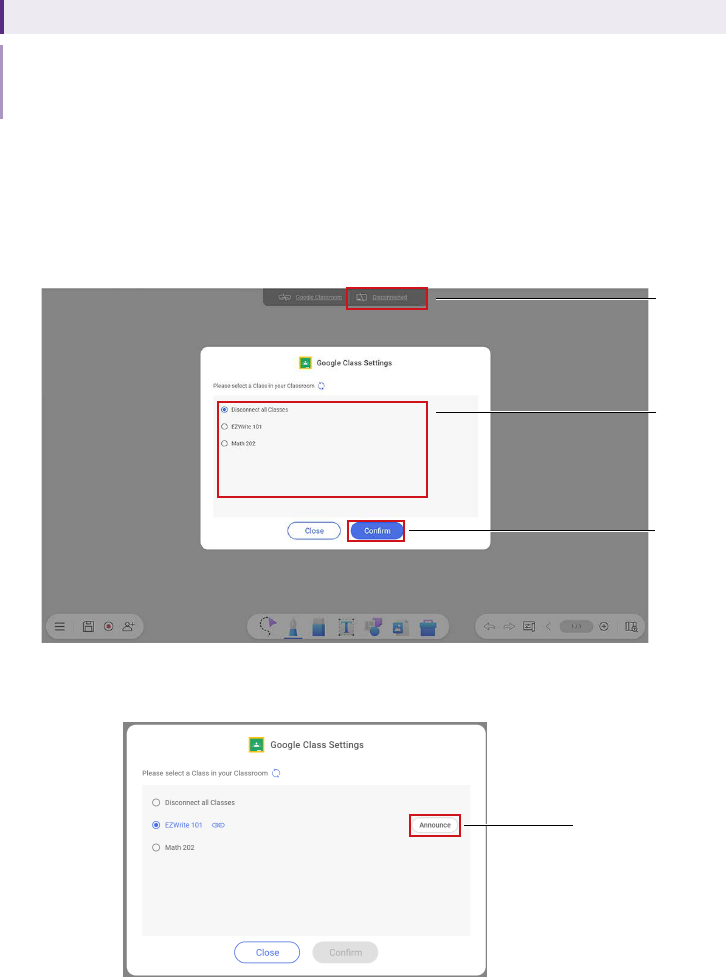
Google Classroom in EZWrite 6
Supported versions: Web, ChromeOS
Note
Make sure you’ve logged in to EZWrite 6 Web/ChromeOS with the Google account you use for your
Google Classroom.
Connect with Google Classroom
1. Select to open Google Classroom.
2. Select a class from the list to connect.
3. Select Confirm to connect.
3
2
1
4. Select Announce to share the whiteboard link to all participants in the
Class.
4
54
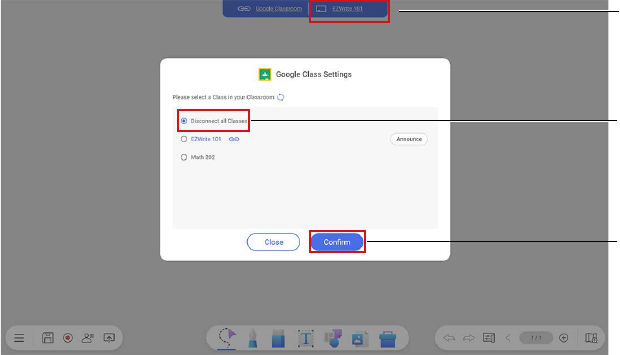
Disconnect your Classroom
1. Select to open Google Classroom
2. Select Disconnect all classes in Google Classroom to disconnect from
the current Classroom.
3. Select Confirm to end the room.
3
2
1
55
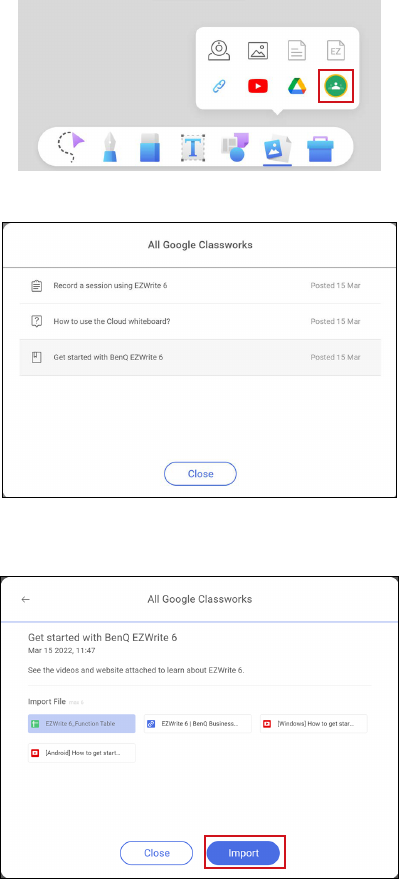
Import materials from Google Classwork
1. Select Import files > Google Classwork to import files in the Google
Classroom.
2. Select a Classwork from the list.
3. Choose the materials in your Classwork and select Import to add files
to the whiteboard.
56
Supported le list of Google Classwork
File type File size
Supported
file types
Images .bmp/.png/.jpg/.jpeg/.gif/.svg
File size <10 MB (limitation
from Google API)
Documents Google Docs, Sheets, Slides, PDF
Links Website links; YouTube links N/A
Unsupported
file types
Others Google Forms, Drawings N/A
Note
Save your file as EZWrite rather than IWB format to ensure your Google Classwork can be opened
through different EZWrite platforms.
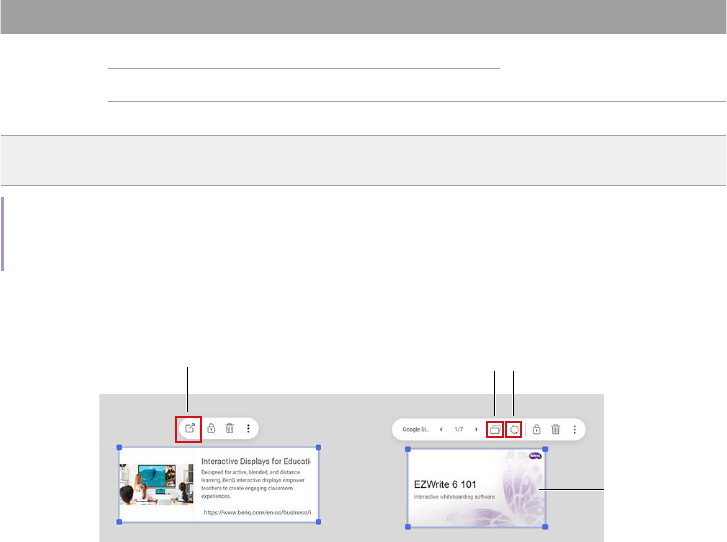
Editing tools in Google Classwork
2 3
1
4
1. Open the link in a new tab.
2. Duplicate the current page as an image.
3. Refresh the online document (e.g. Google Slides).
4. Double click the imported Google document to open a pop-up window.
Users may edit the online file without leaving EZWrite.
57
Function table of cloud whiteboard
Menu
Function
Host Participants
Windows/
macOS
Android
(BenQ
Board)
Web/
ChromeOS
Editable Uneditable
Screen
share
Settings O O O O O O
Export O O O O O O
Open files - - - - - -
New
whiteboard
O O O - - -
Exit O O O O O O
Save O Auto save O O O O
Recording
Windows: O/
macOS: -
O O O O O
Create/
Start cloud
whiteboard
O O O - - -
Participants
list
O O O O (+ raise hand)
Leave room O O O - - -
Screen share O O O - - -
Toolbar
Function
Host Participants
Windows/
macOS
Android
(BenQ
Board)
Web/
ChromeOS
Editable Uneditable
Screen
share
Select O O O O - -
Pen O
O (+dual
pen)
O O - -
Palm eraser -
O in
Uneditable
(All)
- - - -
Move object
in pen mode
-
O in
Uneditable
(All)
- - - -
58
Function
Host Participants
Windows/
macOS
Android
(BenQ
Board)
Web/
ChromeOS
Editable Uneditable
Screen
share
Eraser
O
• Enable editing(All): finger eraser,
strikethrough eraser and erase all
• Disable editing(All): strikethrough eraser
and erase all
O
(Strikethrough
eraser only)
- -
Text O O O O - -
Import Object
O
(Sticky note/shapes/template)
O (Sticky note/
shapes only)
- -
Import files
O
(Picture only)
O
(Picture only)
- -
Toolbox O O O O - -
Navigation bar
Function
Host Participants
Windows/
macOS
Android
(BenQ
Board)
Web/
ChromeOS
Editable Uneditable
Screen
share
Undo/Redo - - - - - -
Change
background
O O O - - -
Add a new
page
O O O - - -
Page O O O - - -
Preview
canvas
O O O O O -
Move canvas
+Zoom in/out
O O O O O -
Edit pages O O O - - -
Next/Previous
page
O O O O - -
Keyboard
hotkey
O - O*
O (Windows
& web)
- -
* Available function: copy and paste external pictures into EZWrite 6 web version.

59
EZ Floating Tool
Supported versions: Android (BenQ Board), Windows
EZ Floating Tool allows you to quickly write or create annotations on your
display.
EZ Floating Tool overview
Android (BenQ Board) Windows
8
2
6
4
7
3
9
5
1
8
2
10
4
7
3
11
5
1
1. Highlighter
2. Pen
3. Operation mode
Hide all the annotations and operate the main interface.
4. Screenshot
5. Record video
6. Toolbox
Calculator, timer, stopwatch, scoreboard, random number generator,
spotlight.
7. Eraser
8. Laser pointer
9. Minimize/Restore
10. Go live
11. Return to EZWrite
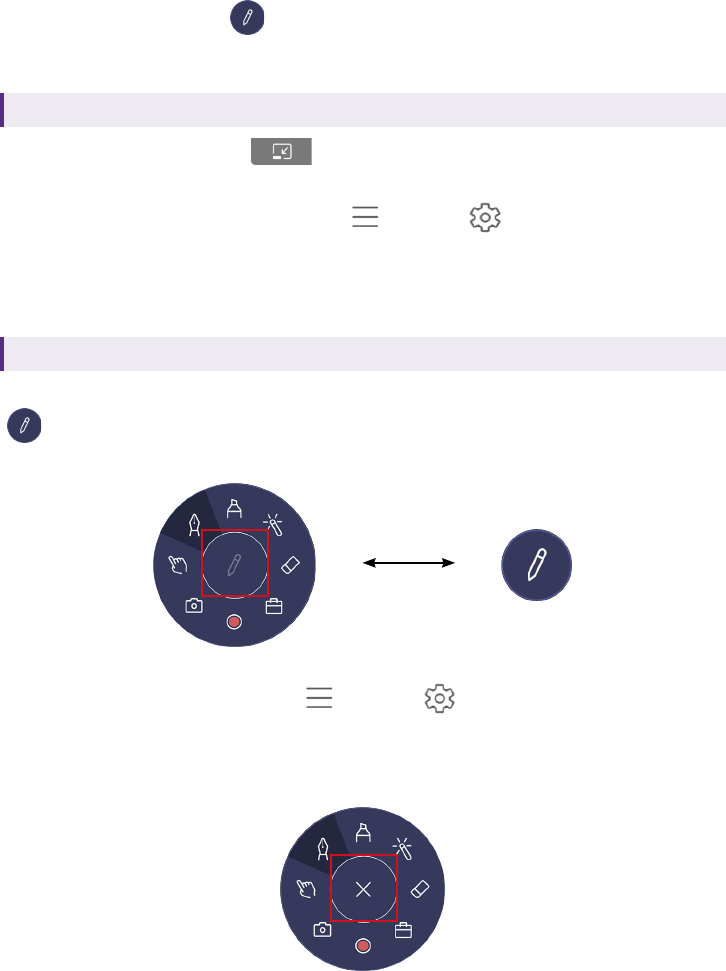
Launch EZ Floating Tool
For Android (BenQ Board) version
60
To access the EZ Floating Tool, use either one of the following methods:
• Tap the pencil icon (
) in the side toolbar of your BenQ Board.
• Touch and hold two fingers spaced about 20 – 50 mm apart on the
screen for more than two seconds to launch the Floating Tool menu.
For Windows version
Select the minimize icon ( ) at the top right corner of EZWrite. The EZ
Floating Tool will show.
To close the EZ Floating Tool, go to
Menu > Settings > General.
Switch Keep floating tool on screen to Off to disable the function.
Keep EZ Floating Tool on/off screen
For Android (BenQ Board) version
EZ Floating Tool can be minimized and shown on screen as a pencil icon
(
) by default. You can always tap on the icon to minimize or restore the
tool.
If you don’t want to keep EZ Floating Tool on screen:
1. In the EZWrite 6 app, go to
Menu > Settings > General.
2. Switch Keep floating tool on screen to Off to disable the function.
3. The icon at the center of the tool becomes a Close icon. Tap the icon
to close the EZ Floating Tool after use.
61
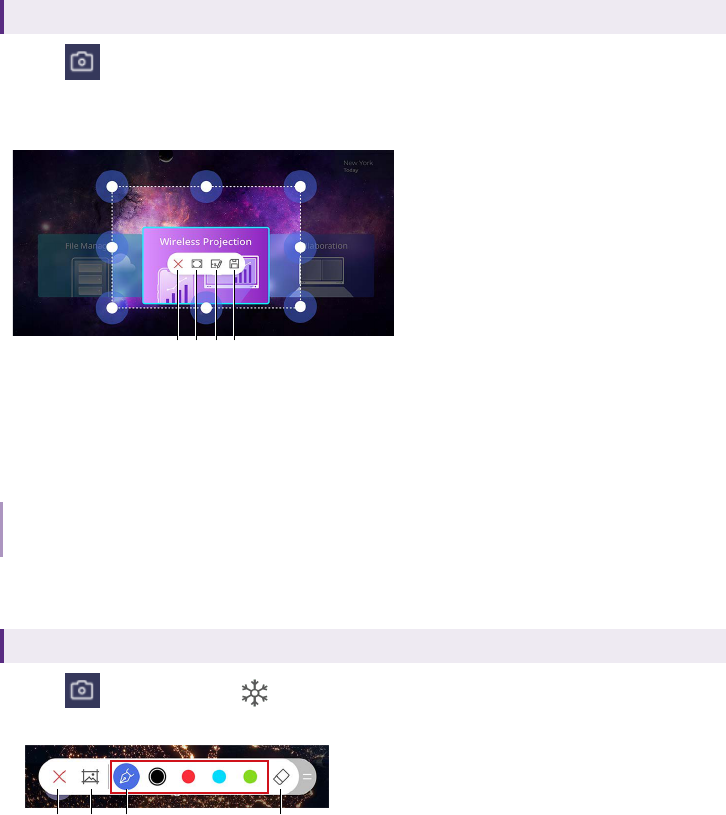
Take a screenshot with EZ Floating
Tool
Supported versions: Android (BenQ Board), Windows
Select Screenshot to take a screenshot of the screen, including
handwritings. Screenshots can be saved or imported to the EZWrite main
page.
1 2 43
1. Close screenshots
2. Full screen
3. Import screenshots to EZWrite
4. Save screenshots
Tip
To adjust screenshot size in BenQ Board, scale the frame with two fingers of both hands.
Freeze screen and annotate on BenQ Board
Supported versions: Android (BenQ Board)
Select Screenshot > Freeze to freeze current screen. An annotation
bar will show.
21 3
4
1. Closes the annotation toolbar.
2. Select to take a screenshot.
3. Tap to switch different pen colors.
4. Opens the eraser toolbar for different eraser types.
62
Hot keys
Supported versions: Windows
The following table provides hot keys for general commands when using
EZWrite 6.
Hot key Behavior
Space + Left mouse button Move canvas
Up & Left key/Page Up Previous page
Down & Right key/Page Down Next page
Mouse wheel Scale canvas (zoom in/zoom out)
Ctrl + Z Undo
Ctrl + Y Redo
Ctrl + S Save
Ctrl + X Cut
Ctrl + C Copy
Ctrl + V Paste
Ctrl + D Copy and paste
Ctrl + G Group
Ctrl + Shift + G Ungroup
Delete/Backspace Delete
Copy and paste
Supported versions: Windows, Web
You can copy and paste images or text
• from one page to another page within EZWrite, or
• from other folders or App (e.g. PowerPoint or Browser) to your EZWrite
whiteboard.
63
Connect to a second display
Supported versions: Windows
Connecting a second display while running EZWrite on a PC opens a pop-
up window that allows you to view EZWrite on the secondary display.
To view EZWrite on your PC screen again, disconnect the second screen.
Tip
Once you’ve decided not to show EZWrite on a second display or you want to change a selection,
you will need to restart EZWrite for the changes to take place.
Note
Recording is not supported if the user extends the display to a second display.
64
Recommended specications
For Windows version
Recommended Minimum
Processor
8th Generation Intel® Core i5 (e.g. i5-
8265U)
4th Generation Intel® Core i3 (e.g. i3-
4010U)
RAM 8 GB 4 GB
Operating system
• Windows 11 (64 bits)
• Windows 10 Pro (64 bits)
Windows 10 Pro (64 bits)
Disk drive SSD HDD/SSD
For macOS version
Operating system
• macOS version 13 (Ventura)
• macOS version 12 (Monterey)
• macOS version 11 (Big Sur)
Supported models MacBook Air (13-inch, Early 2014) ~ MacBook Pro M2 (2022)
Supported browser version
For Web version
Device \ Browser Chrome Firefox Safari Edge
Windows 95+ 94+ - 101+
Mac 95+ 94+ 14+ 101+
iOS 95+ 40+ 14+ -
Android 95+ 94+ - -
Chromebook 95+ 94+ - -
Linux (x86) 95+ 94+ - 101+
65
Supported le formats
Note
• Max. pages/file size varies according to hardware/model/system status and memory size.
• In Windows version, MS Office needs to be installed on the PC to import Office files.
Import les from local storage
For Windows, macOS, Android (BenQ Board), Web, ChromeOS version
File type File formats Limitations
Images
.pdf
• Windows & MacOS: Max. 500 pages, file size < 100
MB
• Android: Max. 90 pages, file size < 100 MB
• Web & ChromeOS: file size < 100 MB
.ppt/.pptx
• Windows: Max. 150 pages, file size < 100 MB
• macOS & Web: not supported
• Android: Max. 90 pages, file size < 100 MB
doc/.docx
.xls/.xlsx
• Windows & Android: File Size < 100 MB
• Web & ChromeOS: not supported
.png/.jpg/.jpeg/.
bmp/.svg
• Windows & Android: < 50 MB
• Web & ChromeOS: File Size < 10 MB
.gif
• For all versions: file size <10MB
• Motion effect only in Windows/Android/Mac
• Crop & OCR function is not allowed.
Video*
.avi/.wmv/.mpeg/.
mov/.mkv
• For all versions: file size <50MB
Audio* .mp3/.wav • For all versions: file size <20MB
Interactive
whiteboard**
.ezwrite
• For all versions: Max. 999 pages
• Android cloud whiteboard: Max. 30 pages
.iwb
• For all versions: Max. 999 pages
• Android cloud whiteboard: Max. 30 pages
.notebook
(limited support)
• For all versions: File Size < 100 MB
.flipchart
(limited support)
• Windows & MacOS: File Size < 100 MB
• Android & Web & ChromeOS: not supported.
* 1.This file type cannot be saved as IWB or be reloaded for future editing; 2. See Supported import
video format (codec) for details.
** IWB & Notebook file limitations: (1) Flash and animation files are not supported, (2) exclusive
proprietary features from 3rd party vendors are not supported, (3) EZWrite 6 does not guarantee that
all objects can be display accurately.
66
Supported import video format (codec)
For Windows, macOS, Android (BenQ Board) version
Codec Extension Windows MacOS Android Google Play
H.264
.avi O X O O
.webm X X X X
.mkv O X O O
.mov O O O O
.mp4 O O O O
H.265
.mkv X X O O
.mov X X O O
.mp4 X X O O
VP8
.webm X X O * O
.mkv X X O O
VP9
.webm O X O O
.mkv X X O O
.avi O X O ** O **
.mp4 O O O O
MPEG1
.mp4 X X X X
.mov X X X X
MPEG4
.mkv O X O O
.mov O O O O
.mp4 O O O O
* .webm file (VP8 +opus) is not supported on RM03 series (Android 9), while .webm file ( VP8 +
Vorbis & VP9 + opus) are supported on RM03 series.
** Video files may play without audio due to audio codec.
For Web, ChromeOS version
Codec Extension Chrome Safari Edge Firefox
H.264
.avi X X X X
.webm X X X X
.mkv X X X X
.mov X X X X
.mp4 O O O O
H.265
.mkv X X X X
.mov X X X X
.mp4 X X X X

67
Codec Extension Chrome Safari Edge Firefox
VP8
.webm O X O O
.mkv X X X X
VP9
.webm X X X X
.mkv X X X X
.avi X X X X
.mp4 O O O O
MPEG1
.mp4 X X X X
.mov X X X X
MPEG4
.mkv X X X X
.mov X X X X
.mp4 X X X X
Import les from Google Drive
For Web, ChromeOS version
File type File formats Limitations
Google documents
Google sheet
• File Size < 10 MB (limitation from Google
export API)
Google Slides
Google Docs
PDF
• File Size < 100 MB (limitation from Google
download API)
Images .png/.jpg/.jpeg/.bmp/.svg
• File Size < 10 MB (limitation from Google
download API)
Interactive whiteboard
.ezwrite
• File Size < 100 MB
• Max. 999 pages.
• Import is not allowed in cloud whiteboard
mode
.iwb*
Video & audio -
• File Size < 10 MB (limitation from Google
download API)
• Import is not allowed in cloud whiteboard
mode
Form & Drawings Not supported
68
Supported recording formats
EZWrite version File formats Limitations
Windows .mkv
• The resolution of the recorded video depends on the
default resolution of the display.
• Recording is not supported if the user extends the
display to a second display.
Android (BenQ Board) .mp4 Maximum resolution: 1080p
Web .webm
On your mobile devices, recording on EZWrite Web is
not supported due to the security polices.
Web browsers and OS supporting video recording
Device \ Browser Chrome Firefox Safari Edge
Windows O O - O
Mac O O O O
iOS X X X X
Android X X - X
Chromebook O X - -
69
Whitelist of EZWrite 6
URL/DNS Description Inbound/Onbound Port
*-ats.iot.eu-central-1.amazonaws.com IoT N/A 443
https://cognito-identity.eu-central-1.
amazonaws.com
Cognito N/A 443
https://benq-ezwrite-eu.s3.eu-central-1.
amazonaws.com
S3 N/A 443
https://sns.eu-central-1.amazonaws.com SNS N/A 443
https://sqs.eu-central-1.amazonaws.com SQS N/A 443
https://ezwrite6.benq.com Portal N/A 443
https://ezwrite6-api.benq.com EZWrite 6 API N/A 443
https://ezwrite.benq.com EZWrite 5 API N/A 443
https://service-portal.benq.com IAM N/A 443
https://accounts.google.com Google OAuth N/A 443
https://www.googleapis.com Google API N/A 443
https://classroom.googleapis.com
Google Classroom
API
N/A 443
https://matomo.benq.com Matomo N/A 443
https://www.youtube.com
Youtube N/A 443
https://youtu.be
https://d2fqxlpnusiysx.cloudfront.net
EZWrite5 &
EZWrite6 apk OTA
URL
N/A 443
http://qspublic.s3.amazonaws.com
APK download
server
N/A http (80)
http://qspublic.s3.ap-southeast-1.
amazonaws.com
https://qspublic.s3-ap-southeast-1.
amazonaws.com/
OTA file server N/A https (443)
